Essential Aspects of Vinyl Plank Flooring Bathroom Installation
Vinyl plank flooring has become increasingly popular for bathroom installations due to its durability, water resistance, and ease of maintenance. However, a successful installation requires careful planning and execution. Here are some essential aspects to consider:
1. Preparation:
Proper preparation is crucial. Remove existing flooring and baseboards, clean the subfloor thoroughly to remove dirt and debris, and repair any imperfections. Ensure the subfloor is level, flat, and dry using a moisture meter.
2. Acclimation:
Acclimating the vinyl planks to the bathroom environment before installation is essential. Store the planks in the room for at least 24 hours, allowing them to adjust to the temperature and humidity levels.
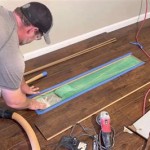
3. Laying the Underlayment:
A quality underlayment provides additional sound dampening and moisture protection. Choose an underlayment specifically designed for vinyl plank flooring and roll it out smoothly, securing it with tape as necessary.
4. Installation Method:
Vinyl plank flooring can be installed using click-and-lock, floating, or glue-down methods. Click-and-lock planks interlock easily, while floating planks rest on the underlayment without adhesives. Glue-down planks provide the most secure installation but require additional skill and time.
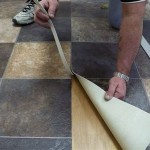
5. Cutting and Fitting:
Measure and cut the planks precisely to fit the room, using a sharp utility knife or a miter saw for angled cuts. Leave a small expansion gap around the perimeter of the room to allow for movement and prevent buckling.
6. Trim and Baseboards:
Install quarter-round trim around the perimeter to conceal the expansion gap. Replace the baseboards or install new ones that match the floor.
7. Grout Lines:
For a more authentic plank look, consider using grout lines between the planks. Apply grout specifically designed for vinyl flooring and allow it to dry completely before cleaning up any excess.
8. Sealing:
Apply a clear sealant around the edges of the room, where water is likely to gather, such as around the shower or bathtub. This provides an extra layer of moisture protection.
9. Maintenance:
Vinyl plank flooring is relatively easy to maintain. Regularly sweep or vacuum the floor to remove dust and dirt. Mop occasionally with a mild cleaning solution and avoid using harsh chemicals or abrasive cleaners.

How To Install Vinyl Plank Flooring In A Bathroom Fixthisbuildthat

How To Install Vinyl Plank Flooring In A Bathroom As Beginner Home Renovation

How To Install Vinyl Plank Flooring In A Bathroom Fixthisbuildthat

Vinyl Planks In Bathrooms Residential Inspiration Flooring

Dos And Don Ts For Installing Vinyl Plank Floors In The Bathroom Advice Homeowners

Installing Vinyl Plank Flooring Lifeproof Waterproof Rigid Core Sustain My Craft Habit

How To Install Vinyl Plank Flooring In A Bathroom

How To Install Vinyl Plank Flooring In A Bathroom

Dos And Don Ts For Installing Vinyl Plank Floors In The Bathroom Advice Homeowners

How To Install Vinyl Plank Flooring In A Bathroom Fixthisbuildthat
Related Posts