How To Install Glueless Vinyl Sheet Flooring
Glueless vinyl sheet flooring offers a practical and aesthetically versatile solution for various spaces within a home. Its ease of installation, coupled with its water resistance and durability, makes it a popular choice for homeowners looking for a cost-effective and DIY-friendly flooring option. This article provides a comprehensive guide on how to successfully install glueless vinyl sheet flooring, ensuring a professional-looking and long-lasting result.
Before embarking on the installation process, meticulous preparation is crucial. This includes gathering the necessary tools and materials, preparing the subfloor, and acclimating the vinyl sheet flooring to the environment. Properly executed preparation work lays the foundation for a seamless and successful installation.
Preparing the Subfloor
The condition of the subfloor is paramount to the final appearance and performance of the glueless vinyl sheet flooring. A smooth, level, and clean subfloor is essential to prevent imperfections from telegraphing through the vinyl and to ensure proper adhesion (if edge-gluing is required at seams) and overall stability.
First, thoroughly clean the subfloor. This involves sweeping, vacuuming, and scrubbing to remove any dirt, debris, adhesive residue, or other contaminants. Pay particular attention to corners and edges, where dust and debris tend to accumulate. A damp mop with a mild detergent can be used to remove stubborn stains, but ensure the subfloor is completely dry before proceeding.
Next, inspect the subfloor for any imperfections, such as cracks, holes, or unevenness. Small cracks can be filled with a patching compound specifically designed for flooring applications. Larger cracks or holes may require more extensive repairs, potentially involving the replacement of sections of the subfloor. Use a leveling compound to address any unevenness. This compound is typically self-leveling and will create a smooth, even surface for the vinyl sheet flooring.
After applying patching or leveling compounds, allow them to dry completely according to the manufacturer's instructions. Once dry, lightly sand the surface to ensure it is perfectly smooth and free of any ridges or bumps. Vacuum the subfloor again to remove any sanding dust.
Finally, consider the subfloor material. If installing over concrete, ensure it is properly cured and sealed. If installing over wood, check for any signs of rot or water damage. Plywood or OSB subfloors should be securely fastened to the joists with screws to prevent movement and squeaking. Any loose or damaged sections should be replaced before proceeding.
Acclimating the Vinyl Sheet Flooring
Vinyl sheet flooring is susceptible to expansion and contraction due to temperature fluctuations. Acclimating the flooring to the room's environment before installation is crucial to prevent buckling, warping, or gapping after installation. This process allows the vinyl to adjust to the room's temperature and humidity, minimizing dimensional changes after it is installed.
Bring the rolled vinyl sheet flooring into the room where it will be installed at least 48 to 72 hours before installation. Remove the flooring from its packaging and unroll it, allowing it to lie flat in the room. This allows for maximum exposure to the room's temperature and humidity. Avoid stacking the rolled flooring or placing heavy objects on top of it, as this can hinder the acclimation process.
Ideally, the room should be at a consistent temperature between 65°F and 75°F (18°C and 24°C) during the acclimation period. Avoid extremely high or low temperatures, as these can negatively affect the vinyl's ability to acclimate properly. If possible, maintain the humidity level in the room between 30% and 50%.
During the acclimation process, monitor the flooring for any signs of expansion or contraction. Observe how the edges of the sheet change over time. This will give you a better understanding of how the flooring will behave once installed. Failure to properly acclimate the vinyl sheet flooring can lead to significant problems after installation, including unsightly gaps, buckling, and reduced lifespan of the flooring.
Keep records of the temperature and humidity during the acclimation period. This information can be helpful in troubleshooting any issues that may arise after installation.
Installing the Glueless Vinyl Sheet Flooring
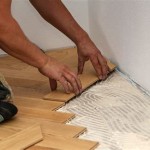
With the subfloor prepared and the vinyl acclimated, the installation process can begin. This involves precisely measuring and cutting the vinyl sheet, positioning it in the room, securing it in place, and trimming any excess material. Taking your time and paying attention to detail during this process is essential for achieving a professional-looking and durable result.
Start by accurately measuring the dimensions of the room. Add a few inches to each dimension to allow for trimming and adjustments. Transfer these measurements to the vinyl sheet flooring, using a straight edge and a utility knife with a sharp blade. Be precise when cutting the vinyl, as any inaccuracies can lead to gaps or overlaps.
Carefully position the vinyl sheet flooring in the room, ensuring it is properly aligned with the walls and any other features. Unroll the vinyl slowly, avoiding any creases or wrinkles. If necessary, use a helper to assist with positioning and handling the sheet.
Once the vinyl is in place, begin securing it to the subfloor. Glueless vinyl sheet flooring typically relies on its weight and friction to stay in place. However, in areas with high traffic or potential for movement, edge-gluing or double-sided tape may be recommended by the manufacturer. Follow the manufacturer's instructions carefully regarding the use of adhesives.
Using a utility knife, trim the excess vinyl along the walls and around any obstacles, such as pipes or doorways. Use a straight edge as a guide to ensure clean, straight cuts. Leave a small gap (approximately 1/4 inch) between the vinyl and the wall to allow for expansion and contraction. This gap will be covered by the baseboards or molding.
Once the vinyl is trimmed, install baseboards or molding along the perimeter of the room to conceal the expansion gap and provide a finished look. Secure the baseboards or molding to the wall using nails or screws. Be careful not to nail or screw into the vinyl flooring itself.
Finally, clean the newly installed vinyl sheet flooring with a mild detergent and water. Avoid using abrasive cleaners or harsh chemicals, as these can damage the surface of the vinyl. Inspect the flooring for any imperfections or problems and address them promptly. Correct any issues while the adhesive, if used, is still curing.
The proper handling of seams is crucial to avoid water damage and other issues. Depending on the specific type of glueless vinyl sheet flooring and the size of the room, seams may be necessary. In such cases, follow the manufacturer’s guidelines regarding seam sealing or welding. Improperly sealed seams can lead to water penetration, which can damage the subfloor and cause the vinyl to lift or buckle. A seam roller should be used to ensure proper adhesion. Some vinyl sheet flooring may require a heat welding tool to create a waterproof seam.
When working around door frames, use a jamb saw to undercut the frame, allowing the vinyl sheet flooring to slide underneath. This provides a clean, professional look and prevents the vinyl from being damaged by the door swinging open and closed. This step ensures that the flooring is tucked neatly under the door jamb, creating a seamless transition.
For areas prone to moisture, such as bathrooms and kitchens, consider applying a bead of silicone caulk along the perimeter of the room where the vinyl meets the walls and fixtures. This creates a waterproof seal that prevents water from seeping under the flooring and damaging the subfloor.
After the installation is complete, allow the adhesive, if any, to cure completely before placing heavy furniture or appliances on the flooring. Follow the manufacturer’s recommended curing time. Prematurely placing heavy objects on the flooring can prevent the adhesive from bonding properly and can lead to problems later on.
Regular maintenance is essential to prolong the life of the vinyl sheet flooring. Sweep or vacuum the flooring regularly to remove dirt and debris. Clean spills promptly with a damp cloth and a mild detergent. Avoid using abrasive cleaners or harsh chemicals, as these can damage the surface of the vinyl. Protect the flooring from heavy furniture by using furniture pads. By following these maintenance tips, you can keep the vinyl sheet flooring looking its best for years to come.
:strip_icc()/SCF_158_05-dfffc96f85aa46f19a8458e342856d97.jpg?strip=all "How To Install Vinyl Sheet Flooring That S Loose Lay In Hours")
How To Install Vinyl Sheet Flooring That S Loose Lay In Hours

Installing Loose Lay Vinyl Flooring

How To Lay Vinyl Flooring Sheets Tiles And Planks Tarkett

How To Install Vinyl Sheet Flooring A Erfly House

How To Install Vinyl Sheet Flooring A Erfly House

How To Install Vinyl Sheet Flooring A Erfly House

How To Install Glueless Interlocking Floating Vinyl Tiles On The Floor

How To Install Sheet Vinyl Floor Decor Adventures

What Is Loose Lay Vinyl Flooring A Plank Guide Reallyfloors America S Est Hardwood

How To Install Sheet Vinyl Floor Decor Adventures
Related Posts