```html
How To Replace Part Of Laminate Flooring
Laminate flooring offers a durable and aesthetically pleasing surface for many homes and businesses. However, despite its resilience, laminate flooring is susceptible to damage from impacts, moisture, or general wear and tear. When a single plank or a small section of laminate flooring becomes damaged, a complete floor replacement is often unnecessary and economically inefficient. Replacing only the affected part is a viable solution that can restore the floor’s appearance and integrity. This article provides a comprehensive guide on how to replace part of laminate flooring, covering various scenarios and techniques.
Assessing the Damage and Gathering Materials
Before starting the replacement process, a thorough assessment of the damage is crucial. Determine the extent of the damage and the number of planks that require replacement. Examine the surrounding planks for any signs of hidden damage, such as water damage or warping. Identifying the original laminate flooring brand, style, and color is also essential. This information allows for sourcing replacement planks that seamlessly blend with the existing floor. If original planks are unavailable, consider salvaging planks from inconspicuous areas, such as under furniture or inside closets, to use as replacements and replacing those areas with new, closely matching planks. This approach ensures a visually consistent repair.
The necessary materials include replacement laminate planks, a utility knife, a tapping block, a pull bar, a hammer, safety glasses, knee pads, a measuring tape, a pencil, and a jigsaw or circular saw (depending on the removal method). A moisture meter can be helpful if water damage is suspected. Always prioritize safety by wearing safety glasses and knee pads throughout the process.
Removing the Damaged Laminate Plank(s)
The method for removing damaged laminate planks varies depending on whether the planks are located near a wall or in the middle of the floor. For planks near a wall, the removal process is generally simpler. Planks located in the middle of the floor require more intricate techniques.
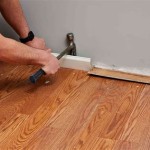
Removing Planks Near a Wall:
Begin by carefully removing the baseboards or moldings along the wall adjacent to the damaged plank(s). Use a pry bar and shim to gently lift the moldings, minimizing damage to the wall or molding itself. Clean any debris or adhesive residue from the wall and moldings. Next, use a utility knife to score the damaged plank along its edges, separating it from the adjacent planks. This scoring helps prevent chipping or damage to the surrounding planks during removal. Using a tapping block and hammer, gently tap the adjacent planks away from the damaged plank to create a small gap. Insert a pull bar into the gap and carefully pry the damaged plank upwards. If the plank is glued down, use a heat gun or hair dryer to soften the adhesive before prying. Exercise caution to avoid damaging the tongue and groove system of the surrounding planks.
Removing Planks in the Middle of the Floor:
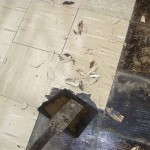
Removing planks in the middle of the floor requires a more destructive approach, as the planks are interlocked on all sides. Begin by wearing safety glasses. Using a drill with a large drill bit, drill a series of holes inside the perimeter of the damaged plank, effectively weakening its structure. Be careful not to drill through the subfloor. Next, insert a jigsaw blade into one of the drilled holes and carefully cut along the inside edges of the plank, avoiding damage to the surrounding planks. The goal is to remove the majority of the damaged plank while leaving the tongue and groove intact on the surrounding planks. Once the center section of the damaged plank is removed, use a chisel or utility knife to carefully remove the remaining edges of the plank, paying close attention to the tongue and groove. This process may require patience and precision to avoid damaging the adjacent planks. After removing the plank, thoroughly clean the area, removing any debris or adhesive residue.
Preparing the Subfloor and Installing the Replacement Plank(s)
Before installing the replacement plank, thoroughly inspect the subfloor. Ensure it is clean, level, and free from any debris or moisture. Use a level to check for any unevenness. If necessary, use a self-leveling compound or shims to correct any imperfections. A moisture meter can be used to verify that the subfloor is dry. High moisture levels can lead to future problems with the laminate flooring. Allow the subfloor to dry completely before proceeding.
Next, prepare the replacement plank. If the replacement plank is new, it will have a tongue and groove system on all four sides. Depending on the location of the replacement plank, it may be necessary to remove the tongue or groove from one or more sides to allow it to fit properly. Use a utility knife or saw to carefully remove the necessary tongue or groove, ensuring a clean and precise cut. Dry-fit the replacement plank to ensure it fits properly and aligns with the surrounding planks. Make any necessary adjustments before applying adhesive.
Apply a thin bead of laminate adhesive to the edges of the surrounding planks where they will connect with the replacement plank. Carefully position the replacement plank into place, aligning the tongue and groove with the adjacent planks. Use a tapping block and hammer to gently tap the replacement plank into place, ensuring a tight and secure fit. Remove any excess adhesive with a damp cloth. For planks near a wall, reattach the baseboards or moldings, using finishing nails or construction adhesive. Ensure the moldings are securely attached and flush with the wall. Allow the adhesive to cure completely according to the manufacturer's instructions. Avoid walking on the repaired area until the adhesive is fully cured. Clean the repaired area with a laminate floor cleaner to remove any remaining residue.
Matching Existing Laminate and Addressing Specific Challenges
Finding an exact match for existing laminate flooring can be challenging, especially if the original flooring is discontinued or several years old. If an exact match is unavailable, consider several alternatives.
Finding a Close Match: Take a sample of the existing laminate plank to a flooring retailer. A flooring professional can help identify a replacement plank that closely matches the color, pattern, and texture of the existing floor. Consider bringing the sample to multiple retailers to increase the chances of finding a suitable match. In some cases, a slightly different shade or pattern may be acceptable, especially if the repaired area is located in a less conspicuous area.
Using Planks from Inconspicuous Areas: As previously mentioned, if an exact match is unattainable, consider using planks from inconspicuous areas, such as under furniture or inside closets, to repair the damaged area. Replace those areas with new planks that closely match the overall floor. This approach ensures a visually consistent repair in the most visible areas.
Dealing with Swollen or Warped Planks: If the damaged laminate planks are swollen or warped due to water damage, it is crucial to address the underlying moisture issue before replacing the planks. Identify the source of the moisture and take steps to prevent future water damage. This may involve repairing leaky pipes, improving ventilation, or sealing any cracks or gaps in the flooring. Allow the subfloor to dry completely before installing the replacement planks. Consider using a moisture barrier to prevent future water damage.
Addressing Gaps Between Planks: Over time, gaps may develop between laminate planks due to expansion and contraction caused by changes in temperature and humidity. If gaps are present near the damaged area, consider addressing them during the replacement process. Use a laminate floor gap filler or color-matched caulk to fill the gaps. Apply the filler or caulk according to the manufacturer's instructions, ensuring a smooth and even finish. Wipe away any excess filler or caulk with a damp cloth.
Replacing Multiple Damaged Planks: If multiple planks are damaged in a concentrated area, it may be more efficient to replace a larger section of the floor. This involves removing a larger area of laminate flooring and installing new planks to fill the space. The process is similar to replacing a single plank, but requires more precision and attention to detail. Ensure the replacement planks are properly aligned and interlocked to create a seamless and uniform surface.
Replacing part of laminate flooring is a manageable task with the right tools, materials, and techniques. By carefully assessing the damage, properly removing the damaged planks, preparing the subfloor, and installing the replacement planks, it is possible to restore the floor’s appearance and extend its lifespan. Addressing specific challenges, such as matching existing laminate and dealing with moisture damage, requires additional attention and planning. With patience and attention to detail, a successful repair can be achieved, saving the cost and effort of a complete floor replacement.
```
Laminate Floor Repair Diy Family Handyman

How To Easily Replace A Damaged Laminate Floor Plank Interior Design Wonderhowto

3 Ways To Repair Laminate Flooring Wikihow

How To Replace Laminate Flooring Episode 7 Howtospecialist Build Step By Diy Plans

Repair Laminate Flooring How To Replace A Broken Plank

Laminate Floor Repair Diy Family Handyman

How To Replace Warped Water Damaged Laminate Floor Boards

How To Replace Laminate Flooring Episode 7 Howtospecialist Build Step By Diy Plans

Easy Methods To Fix Laminate Flooring Side Gaps Surya

Diy Removing A Section Of Laminate Flooring With Multi Tool
Related Posts