TrafficMaster Sheet Vinyl Flooring Installation Instructions
TrafficMaster sheet vinyl flooring offers a durable and cost-effective flooring solution suitable for various residential spaces, including kitchens, bathrooms, laundry rooms, and basements. Proper installation is crucial to achieving a long-lasting, aesthetically pleasing, and water-resistant floor. These instructions provide a comprehensive guide to installing TrafficMaster sheet vinyl flooring effectively.
Before commencing the installation process, meticulous planning and preparation are essential. This includes assessing the existing subfloor, gathering the necessary tools and materials, and ensuring the work area is adequately prepared. Rushing this preliminary stage can result in complications during the installation and compromise the quality of the finished floor.
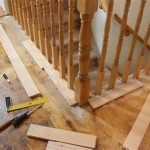
Key Point 1: Subfloor Preparation
The subfloor is the foundation upon which the sheet vinyl is installed. Its condition directly impacts the final appearance and longevity of the flooring. A clean, dry, level, and structurally sound subfloor is paramount for a successful installation.
Begin by thoroughly inspecting the existing subfloor. Common subfloor materials include concrete, plywood, and particleboard. Identify and address any imperfections, such as cracks, holes, unevenness, or moisture issues.
For concrete subfloors, fill any cracks or holes with a concrete patching compound. Ensure the compound is fully cured according to the manufacturer's instructions before proceeding. Grinding down any high spots will help achieve a level surface. A moisture test should be performed to determine the moisture content of the concrete. Excess moisture can lead to adhesive failure and mold growth. If moisture levels are high, a moisture mitigation system may be required before installation.
For plywood or particleboard subfloors, inspect for any signs of water damage, rot, or delamination. Replace any damaged sections with new subfloor material of the same thickness. Secure the subfloor to the joists with screws or nails at regular intervals to prevent movement and squeaking. Fill any screw or nail holes with wood filler and sand smooth. Ensure the subfloor is level, using a self-leveling compound if necessary. This is particularly important in areas with significant dips or rises.
Regardless of the subfloor material, thoroughly clean the surface to remove any dirt, dust, debris, wax, or old adhesive residue. A vacuum cleaner is effective for removing loose particles, while a scraper can be used to remove stubborn adhesive. Follow this with a damp mop using a mild detergent solution; ensure the subfloor is completely dry before proceeding.
Once the subfloor is prepared, use a straightedge or level to check for any remaining imperfections. Minor imperfections can be addressed with a thin layer of patching compound specifically designed for flooring applications. Allow the compound to dry completely before sanding smooth. The goal is to create a perfectly smooth surface to prevent any telegraphing of imperfections through the sheet vinyl.
Key Point 2: Cutting and Fitting the Sheet Vinyl
Accurate cutting and fitting of the sheet vinyl are critical for a professional-looking installation. Precise measurements and careful cutting techniques are crucial to minimize waste and ensure a seamless fit.
Begin by unrolling the sheet vinyl in the room and allowing it to acclimate to the room's temperature for at least 24 hours. This helps the vinyl relax and prevents shrinking or expansion after installation. Use a measuring tape to determine the dimensions of the room, including any alcoves, doorways, or irregularities. Add a few inches to these measurements to allow for trimming and adjustments.
Transfer the room's dimensions to the sheet vinyl using a measuring tape and a straightedge. Use a utility knife with a sharp blade to cut the vinyl to the approximate size. It is better to cut slightly larger than necessary, as excess material can be trimmed later. When cutting, use a combination square or T-square to ensure cuts are square and accurate.
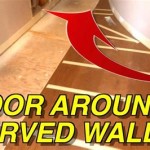
Position the sheet vinyl in the room, aligning it with the walls. Use a utility knife and a straightedge to trim the vinyl to fit snugly against the walls. Work carefully and gradually, trimming small amounts at a time to avoid overcutting. For inside corners, make relief cuts to allow the vinyl to lie flat. For outside corners, carefully miter the vinyl using a utility knife and a miter square. A flexible quarter-round trim can be installed later to conceal any minor imperfections along the walls.
When fitting the sheet vinyl around pipes, toilets, or other fixtures, use a template or cardboard cutout to create precise openings. Trace the outline of the fixture onto the vinyl and carefully cut along the lines using a utility knife. Ensure the openings are slightly larger than the fixtures to allow for expansion and contraction. Cover plates or escutcheons can be used to conceal any gaps around the fixtures.
Once the sheet vinyl is fitted to the room, carefully inspect all edges and seams. Ensure there are no gaps or overlaps. If necessary, make further adjustments to achieve a perfect fit. If the installation involves multiple sheets of vinyl, carefully align the seams and use a seam roller to create a seamless bond. Use the manufacturer’s recommended seam sealer to prevent moisture penetration and ensure a long-lasting seam.
Key Point 3: Adhering the Sheet Vinyl
Proper adhesion is essential for securing the sheet vinyl to the subfloor and preventing movement or buckling. The choice of adhesive and its application method are crucial for a successful installation.
Select an adhesive specifically designed for sheet vinyl flooring. Consider the type of subfloor and the environmental conditions when choosing an adhesive. Follow the manufacturer's instructions regarding the application rate and drying time. Some adhesives are applied using a trowel, while others are sprayed or rolled on.
Before applying the adhesive, fold back half of the sheet vinyl to expose the subfloor. Apply the adhesive to the exposed subfloor using the recommended application method. Ensure the adhesive is evenly distributed and covers the entire surface. Allow the adhesive to tack up according to the manufacturer's instructions. This allows the adhesive to become slightly sticky, which promotes a stronger bond with the sheet vinyl.
Carefully roll the sheet vinyl back onto the adhered subfloor, pressing it firmly into the adhesive. Use a floor roller to apply even pressure across the entire surface, ensuring the vinyl is fully bonded to the adhesive. Work slowly and methodically, removing any air bubbles or wrinkles as you go. Pay particular attention to the edges and seams, ensuring they are securely bonded to the subfloor.
Repeat the process for the other half of the sheet vinyl. Fold back the remaining section, apply the adhesive, allow it to tack up, and roll the vinyl back into place. Use the floor roller to apply even pressure and remove any air bubbles or wrinkles.
After the sheet vinyl is installed, allow the adhesive to cure completely according to the manufacturer's instructions. Avoid walking on the floor during the curing process. The curing time may vary depending on the type of adhesive and the environmental conditions. Proper curing is essential for achieving a strong and durable bond.
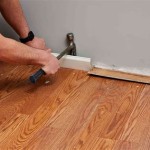
Once the adhesive is fully cured, install any necessary trim, such as baseboards, quarter-round molding, or transitions. These trim pieces will conceal any gaps along the walls and provide a finished look to the installation. Use a nail gun or adhesive to secure the trim pieces to the walls or floor. Ensure the trim pieces are properly aligned and securely fastened.
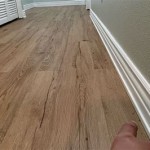
Finally, clean the newly installed sheet vinyl floor with a damp mop and a mild detergent solution. Avoid using harsh chemicals or abrasive cleaners, as these can damage the surface of the vinyl. Regular cleaning and maintenance will help keep the floor looking its best for years to come.
When installing sheet vinyl flooring in bathrooms or other areas with high moisture, it is crucial to seal the seams and edges with a waterproof sealant. This will prevent water from seeping under the vinyl and causing damage to the subfloor. Apply the sealant carefully and evenly, following the manufacturer's instructions. Regular inspection and maintenance of the sealant is necessary to ensure its effectiveness.
For installations in large areas, it may be necessary to use multiple sheets of vinyl. When joining multiple sheets, carefully align the seams and use a seam roller to create a seamless bond. A seam sealer specifically designed for sheet vinyl flooring should be applied to the seams to prevent moisture penetration and ensure a long-lasting bond. Choose a color-matched seam sealer for a more aesthetically pleasing result.
If installing sheet vinyl over a radiant heat system, it is essential to follow the manufacturer's instructions regarding the maximum allowable temperature. Excessive heat can damage the vinyl and void the warranty. Use a temperature sensor to monitor the floor's surface temperature and prevent overheating. Ensure the radiant heat system is properly installed and calibrated before installing the sheet vinyl.
Proper ventilation is crucial during the installation process, especially when using solvent-based adhesives. Open windows and doors to provide adequate airflow and prevent the buildup of harmful fumes. Wear a respirator if necessary to protect against inhalation of vapors. Always follow the manufacturer's safety precautions and guidelines when working with adhesives and other installation materials.
In summary, installing TrafficMaster sheet vinyl flooring requires careful planning, meticulous preparation, and precise execution. By following these instructions and paying attention to detail, individuals can achieve a beautiful, durable, and long-lasting floor. These guidelines are designed to assist in a successful installation, but always refer to the specific manufacturer's instructions for TrafficMaster sheet vinyl flooring being installed for any specific requirements or recommendations.

Trafficmaster Ceramica 12 X 24 Vinyl Tile Floor Installation

Trafficmaster Harbor Slate Neutral Stone Residential Vinyl Sheet Flooring 12ft Wide X Cut To Length C5430407c992p14 The Home Depot

Home Depot Traffic Master 5g Installation

Have A Question About Trafficmaster Rustic Taupe Residential Vinyl Sheet Flooring 12 Ft Wide X Cut To Length Pg 3 The Home Depot

Trafficmaster Emerson White Residential Vinyl Sheet Flooring 12 Ft Wide X Cut To Length U8530407c502p14 The Home Depot

Trafficmaster Laurel Gray Residential Vinyl Sheet Flooring 12 Ft Wide X Cut To Length U4300406k591g14 The Home Depot

How To Install Sheet Vinyl Flooring

Have A Question About Trafficmaster Greyed Oak Wood 10 Mil X 12 Ft W Cut To Length Waterproof Vinyl Sheet Flooring Pg 3 The Home Depot

Installing Allure Trafficmaster Resilient Vinyl Flooring Basement Floor Installation Plank

How To Install Vinyl Flooring Traffic Master Moonstone Rigid Core Plank Diy
Related Posts