What Flooring Can You Lay Over Linoleum?
Linoleum, a resilient and relatively inexpensive flooring material, was once a popular choice for homes and businesses. However, its aesthetic appeal is often considered outdated, and homeowners frequently seek alternatives to modernize their spaces without the expense and disruption of a full floor removal. Laying new flooring over existing linoleum is a viable option under certain circumstances. This approach can save time, money, and labor, but careful consideration must be given to the condition of the existing linoleum floor, the type of new flooring being installed, and the preparation techniques required.
Before making a decision, understanding the advantages and disadvantages of laying flooring over linoleum is crucial. A primary advantage is cost savings. Removing old flooring can be labor-intensive and may uncover unforeseen issues such as asbestos (especially with older linoleum), requiring professional remediation. Covering the existing floor eliminates these concerns. Furthermore, the existing linoleum can act as an underlayment, providing a degree of cushioning and sound insulation. However, there are drawbacks. If the existing linoleum is damaged, uneven, or contains moisture issues, simply covering it will not solve these problems and may even exacerbate them. The added thickness of the new flooring can also affect door clearances and transitions between rooms, requiring adjustments.
The success of installing new flooring over linoleum depends heavily on proper preparation. Neglecting this step can lead to a variety of problems, including uneven surfaces, premature wear, and even the need to redo the entire flooring project. Therefore, a thorough assessment of the existing linoleum floor is essential.
Assessing the Existing Linoleum Floor
The first step is a comprehensive inspection of the linoleum. Look for signs of damage such as tears, gouges, stains, or bubbling. Significant damage indicates the existing linoleum is not a suitable base for new flooring. Minor imperfections may be repairable, but extensive damage necessitates removal. Pay close attention to areas prone to moisture, such as bathrooms and kitchens. Moisture trapped beneath the new flooring can lead to mold growth and structural damage.
Next, check for unevenness. Use a long level to identify dips or high spots in the floor. Minor variations can often be leveled with self-leveling compound, but significant unevenness suggests underlying structural issues that need to be addressed before installing new flooring. Also, assess the linoleum's adherence to the subfloor. Loose or peeling linoleum must be securely reattached or removed entirely. Insecure areas can create instability and compromise the integrity of the new flooring.
Finally, consider the age of the linoleum. Older linoleum, especially that installed before the 1980s, may contain asbestos. Disturbing asbestos-containing materials can release harmful fibers into the air. If you suspect the linoleum contains asbestos, have it professionally tested before undertaking any work. If asbestos is present, encapsulation (covering it) is often a safer and more cost-effective option than removal, but professional advice is essential.
Suitable Flooring Options for Installation Over Linoleum
Once the condition of the existing linoleum floor has been assessed and addressed, the next step is to choose a suitable type of flooring to install over it. Certain types of flooring are more compatible with this installation method than others. Considerations should include the flooring's thickness, flexibility, and moisture resistance.
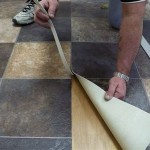
Luxury Vinyl Plank (LVP) and Luxury Vinyl Tile (LVT) are popular choices for installation over linoleum. These materials are relatively thin, durable, and water-resistant, making them suitable for various rooms in the house. LVP and LVT are available in a wide range of styles and colors, mimicking the look of hardwood, stone, and tile. Many LVP and LVT products feature a click-lock installation system, making them relatively easy for DIYers to install. However, it is crucial to ensure the linoleum surface is smooth and level before installation, as any imperfections will telegraph through the new flooring.
Engineered hardwood is another option, although it requires more careful consideration. Engineered hardwood consists of a thin layer of real hardwood veneer bonded to a plywood or fiberboard core. It is more dimensionally stable than solid hardwood, making it less susceptible to warping or cracking due to moisture fluctuations. However, engineered hardwood is typically thicker than LVP or LVT, which can create transition issues between rooms. Proper preparation of the existing linoleum is also essential to ensure a smooth and level surface for the engineered hardwood. A moisture barrier is generally recommended to prevent moisture from migrating up from the subfloor.
Laminate flooring is often considered a budget-friendly alternative to hardwood. Like engineered hardwood, laminate flooring consists of layers of material bonded together, with a photographic image of wood or stone on the surface. Laminate is relatively easy to install and maintain, but it is less water-resistant than LVP or LVT. Installing laminate flooring over linoleum is possible, but it is crucial to use a high-quality underlayment to provide cushioning and moisture protection. Proper ventilation is also essential to prevent moisture buildup beneath the flooring.
While tile can be installed over linoleum, it's generally not recommended. The rigidity of tile requires a perfectly stable and level subfloor. Linoleum, even in good condition, may have some give, which can lead to cracking of the tile and grout over time. Additionally, the added weight of the tile can place significant stress on the existing floor structure. If tile is the desired flooring, it’s generally better to remove the existing linoleum and install a proper tile underlayment.
Preparation and Installation Techniques
Effective preparation of the existing linoleum floor is critical for a successful installation, regardless of the type of new flooring chosen. This includes cleaning, leveling, and potentially adding an underlayment.
Begin by thoroughly cleaning the linoleum floor. Remove any dirt, dust, and debris with a vacuum cleaner and a damp mop. Use a mild detergent to remove stubborn stains and grease. Ensure the floor is completely dry before proceeding. For areas with particularly stubborn stains or residue, a specialized linoleum cleaner may be necessary, following the manufacturer's instructions carefully.
Next, address any unevenness in the floor. Small dips or imperfections can be filled with self-leveling compound. Apply the compound according to the manufacturer's instructions, ensuring it is evenly distributed and allowed to dry completely. For larger areas of unevenness, multiple applications of self-leveling compound may be required. Alternatively, consider using a patching compound for localized repairs.
The use of an underlayment is often recommended, especially when installing laminate or engineered hardwood over linoleum. An underlayment provides cushioning, sound insulation, and moisture protection. Choose an underlayment specifically designed for use with the chosen flooring type. Install the underlayment according to the manufacturer's instructions, ensuring it is securely attached to the linoleum floor. Some underlayments come with an adhesive backing, while others require the use of tape or staples.
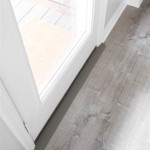
Once the linoleum floor is properly prepared, the new flooring can be installed according to the manufacturer's instructions. Pay close attention to expansion gaps around the perimeter of the room. These gaps allow for the natural expansion and contraction of the flooring due to temperature and humidity changes. Failure to leave adequate expansion gaps can lead to buckling or warping of the flooring. Use transition strips to create smooth transitions between the new flooring and adjacent rooms. These strips provide a clean and professional finish and help prevent tripping hazards.
When installing click-lock flooring, ensure that each plank or tile is securely engaged with the adjacent ones. Use a tapping block and mallet to gently tap the planks or tiles together. Avoid using excessive force, as this can damage the locking mechanism. Check the alignment of the flooring frequently to ensure it is straight and even. Periodically use a level to check for any unevenness. Address any issues promptly to prevent them from becoming more difficult to correct later.
For glued-down flooring, apply the adhesive according to the manufacturer's instructions. Spread the adhesive evenly and ensure that each plank or tile is properly seated in the adhesive. Use a roller to press the flooring firmly into the adhesive. Wipe away any excess adhesive immediately. Allow the adhesive to cure completely before walking on the new flooring.
After installation, inspect the new flooring for any defects or imperfections. Address any issues promptly. Clean the new flooring according to the manufacturer's instructions. Use appropriate cleaning products to avoid damaging the surface. Routine maintenance is essential to prolong the life of the new flooring. Sweep or vacuum regularly to remove dirt and debris. Use mats at entrances to prevent dirt and moisture from being tracked onto the flooring. Consider using furniture pads to protect the flooring from scratches and dents.

Can You Lay Tile Over Linoleum Rubi Blog Usa

How To Install Vinyl Flooring Over Tiles Linoleum Thrift Diving

How To Install Luxury Vinyl Tile Over Linoleum

How To Tile Over Linoleum Floors Correctly

Types Of Flooring That Can Be Installed Over Linoleum

How To Install Luxury Vinyl Tile Over Linoleum

How To Install Vinyl Flooring Over Tiles Linoleum Thrift Diving

Can You Tile Over Linoleum Networx

Should You Tile Over Vinyl Flooring Builddirect

How To Install L And Stick Tile Over Linoleum My Homier Home
Related Posts