```html
Vinyl Wood Flooring Installation: A Comprehensive Guide
Vinyl wood flooring has emerged as a popular choice for homeowners seeking a cost-effective and aesthetically pleasing alternative to traditional hardwood. Its durability, water resistance, and ease of maintenance make it suitable for various rooms, including kitchens, bathrooms, and basements. Successful vinyl wood flooring installation hinges on meticulous preparation, proper techniques, and attention to detail. This article provides a comprehensive guide to navigating the process, ensuring a professional-looking and long-lasting result.
Before embarking on the installation, it's crucial to understand the different types of vinyl wood flooring available. Options commonly include vinyl planks, vinyl tiles, and sheet vinyl. Vinyl planks typically feature a click-lock or glue-down installation method and offer a realistic wood appearance. Vinyl tiles are often square or rectangular and can be installed in various patterns. Sheet vinyl comes in large rolls and is suitable for covering entire rooms with minimal seams. The choice depends on individual preferences, budget, and the specific requirements of the space being renovated.
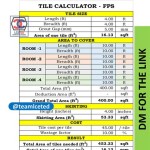
Essential tools and materials for vinyl wood flooring installation include a measuring tape, utility knife or flooring cutter, straight edge, pencil, tapping block, rubber mallet, safety glasses, knee pads, and appropriate adhesive (for glue-down installations). A moisture meter may also be necessary to assess the subfloor's moisture content. Depending on the subfloor condition, self-leveling compound or patching compound might be required to create a smooth and even surface. Additionally, consider transition strips to seamlessly connect the new flooring to adjacent surfaces.
Preparing the Subfloor: The Foundation of a Successful Installation
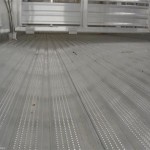
The subfloor is the underlying layer upon which the vinyl wood flooring is installed. Its condition significantly impacts the final outcome. A clean, level, and dry subfloor is paramount for proper adhesion and longevity. The preparation process typically involves several steps, starting with a thorough inspection.
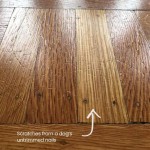
Begin by examining the subfloor for any signs of damage, such as cracks, holes, or unevenness. These imperfections can translate into visible flaws and potential durability issues in the finished flooring. Fill any cracks or holes with a patching compound specifically designed for subfloors. Allow the compound to dry completely according to the manufacturer's instructions before proceeding.
Next, address any unevenness in the subfloor. Use a self-leveling compound to create a perfectly flat surface. This is especially important for glue-down installations, as unevenness can lead to gaps and weak spots in the adhesive bond. Follow the manufacturer's instructions carefully when applying self-leveling compound, ensuring proper mixing and pouring techniques.
Clean the subfloor thoroughly to remove any dirt, dust, debris, or adhesive residue. A vacuum cleaner with a brush attachment is ideal for this purpose. For stubborn residues, use a scraper or adhesive remover formulated for flooring applications. Allow the subfloor to dry completely before proceeding to the next step.
Moisture testing is critical, particularly for concrete subfloors. Excessive moisture can interfere with the adhesive bond and lead to mold growth or warping. Use a moisture meter to measure the subfloor's moisture content. The acceptable level varies depending on the type of vinyl flooring and the manufacturer's recommendations. If the moisture level exceeds the acceptable threshold, take steps to mitigate the moisture issue before proceeding with the installation. This might involve installing a moisture barrier or allowing the subfloor to dry for a longer period.
Finally, ensure the subfloor is structurally sound. Loose or weak areas should be repaired or replaced before installing the vinyl flooring. This may involve reinforcing the subfloor with additional supports or replacing damaged sections entirely.
Layout and Cutting: Precision for a Seamless Finish
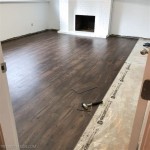
Proper layout and cutting are essential for achieving a professional-looking and gap-free installation. Begin by determining the orientation of the planks or tiles. Consider the room's dimensions, natural light sources, and existing architectural features when deciding on the layout. Typically, running the planks parallel to the longest wall creates a more visually appealing and spacious effect.
Before cutting any material, dry-lay a row of planks or tiles along the longest wall. This allows you to visualize the final appearance and make any necessary adjustments to the layout. Ensure there is sufficient space for expansion and contraction along the perimeter of the room. This is typically achieved by leaving a small gap (usually ¼ inch) between the flooring and the walls. This gap is covered by baseboards after the installation is complete.
Use a measuring tape and straight edge to accurately measure and mark the planks or tiles for cutting. A utility knife or flooring cutter can be used to make precise cuts. For intricate cuts around doorways or obstacles, consider using a template or cardboard cutout to ensure accuracy. Always err on the side of caution and cut slightly larger than necessary, as it's easier to trim away excess material than to add it back.
When cutting vinyl planks or tiles with a utility knife, score the surface several times along the marked line. Then, snap the plank or tile along the score line. This technique provides a clean and precise cut. For more complex cuts or thicker materials, a flooring cutter may be more efficient. Follow the manufacturer's instructions for operating the flooring cutter safely and effectively.
Continuously check the fit of the cut pieces as you progress. This helps to identify and correct any errors early on, preventing them from accumulating and affecting the overall appearance of the installation. Remember to wear safety glasses and gloves when cutting vinyl flooring to protect yourself from sharp edges and debris.
Installation Techniques: Click-Lock vs. Glue-Down
The installation technique varies depending on the type of vinyl wood flooring chosen. Click-lock and glue-down are the two most common methods. Click-lock systems feature interlocking edges that snap together, creating a floating floor that doesn't require adhesive. Glue-down installations, on the other hand, involve applying adhesive to the subfloor and adhering the planks or tiles directly to the surface.
For click-lock installations, start by placing the first row of planks along the longest wall, ensuring the tongue side faces the wall. Use spacers to maintain the expansion gap along the perimeter. Connect the planks by aligning the interlocking edges and gently tapping them together with a tapping block and rubber mallet. Continue installing rows of planks, staggering the end joints for a more visually appealing and structurally sound floor. Staggering the end joints also helps to distribute weight evenly and prevent the formation of weak spots.
Pay close attention to the alignment of the planks as you proceed. Ensure they are properly interlocked and that there are no gaps or overlaps. Use a tapping block and rubber mallet to gently tap the planks into place, avoiding excessive force that could damage the interlocking edges. For the last row, you may need to rip the planks to the appropriate width. Remember to maintain the expansion gap along the wall.
For glue-down installations, begin by applying the appropriate adhesive to the subfloor using a trowel. The type of trowel and the amount of adhesive required will depend on the manufacturer's recommendations. Apply the adhesive in small sections, working in manageable areas to prevent it from drying out before the planks or tiles are installed.
Carefully position the planks or tiles onto the adhesive, ensuring they are properly aligned and that there are no gaps. Use a roller or hand roller to firmly press the planks or tiles into the adhesive, ensuring a strong and even bond. Wipe away any excess adhesive immediately with a damp cloth. Continue installing the planks or tiles, ensuring each piece is properly adhered and aligned. For the last row, you may need to cut the planks or tiles to the appropriate width.
Allow the adhesive to cure completely according to the manufacturer's instructions before walking on the floor or replacing furniture. This typically takes 24-48 hours. During this time, avoid excessive traffic and protect the floor from damage. After the adhesive has cured, install baseboards and transition strips to complete the installation.
Regardless of the installation method, it is imperative to follow the manufacturer's instructions precisely. Deviating from the recommended procedures can void the warranty and compromise the quality and longevity of the flooring.
```
How To Install Vinyl Flooring Planks

Installing Vinyl Plank Flooring How To Fixthisbuildthat

Laying Vinyl Planks The Right Way Expert Guide By Fantastic Handyman

How To Install Vinyl Plank Flooring In A Bathroom Fixthisbuildthat

What Are The Advantages Of Loose Lay Vinyl Plank Impression Floors

Installing Vinyl Floors A Do It Yourself Guide The Honeycomb Home

10 Beginner Mistakes Installing Vinyl Plank Flooring

How To Install Vinyl Plank Flooring As A Beginner Home Renovation

Installing Vinyl Floors A Do It Yourself Guide The Honeycomb Home

A Complete Guide How To Stagger Vinyl Plank Flooring Whole Cabinet Supply
Related Posts