Install Vinyl Plank Flooring Like a Pro: A Comprehensive Guide to DIY Excellence
Embarking on a vinyl plank flooring installation project can be both rewarding and daunting. With meticulous planning and the right techniques, you can elevate your living space with a durable and stylish floor. Here's a comprehensive guide to help you achieve professional-grade results:
1. Preparation: The Foundation for Success
Begin by clearing the existing flooring and baseboards. Ensure that the subfloor is level, smooth, and free of moisture. A moisture barrier is essential to prevent potential water damage. For concrete subfloors, use a self-leveling compound to fill any imperfections.
2. Layout Planning: Map Out Your Plan
Plan the layout to minimize waste. Start by measuring the room and creating a diagram with the desired plank orientation. Align the first row parallel to the longest wall. Use spacers to maintain consistent gaps between planks.
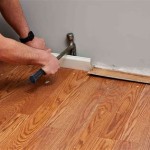
3. Cutting and Installation: Precision and Accuracy
Use a sharp utility knife or a power saw to cut planks to the required lengths. Ensure precise cuts for a seamless fit. Apply adhesive to the subfloor as per the manufacturer's instructions. Align the first plank and lock it into place. Repeat the process, row by row, staggering the joints for stability.
4. Transitions and Accessories: Finishing Touches
Where different flooring materials meet, use transition strips or moldings to create a smooth transition. Add quarter rounds at the baseboards to conceal the gap and enhance aesthetics. Use caulk to fill any gaps and prevent moisture penetration.
5. Maintenance: Preserve the Beauty
Vinyl plank flooring is renowned for its easy maintenance. Regular sweeping or vacuuming will remove dust and debris. Use a damp mop or a pH-neutral cleaner for occasional cleaning. Avoid abrasive cleaners and excessive water to maintain the integrity of the flooring.
Additional Tips for Impeccable Results
- Allow the planks to acclimate to room temperature before installation.
- Use a tapping block to firmly lock the planks together.
- Pay attention to temperature and humidity during installation.
- Take breaks to ensure accuracy and prevent fatigue.

Installing Vinyl Plank Flooring For Beginners Anika S Diy Life

Lvp Flooring Installation How To Install Luxury Vinyl Plank In A Basement Diy

How To Install Vinyl Plank Flooring Diy Cost Breakdown With Underlayment

Installing Vinyl Floors A Do It Yourself Guide The Honeycomb Home

10 Beginner Mistakes Installing Vinyl Plank Flooring

Installing Vinyl Plank Flooring For Beginners Anika S Diy Life

How To Install Vinyl Plank Flooring The Home Depot

A Beginner S Guide To Installing Vinyl Plank Flooring Dumpsters Com

Installing Vinyl Floors A Do It Yourself Guide The Honeycomb Home Plank Flooring Diy

10 Beginner Mistakes Installing Vinyl Plank Flooring
Related Posts