Putting Down Flooring in a Basement: A Comprehensive Guide
Transforming a basement from a cold, utilitarian space into a comfortable and inviting living area often begins with flooring. Choosing and installing the right type of flooring is crucial for basement environments, which are susceptible to moisture and temperature fluctuations. This article provides a comprehensive guide to understanding the essential aspects of selecting and installing flooring in a basement, covering various flooring options, preparation steps, and installation techniques for a successful outcome.
Understanding the Basement Environment
Before embarking on any flooring project in a basement, a thorough understanding of the specific environmental conditions is paramount. Unlike above-ground rooms, basements are typically located below the water table, making them vulnerable to moisture penetration through the foundation walls and floor. This moisture can manifest as water seepage, humidity, or condensation, all of which can negatively impact certain types of flooring. Therefore, a proactive approach to moisture management is essential.
Assessing the basement for existing moisture problems is the first step. This involves visually inspecting the walls and floor for signs of water damage, such as water stains, efflorescence (a white, powdery residue), or mold growth. A moisture meter can be used to measure the moisture content of the concrete slab. Ideally, the moisture content should be below a certain threshold, typically around 3-5%, depending on the flooring type. If excessive moisture is detected, addressing the underlying cause is crucial before installing any flooring.
Remedial measures to mitigate moisture problems can include improving exterior drainage by ensuring proper grading and functioning gutters and downspouts. Interior solutions may involve applying a waterproof sealant to the foundation walls, installing a vapor barrier under the flooring, or even considering a dehumidifier to control humidity levels. Ignoring moisture issues can lead to flooring failure, mold growth, and potential health problems.
Selecting the Right Flooring Material
The selection of flooring material is a critical decision that should be based on factors such as moisture resistance, durability, budget, and aesthetic preferences. Not all flooring types are suitable for basement environments. Some materials are more susceptible to damage from moisture and humidity than others.
Waterproof Flooring Options:
Several flooring options are specifically designed for basements due to their inherent water resistance:
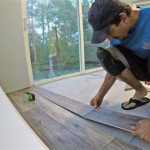
Luxury Vinyl Flooring (LVF): LVF, including luxury vinyl planks (LVP) and luxury vinyl tiles (LVT), is a popular choice for basements. It is completely waterproof, durable, and resistant to scratches and stains. LVF is available in a wide range of styles and patterns that mimic the appearance of hardwood, stone, and tile. Installation options include glue-down, click-lock, and loose-lay systems, offering flexibility for different subfloor conditions.
Ceramic and Porcelain Tile: Ceramic and porcelain tile are highly resistant to water and are suitable for basements. These tiles are durable, easy to clean, and can withstand heavy foot traffic. They are available in a vast array of colors, sizes, and textures, providing endless design possibilities. However, tile installation requires more skill and meticulous preparation of the subfloor. Grout lines need to be properly sealed to prevent moisture penetration.
Sheet Vinyl: Sheet vinyl offers a seamless, waterproof surface, making it an excellent choice for basements. It is relatively inexpensive and easy to install, although professional installation is often recommended to ensure a smooth, wrinkle-free finish. Sheet vinyl comes in a variety of patterns and colors and is resistant to stains and mildew.
Water-Resistant Flooring Options:
While not completely waterproof, some flooring options offer good water resistance and can be suitable for basements if moisture is well-controlled:
Engineered Hardwood: Engineered hardwood is constructed with a plywood or fiberboard core topped with a layer of real hardwood veneer. This construction makes it more dimensionally stable than solid hardwood and less susceptible to warping and cupping in humid environments. However, it is still vulnerable to prolonged exposure to water and should be used in basements with good moisture control.
Alternatives to Avoid:
Certain flooring options are generally not recommended for basements due to their susceptibility to moisture damage:
Solid Hardwood: Solid hardwood is highly susceptible to warping, cupping, and rotting in damp environments, making it unsuitable for basements. It is best to avoid using solid hardwood in basements unless the basement is completely dry and well-ventilated.
Carpet: While carpet can provide warmth and comfort, it is highly absorbent and can trap moisture, leading to mold and mildew growth. Even with proper ventilation, carpet in a basement is risky due to the potential for undetected leaks or spills. If carpet is desired, opting for synthetic fibers and a moisture-resistant padding is recommended, but vigilance in monitoring for moisture is absolutely essential.
Prepping the Basement Floor for Flooring
Proper preparation of the basement floor is essential for a successful flooring installation. This involves cleaning, leveling, and potentially applying a vapor barrier to prevent moisture from damaging the flooring.
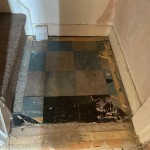
Cleaning the Subfloor:
The first step is to thoroughly clean the concrete subfloor. Remove any dirt, debris, paint, adhesive residue, or existing flooring materials. Use a scraper to remove stubborn residue, and then sweep or vacuum the entire surface. For stubborn stains or mildew, a mixture of water and bleach can be used, followed by a thorough rinse.
Leveling the Subfloor:
An uneven subfloor can cause problems such as uneven flooring, cracking of tiles, and instability of floating floors. Use a long level to check for high and low spots in the concrete. Minor imperfections can be addressed with a self-leveling compound. Follow the manufacturer's instructions carefully when applying the compound. For more significant unevenness, professional concrete grinding or patching may be necessary.
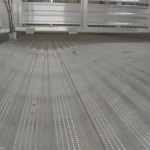
Applying a Vapor Barrier:
A vapor barrier is a thin, waterproof membrane that is installed between the concrete subfloor and the flooring material. It helps to prevent moisture from migrating up through the concrete and damaging the flooring. A 6-mil polyethylene film is commonly used as a vapor barrier. Overlap the seams by at least 6 inches and seal them with moisture-resistant tape. Extend the vapor barrier up the walls a few inches and trim it after the flooring is installed. Some flooring products may have an integrated vapor barrier, eliminating the need for a separate application.
Acclimation:
Before beginning the flooring installation, it's crucial to acclimate the flooring material to the basement environment. This allows the flooring to adjust to the temperature and humidity levels, minimizing the risk of expansion or contraction after installation. Store the flooring in the basement for at least 48-72 hours before starting the installation, following the manufacturer's recommendations. Spread the flooring out to allow for proper air circulation.
Installation Techniques and Considerations
The specific installation techniques will vary depending on the type of flooring chosen. It's important to follow the manufacturer's instructions carefully to ensure a successful and long-lasting installation.
Floating Floors:
Floating floors, such as LVP with a click-lock system and some engineered hardwood floors, are not attached to the subfloor. Instead, they are connected to each other, creating a "floating" surface. This type of installation is relatively easy and can be done by experienced DIYers. Begin by laying a foam underlayment over the vapor barrier to provide cushioning and sound insulation. Follow the manufacturer's instructions for connecting the planks or tiles, ensuring that they are properly aligned and locked together. Leave an expansion gap around the perimeter of the room to allow for expansion and contraction.
Glue-Down Floors:
Glue-down floors, such as some LVP and tile, are attached to the subfloor with adhesive. This type of installation requires careful preparation of the subfloor and a smooth, even surface. Use the recommended adhesive for the specific flooring material and follow the manufacturer's instructions for application. Spread the adhesive evenly and allow it to tack up before placing the flooring. Use a roller to ensure good contact between the flooring and the adhesive. Work in small sections to prevent the adhesive from drying out.
Tile Installation:
Tile installation requires more skill and experience than other flooring types. First, create a layout that minimizes cuts and ensures a balanced appearance. Apply a thin-set mortar adhesive to the subfloor using a notched trowel. Press the tiles firmly into the mortar, ensuring that they are level and properly spaced. Use spacers to maintain consistent grout lines. Allow the mortar to cure for the recommended time before grouting. Apply grout to the joints, pushing it in with a grout float. Wipe away excess grout with a damp sponge. Seal the grout lines to prevent moisture penetration.
Dealing with Obstacles:
Most basements have obstacles such as support columns, pipes, and irregular wall angles. Accurate measurements and careful cutting are essential to achieve a professional-looking result. Use a jigsaw or other appropriate cutting tool to cut the flooring around obstacles. Leave a small gap around pipes and columns to allow for expansion and contraction. Use trim pieces to cover gaps and create a finished look.
Post-Installation Care:
Proper maintenance is essential to prolong the life of the basement flooring. Clean the flooring regularly with a mild detergent and water. Avoid using harsh chemicals or abrasive cleaners. Wipe up spills immediately to prevent staining. Use mats at entrances to trap dirt and moisture. Consider using furniture pads to protect the flooring from scratches. Periodically inspect the flooring for signs of damage and address any issues promptly. Ensure adequate ventilation to minimize humidity levels.

How To Install Vinyl Or Laminate Floors In A Basement Over Concrete Slab

Diy Installing Laminate Floors Basement Update House To Home

The Best Flooring Options For Your Basement

The Best Flooring For Basement Renovations Guide Reallyfloors America S Est Hardwood

Lvp Flooring Installation How To Install Luxury Vinyl Plank In A Basement Diy

Using Laminate Flooring For The Basement What To Know

How To Carpet A Basement Floor Diy Family Handyman

Laminate Flooring On Concrete Basement Floors Expert Installation Guide Csg Renovation

Tips For Installing Vinyl Plank Over Concrete Floors Lemon Thistle

The Best Flooring Options For Your Basement
Related Posts