Laying Vinyl Flooring: A Comprehensive Guide to a Flawless Installation
Vinyl flooring has gained immense popularity due to its durability, affordability, and ease of maintenance. However, achieving a professional-looking installation requires careful preparation and attention to detail. This comprehensive guide will walk you through the essential aspects of laying vinyl flooring, ensuring a seamless and long-lasting result.
1. Preparation: The Key to a Successful Installation
Before embarking on the installation process, meticulous preparation is crucial. Start by removing existing floor coverings, including carpets, tiles, or moldings. Inspect the subfloor thoroughly for any imperfections, such as unevenness, cracks, or damage. If necessary, repair or level the subfloor using appropriate underlayment or self-leveling compound.
2. Choosing the Right Vinyl Flooring
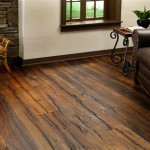
The type of vinyl flooring you select will depend on your specific needs and preferences. Luxury vinyl plank (LVP) and luxury vinyl tile (LVT) are popular options that offer realistic wood or stone textures. Sheet vinyl is another choice that provides a seamless, waterproof surface ideal for kitchens or bathrooms.
3. Essential Tools and Materials
To ensure a successful installation, gather the necessary tools and materials. These include a utility knife, straight edge, measuring tape, spacers, a tamping block or roller, and adhesive or underlayment, depending on the type of vinyl flooring you choose.
4. Layout and Cutting
Plan the layout of your flooring by measuring the room and determining the placement of seams. Start by laying down full planks or tiles along the longest wall. Use spacers to maintain consistent gaps between pieces. When cutting, use a sharp utility knife and a straight edge to ensure precise cuts.
5. Installation: Adhesive or Underlayment
Depending on the type of vinyl flooring, you will need to use either adhesive or underlayment. For glue-down vinyl, apply adhesive evenly to the subfloor and press the planks or tiles into place. For floating vinyl with underlayment, simply lay the pieces together, interlocking the edges.
6. Finishing Touches: Transitions and Moldings
Once the flooring is installed, add transitions or moldings to cover seams or transitions between different flooring materials. These finishing touches enhance the overall aesthetics and durability of your vinyl flooring.
7. Maintenance and Care
Proper maintenance is essential to extend the life of your vinyl flooring. Regular cleaning with a soft microfiber mop or vacuum cleaner will remove dirt and debris. Avoid using harsh chemicals or abrasive cleaners that can damage the finish.
By adhering to these essential aspects, you can achieve a professional-looking vinyl flooring installation that will enhance the beauty and functionality of your space for years to come.

Laying Vinyl Planks The Right Way Expert Guide By Fantastic Handyman

What Are The Advantages Of Loose Lay Vinyl Plank Impression Floors

How To Lay Vinyl Flooring Sheets Tiles And Planks Tarkett

How To Lay Vinyl Flooring Checkatrade

How To Install Vinyl Plank Flooring As A Beginner Home Renovation

How To Install Vinyl Plank Flooring The Home Depot

What Is Loose Lay Vinyl Flooring How To Install Id

What Is Loose Lay Vinyl Flooring A Plank Guide Reallyfloors America S Est Hardwood

Vinyl Tile Installation A Comprehensive Guide Gc Flooring Pros

Average Cost Of Vinyl Flooring Installation In 2024 Forbes Home
Related Posts