Laying Laminate Flooring in the Kitchen: A Step-by-Step Guide
Laminate flooring has become a popular choice for kitchens due to its durability, affordability, and ease of maintenance. It offers a stylish and practical alternative to traditional flooring options like tile or hardwood. While installing laminate flooring can be a DIY project, it requires careful planning and execution to achieve a professional look. This article will guide you through the process of laying laminate flooring in your kitchen, highlighting key steps and considerations for a successful installation.
Preparing the Subfloor
A smooth and level subfloor is crucial for a successful laminate flooring installation. Uneven surfaces can lead to gaps, squeaks, and uneven wear patterns. If your kitchen subfloor is concrete, check for cracks or gaps that need to be filled. Wood subfloors should be inspected for any damage or warping and repaired if necessary. You may need to apply a leveling compound or use plywood sheets to create a level surface. Ensure the subfloor is clean and free of debris before proceeding with installation.
Measuring and Planning
Precise measurements are essential for a seamless installation. Determine the dimensions of your kitchen and the area you want to cover with laminate flooring. Factor in any existing cabinetry, appliances, or other obstacles. Consider the direction of the flooring planks and how they will align with your kitchen layout. It is advisable to create a layout plan on paper to visualize the installation process.
When purchasing laminate flooring, order enough planks to cover the entire kitchen area, factoring in any potential waste due to cuts or mishaps. A 10% overage is generally recommended. Make sure to choose laminate flooring with appropriate moisture resistance for a kitchen environment.
Installing the Underlayment
Underlayment serves as a buffer between the subfloor and the laminate planks, providing insulation, sound dampening, and moisture protection. There are various types of underlayment available, including foam, felt, and rubber. Choose an appropriate underlayment based on your subfloor and the desired level of insulation and sound reduction.
Install the underlayment according to the manufacturer's instructions. It is usually rolled out and secured to the subfloor using staples or tape. Make sure the underlayment is seamless and without any gaps or folds to ensure proper support for the laminate flooring.
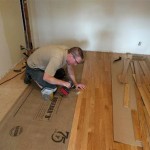
Laying the First Row of Laminate Planks
Start laying the laminate planks from the furthest corner of the kitchen and work your way towards the entrance. Use a tape measure to ensure the first plank is aligned with the wall and the edge is straight.
Laminate planks have a tongue-and-groove system for easy interlocking. Insert the tongue of the first plank into the groove of the previous one, aligning the ends of the planks. Use a tapping block and mallet to gently tap the planks into place.
For the first row, you may need to cut the planks to fit the remaining space. Use a circular saw or a hand saw for precise cuts. Always make sure the planks are cut accurately to ensure a clean and seamless finish.
Installing the Remaining Rows
Once the first row is installed, start laying the subsequent rows, ensuring the planks are aligned with the previous row. Each plank should be offset from the previous one by at least half the plank width, similar to brickwork. This staggering pattern helps prevent the flooring from locking together in a straight line and avoids a weak point for potential movement.
Continue laying each row, ensuring the planks are tightly fitted and the edges are flush. Use a tapping block to secure each plank and maintain a consistent level. As you approach walls or obstacles, you may need to make additional cuts.
Finishing Touches
After completing the installation, ensure all the planks are tightly fitted and the edges are flush. Use transition strips to connect the laminate flooring to other flooring materials, such as tile or hardwood.
Apply a bead of sealant around the perimeter of the kitchen to prevent water damage and moisture penetration. Clean the laminate flooring with a damp cloth to remove any dust or debris from the installation process.
Allow the flooring to acclimate to the room temperature for at least 24 hours before placing furniture or appliances on it. This will ensure the flooring is fully stable and prevents any potential warping or buckling.

Do You Install Floating Floor Under Cabinets Wood Flooring

Laminate Flooring In Kitchens Do It Yourself Installation

Do You Install Floating Floor Under Cabinets Wood Flooring

Laminate Flooring In Kitchens Do It Yourself Installation

Is There A Special Way To Install Laminate Flooring In The Kitchen

How To Install Laminate Flooring Diy Tips And Tricks

Laminate Flooring In The Kitchen

Working Around Kitchen Appliances Installing Laminate Flooring Vlog 194

Do You Install Floating Floor Under Cabinets Wood Flooring

5 Best Laminate Flooring For Your Kitchen
Related Posts