Best Way to Install Engineered Hardwood Flooring On Concrete
Engineered hardwood flooring offers an attractive and durable alternative to solid hardwood, particularly when installing flooring over concrete subfloors. Concrete, known for its hardness and potential for moisture, presents unique challenges that engineered hardwood is well-suited to address. Unlike solid hardwood, engineered hardwood is constructed of multiple layers, with a hardwood veneer on top and a supporting core, making it more dimensionally stable and less susceptible to warping or expansion and contraction due to moisture fluctuations. This article will outline the recommended methods and best practices for successfully installing engineered hardwood flooring on concrete, ensuring a long-lasting and aesthetically pleasing result. Proper preparation, material selection, and installation techniques are critical to achieving optimal performance and longevity.
Before initiating any flooring project over concrete, it is essential to understand the inherent properties of the concrete slab itself. Concrete is porous and can wick moisture from the ground. Therefore, moisture testing is a paramount step. Failing to address moisture-related issues can lead to flooring failure, including warping, cupping, and mold growth.
The installation process involves several crucial steps, starting with assessing the concrete subfloor and ensuring its readiness to receive the new flooring. This includes moisture testing, leveling any imperfections, and selecting the appropriate installation method based on the specific engineered hardwood product and the conditions of the concrete subfloor. The success of the project hinges on meticulously executing each of these steps.
Moisture Testing and Mitigation
Concrete is porous and can absorb moisture from the ground or ambient humidity. Elevated moisture levels can wreak havoc on engineered hardwood, causing it to warp, buckle, or separate. Therefore, performing thorough moisture tests is the first and one of the most critical steps in the installation process. There are several methods available for testing moisture levels, each with its own advantages and limitations.
Calcium Chloride Test (CaCl Test): This test involves placing a pre-weighed dish of calcium chloride under a sealed dome on the concrete surface for a specified period (typically 72 hours). The calcium chloride absorbs moisture from the concrete. The dish is then re-weighed, and the difference in weight determines the moisture vapor emission rate (MVER), measured in pounds per 1,000 square feet per 24 hours. Flooring manufacturers generally specify a maximum MVER for their products, usually around 3-5 lbs. This test is considered relatively accurate but requires specific equipment and time.
Relative Humidity (RH) Test: This test measures the relative humidity within the concrete slab. A small hole is drilled into the concrete, and a probe is inserted to measure the RH. Readings are typically taken after 24-72 hours of probe insertion. The RH provides a direct indication of the moisture content within the slab. Flooring manufacturers often specify a maximum RH level, typically around 75-85%. This test is more accurate than the calcium chloride test, as it measures the moisture content within the slab itself rather than relying on surface emissions.
Electronic Moisture Meter: While less precise than the CaCl or RH tests, electronic moisture meters can provide a quick and convenient estimate of moisture levels. These meters use electrical resistance or capacitance to measure the moisture content of the concrete surface. However, they are susceptible to surface conditions and may not accurately reflect the moisture content deeper within the slab. It's recommended to use an electronic moisture meter only for preliminary assessment and to confirm results with more accurate testing methods.
If the moisture tests reveal unacceptable levels, mitigation measures are necessary. These can include applying a moisture barrier, such as a liquid-applied epoxy or urethane coating, to the concrete surface. These coatings create a waterproof layer that prevents moisture from migrating into the flooring. Another option is to install a subfloor system with a built-in moisture barrier. These systems typically consist of interlocking panels or a plywood layer with a moisture-resistant membrane. The choice of mitigation method will depend on the severity of the moisture problem and the specific recommendations of the flooring manufacturer. Always consult with a flooring professional to determine the most appropriate course of action.
Subfloor Preparation and Leveling
After moisture testing, the next step is to thoroughly prepare the concrete subfloor. This involves cleaning, repairing any cracks or imperfections, and ensuring the surface is level. A clean, sound, and level subfloor is crucial for a successful engineered hardwood installation.
Cleaning: Begin by thoroughly sweeping or vacuuming the concrete surface to remove any loose debris, dust, or dirt. Then, use a concrete cleaner or degreaser to remove any grease, oil, or paint stains. Rinse the surface thoroughly with clean water and allow it to dry completely. Avoid using harsh chemicals that could damage the concrete or interfere with the bonding of adhesives or underlayments.
Crack Repair: Inspect the concrete for any cracks or imperfections. Small cracks (less than 1/8 inch wide) can be filled with a concrete crack filler or patching compound. Larger cracks or structural issues should be addressed by a qualified concrete repair specialist. The crack filler should be compatible with concrete and able to withstand foot traffic and temperature changes. Follow the manufacturer's instructions for application and curing time.
Leveling: Concrete floors are rarely perfectly level. Even minor imperfections can cause the engineered hardwood to flex, squeak, or develop gaps. To ensure a level surface, use a self-leveling underlayment (SLU). These are cement-based mixtures that are poured onto the concrete and spread evenly. The SLU flows into low spots and levels out, creating a smooth and flat surface. Before applying SLU, prime the concrete surface with a concrete primer to improve adhesion. Follow the manufacturer's instructions for mixing, application, and curing time. Use a long, leveling bar to check the levelness of the subfloor before and after applying the SLU. Aim for a tolerance of no more than 3/16 inch over a 10-foot span.
Once the SLU has cured completely, lightly sand the surface to remove any imperfections or bumps. Vacuum the surface thoroughly to remove any dust before proceeding with the flooring installation.
Installation Methods: Glue-Down vs. Floating
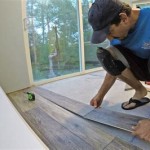
There are two primary methods for installing engineered hardwood flooring over concrete: the glue-down method and the floating method. Each method has its own advantages and disadvantages, and the best choice will depend on factors such as the specific engineered hardwood product, the condition of the subfloor, and personal preferences.
Glue-Down Method: The glue-down method involves adhering the engineered hardwood planks directly to the concrete subfloor using a specialized adhesive. This method provides a very stable and solid feel underfoot, minimizing movement and noise. It also offers excellent heat transfer for radiant heating systems. However, the glue-down method requires a very clean, level, and dry subfloor. The adhesive can be costly, and the installation process can be more labor-intensive than the floating method. Removal of the flooring can also be more challenging.
When using the glue-down method, it is critical to select the appropriate adhesive. Use an adhesive specifically designed for engineered hardwood and concrete. Follow the adhesive manufacturer's instructions carefully for application, open time, and curing time. Apply the adhesive evenly using a notched trowel of the recommended size. Ensure that the planks are properly aligned and pressed firmly into the adhesive. Use a roller to ensure full contact between the flooring and the adhesive. Allow the adhesive to cure completely before allowing heavy traffic on the floor.
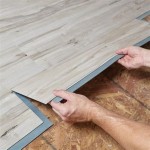
Floating Method: The floating method involves installing the engineered hardwood planks over an underlayment, without attaching them directly to the concrete subfloor. The planks are typically connected to each other via a tongue-and-groove system or a click-lock mechanism. This method is generally easier and faster to install than the glue-down method. It is also more forgiving of minor imperfections in the subfloor. The floating method allows for some expansion and contraction of the flooring, which can be beneficial in areas with fluctuating humidity levels. However, the floating method may not provide as solid or quiet a feel as the glue-down method, and it may not be suitable for all radiant heating systems.
When using the floating method, select an appropriate underlayment. The underlayment provides cushioning, sound absorption, and moisture protection. Choose an underlayment that is specifically designed for engineered hardwood and concrete. Install the underlayment according to the manufacturer's instructions, ensuring that it is flat and secure. When installing the engineered hardwood planks, follow the manufacturer's instructions for connecting the planks and maintaining proper expansion gaps around the perimeter of the room. Use spacers to ensure consistent expansion gaps. Avoid walking on the newly installed flooring until it is fully connected and stable.
Regardless of the installation method chosen, it is essential to acclimatize the engineered hardwood flooring to the room's environment for several days before installation. This allows the flooring to adjust to the temperature and humidity levels, minimizing expansion and contraction after installation. Follow the flooring manufacturer's recommendations for acclimatization.
By following these guidelines and paying close attention to detail, installing engineered hardwood flooring over concrete can result in a beautiful, durable, and long-lasting floor.

Installing Engineered Hardwood On Concrete Twenty Oak

Installing Wood Flooring Over Concrete Diy

Installing Engineered Hardwood On Concrete Twenty Oak

Installing Hardwood Floors On Concrete Subfloors

Installing Engineered Flooring On A Concrete Slab Fine Homebuilding

How To Install An Engineered Hardwood Floor

Installing Engineered Hardwood On Concrete Villagio Guide

How To Install Lock Engineered Hardwood Flooring

How To Install Engineered Flooring On Concrete Adm

Hardwood Over Concrete Auten Wideplank Flooring
Related Posts