Laying Cork Flooring Over Ceramic Tiles: A Comprehensive Guide
Laying cork flooring over existing ceramic tiles presents a viable option for homeowners seeking to update their living spaces without the extensive demolition and disposal costs associated with removing the existing tile. This approach offers numerous benefits, including improved insulation, enhanced comfort underfoot, and a fresh aesthetic appeal. However, successful installation hinges on careful preparation, selecting the appropriate materials, and employing proper techniques. This article provides a detailed guide to laying cork flooring over ceramic tiles, covering essential considerations and step-by-step instructions.
Assessing the Suitability of Existing Ceramic Tiles
Prior to embarking on the project, a thorough assessment of the existing ceramic tile surface is crucial. The primary concern is the condition of the tiles and the underlying substrate. Any loose, cracked, or uneven tiles must be addressed before proceeding. A compromised substrate will inevitably lead to problems with the cork flooring, potentially causing it to crack, buckle, or delaminate.
Begin by inspecting each tile individually. Look for cracks, chips, or signs of damage. Gently tap each tile with a rubber mallet or similar tool. A hollow sound indicates that the tile is not properly adhered to the substrate and requires attention. Loose tiles must be carefully removed and re-adhered using a suitable thin-set mortar. Ensure the mortar is allowed to cure completely according to the manufacturer's instructions before moving on to the next step.
Next, evaluate the levelness of the tile surface. Minor imperfections, such as slight grout line variations, are generally acceptable. However, significant unevenness can create problems. A long level, ideally six feet or longer, should be used to identify high and low spots. Areas with substantial dips or humps should be leveled using a self-leveling compound. Follow the manufacturer's instructions carefully when applying self-leveling compound, paying particular attention to proper mixing ratios and drying times.
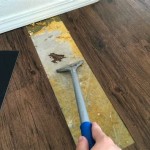
Finally, consider the existing tile's surface texture. Cork flooring adheres best to a clean, slightly textured surface. Glossy or highly polished tiles may require roughening to promote proper adhesion. This can be achieved by lightly sanding the tile surface with a medium-grit sandpaper. Clean the surface thoroughly after sanding to remove any dust or debris.
Selecting the Appropriate Cork Flooring and Adhesive
Choosing the right type of cork flooring and adhesive is paramount to a successful installation. Cork flooring is available in various forms, including cork tiles and cork planks. Cork tiles typically come in square or rectangular shapes and are adhered directly to the subfloor. Cork planks, on the other hand, often feature a click-lock mechanism that allows them to be floated over the subfloor without the need for adhesive. For installation over ceramic tiles, both cork tiles and floating cork planks are viable options, but each has its own set of considerations.
When selecting cork tiles, pay close attention to the thickness and density of the cork. Thicker cork provides better insulation and sound absorption, while higher density cork is more durable and resistant to indentation. Choose a cork tile that is specifically designed for flooring applications and has a wear layer suitable for the intended use of the room. The adhesive chosen should be compatible with both the cork flooring and the ceramic tile. A high-quality, flexible adhesive designed for resilient flooring is generally recommended. Consult with the cork flooring manufacturer or a flooring specialist to determine the most appropriate adhesive for the specific cork tile being used.
For floating cork planks, ensure that the product is designed for installation over hard surfaces like ceramic tile. This type of flooring usually incorporates an underlayment attached to the cork plank, which provides cushioning and helps to level out minor imperfections in the subfloor. While floating cork planks offer the advantage of easier installation and the elimination of adhesive, they may not be suitable for areas with high moisture levels or heavy traffic. Check the manufacturer's specifications to ensure the planks are appropriate for the intended application.
Regardless of the type of cork flooring chosen, it is essential to acclimate the material to the room's temperature and humidity for at least 48 to 72 hours before installation. This allows the cork to expand or contract as needed, minimizing the risk of issues such as gapping or buckling after installation.
Step-by-Step Installation Guide for Cork Tiles
This section outlines the process of installing cork tiles directly onto the ceramic tile surface, assuming the ceramic tiles have been properly prepared as described above.
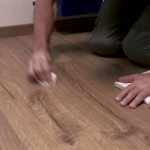
Step 1: Prepare the Surface. Ensure that the ceramic tile surface is clean, dry, and free of any dust, debris, or grease. Vacuum the surface thoroughly and then wipe it down with a damp cloth. Allow the surface to dry completely before proceeding.
Step 2: Dry-Fit the Tiles. Before applying any adhesive, lay out the cork tiles in the desired pattern. This allows to visualize the final appearance and make any necessary adjustments to ensure a balanced and aesthetically pleasing layout. Start in the center of the room and work outwards. Use spacers to maintain consistent grout lines between the tiles.
Step 3: Apply Adhesive. Using a notched trowel recommended by the adhesive manufacturer, apply a thin, even layer of adhesive to a small section of the ceramic tile surface. The size of the section should be manageable, allowing to apply the tiles before the adhesive begins to dry. Follow the adhesive manufacturer's instructions regarding open time and working time.
Step 4: Install the Tiles. Carefully place the cork tiles onto the adhesive, aligning them with the edges of the adjacent tiles and maintaining consistent grout lines. Press each tile firmly into the adhesive to ensure proper adhesion. Use a rubber roller to roll over the tiles to further promote bonding.
Step 5: Cut Tiles as Needed. When reaching the edges of the room, it will likely be necessary to cut tiles to fit. Measure the required size precisely and use a sharp utility knife or a cork tile cutter to make clean, accurate cuts. Ensure that the cut edges are smooth and straight before installing the tiles.
Step 6: Remove Excess Adhesive. As you install the tiles, some adhesive may squeeze up through the grout lines. Immediately wipe away any excess adhesive with a damp cloth. Dried adhesive can be difficult to remove and may damage the cork surface.
Step 7: Allow the Adhesive to Cure. Once all of the tiles have been installed, allow the adhesive to cure completely according to the manufacturer's instructions. This typically takes 24 to 72 hours. Avoid walking on the floor during this time.
Step 8: Apply Grout (Optional). If desired, apply grout to the grout lines between the cork tiles. Use a flexible grout specifically designed for resilient flooring. Follow the grout manufacturer's instructions for application and cleanup. Note that some installations may omit grout lines and use a tight-fitting installation instead.
Step 9: Apply a Protective Finish. To protect the cork flooring from scratches, stains, and wear, apply a protective finish. Choose a finish that is specifically designed for cork flooring and is compatible with the adhesive and grout used. Follow the finish manufacturer's instructions for application and maintenance.
Installation of Floating Cork Planks
Installing floating cork planks over ceramic tile offers a quicker and often less labor-intensive alternative to adhering cork tiles. Here's a simplified guide assuming the ceramic tile preparation steps from earlier have been completed.
Step 1: Inspect the Surface. While floating floors are more forgiving than direct-adhere installations, ensure the ceramic tiles are clean, dry, and relatively level. Any major undulations should still be addressed with self-leveling compound.
Step 2: Install Underlayment (If Required). Some floating cork planks have an integrated underlayment. If the product does not have a pre-attached underlayment, install a separate underlayment suitable for floating floors. This provides cushioning and helps to level out minor imperfections. Follow the underlayment manufacturer's instructions for installation.
Step 3: Begin the Installation. Start in one corner of the room and work outwards, following the manufacturer's recommended layout pattern. Typically, planks are installed lengthwise along the longest wall of the room. Leave an expansion gap of approximately ¼ inch around the perimeter of the room to allow for expansion and contraction of the flooring. This gap will be covered by baseboards or molding.
Step 4: Connect the Planks. Utilize the click-lock mechanism to connect the planks together. Align the edges of the planks and gently tap them together using a rubber mallet. Ensure that the planks are securely locked together and that there are no gaps between them.
Step 5: Cut Planks as Needed. When reaching the edges of the room, it will likely be necessary to cut planks to fit. Measure the required size precisely and use a utility knife or a saw to make clean, accurate cuts. Ensure that the cut edges are smooth and straight before installing the planks.
Step 6: Install Baseboards and Molding. Once all of the planks have been installed, install baseboards and molding around the perimeter of the room to cover the expansion gap. This will also provide a finished look to the flooring.
Maintenance and Care of Cork Flooring
Proper maintenance is essential to prolong the life and beauty of cork flooring. Regular cleaning and preventive measures will help to protect the floor from damage and maintain its appearance.
Regular Cleaning: Sweep or vacuum the cork flooring regularly to remove dirt, dust, and debris. Use a soft-bristled broom or a vacuum cleaner with a felt brush attachment to avoid scratching the surface. For deeper cleaning, use a damp mop with a mild, pH-neutral cleaner specifically designed for cork flooring. Avoid using excessive water, as this can damage the cork. Always wring out the mop thoroughly before mopping the floor.
Preventive Measures: Place mats or rugs at entrances to trap dirt and moisture before it enters the room. Use furniture pads under the legs of furniture to prevent scratches and dents. Avoid wearing shoes with high heels or cleats on the cork flooring. Clean up spills immediately to prevent staining. Avoid using harsh chemicals or abrasive cleaners, as these can damage the finish of the cork flooring.
Refinishing: Over time, the finish on cork flooring may wear down. When this occurs, it may be necessary to refinish the floor. This involves sanding the surface to remove the old finish and applying a new coat of finish. Refinishing should be performed by a qualified professional.

Advantages Of A Cork Floating Floor Over Glue Down Tiles Cancork

Advantages Of A Cork Floating Floor Over Glue Down Tiles Cancork

How To Install A Cork Floor Young House Love

Cork Tiles Or Floating Flooring

Complete Guide To Cork Flooring Installation Deerfoot Carpet

How To Install A Cork Floor Young House Love

Cork Flooring Pros And Cons Is It The Right Choice For You

Complete Guide To Cork Flooring Installation Deerfoot Carpet

Advantages Of A Cork Floating Floor Over Glue Down Tiles Cancork

Jelinek Cork Flooring Types Group
Related Posts