Installing Harmonics Glueless Laminate Flooring: A Step-by-Step Guide
Installing Harmonics glueless laminate flooring is a relatively easy and straightforward process that can be completed by do-it-yourselfers with basic home improvement skills. By following this step-by-step guide, you can achieve a professional-looking floor that will last for years to come.
Step 1: Prepare the Subfloor
The first step is to prepare the subfloor by making sure it is clean, level, and free of any debris. Sweep or vacuum the subfloor thoroughly, then use a level to check for any uneven spots. If there are any bumps or dips, level them out using a self-leveling compound.
Step 2: Install the Underlayment
Once the subfloor is prepared, install the underlayment. Underlayment helps to protect the flooring from moisture and sound, and it also provides a cushion for the flooring to walk on. Roll out the underlayment over the subfloor, making sure to overlap the edges by at least 2 inches. Tape the seams together with duct tape.
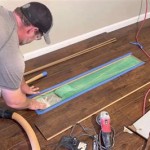
Step 3: Start Laying the Laminate Flooring
Start laying the laminate flooring in a corner of the room. Position the first plank against the wall, leaving a small gap of about 1/4 inch between the plank and the wall. Use a spacer to maintain this gap throughout the installation.
Align the next plank with the first plank and click it into place. Continue clicking planks together until you reach the end of the row.
Step 4: Complete the First Row
Once you reach the end of the first row, measure the distance from the last plank to the wall. Cut the last plank to length and click it into place.
Step 5: Start the Second Row
Start the second row by cutting the first plank in half. This will create a staggered joint, which will add strength and stability to the floor.
Position the cut plank against the wall and click it into place. Align the next plank with the first plank and click it into place.
Step 6: Continue Installing the Flooring
Continue installing the flooring in this manner, staggering the joints and clicking the planks into place. Work your way around the room, filling in the rows until the floor is complete.
Step 7: Cut the Last Row
Once you reach the last row, measure the distance from the last plank to the wall. Cut the planks to length and click them into place.
Step 8: Install the Moldings
Once the flooring is installed, install the moldings around the edges of the room. Moldings help to cover the expansion gap and give the floor a finished look.
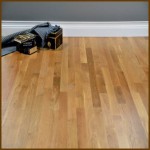
Step 9: Enjoy Your New Floor
Congratulations! You have now successfully installed Harmonics glueless laminate flooring. Enjoy your new floor for years to come.

Harmonics Laminate Flooring Underlayment Installation Kit Model Ik 401

Harmonics Laminate Flooring Easy To Install And Keep Clean Anaheim

Costco Harmonics Vineyard Cherry Laminate Review

Costco Harmonics Flooring Review And Installation

Harmonics Laminate Floor Covering Easy To Install And Keep Clean

Costco Harmonics Flooring Review And Installation

Harmonics Glueless Laminate Flooring 11 Boxes For In Las Vegas Nv Offerup

Flooring Harmonics Wood Materials By Owner Craigslist

Laminate Flooring Installation Kit With Underfloor Tapping Block Pul Materials By Owner Craigslist

Harmonics Laminate Flooring
Related Posts