How To Put Vinyl Flooring On Walls: A Comprehensive Guide
Vinyl flooring, traditionally used for horizontal surfaces, is gaining traction as a unique and durable wall covering. Its water resistance, ease of cleaning, and variety of patterns make it an attractive alternative to paint, wallpaper, and traditional tile in various spaces, from bathrooms and kitchens to accent walls in living rooms and commercial settings. Successfully installing vinyl flooring on walls requires careful preparation, appropriate materials, and precise application techniques. This article offers a detailed guide to ensure a professional and long-lasting result.
Key Considerations Before Installation
Before commencing any installation project, several factors need diligent evaluation. These considerations will significantly influence the final outcome and the overall suitability of vinyl flooring as a wall covering for the specific environment.
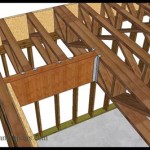
Substrate Preparation: The wall surface must be perfectly clean, smooth, and structurally sound. Existing wall coverings, such as wallpaper or loose paint, must be removed entirely. Any imperfections, including cracks, holes, or unevenness, should be filled with patching compound and sanded smooth. The surface should be primed with a suitable primer to promote adhesion. Priming is especially crucial on porous surfaces like drywall or plaster. A uniform and level substrate is essential to prevent the vinyl flooring from conforming to any underlying imperfections, which can lead to visible bumps or unevenness.
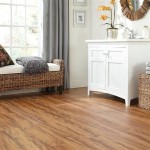
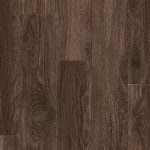
Vinyl Flooring Selection: Not all vinyl flooring is suitable for wall applications. Thinner, more flexible vinyl sheets or tiles are generally easier to work with on vertical surfaces. Rigid vinyl planks might be challenging to manipulate and adhere securely, especially around corners or curved areas. The chosen vinyl flooring should be compatible with the selected adhesive and the intended environment. For example, in bathrooms or kitchens with high humidity, waterproof vinyl options are preferable. Furthermore, consider the size and weight of the vinyl pieces; larger, heavier pieces may require additional support during the adhesive curing process.
Adhesive Selection: The adhesive is arguably the most critical component of the installation. Using the correct adhesive is paramount for ensuring a strong and lasting bond between the vinyl flooring and the wall surface. Choose an adhesive specifically designed for installing vinyl to walls or vertical surfaces. These adhesives typically have a higher initial grab and stronger bonding properties than adhesives intended for floor applications. Carefully review the adhesive manufacturer's recommendations regarding application methods, curing times, and compatibility with the chosen vinyl flooring type. Consider factors such as humidity levels and temperature variations within the installation environment, as these may affect the adhesive's performance.
Tools and Materials: Gather all the necessary tools and materials before starting the installation. This will streamline the process and prevent delays. Essential tools include a measuring tape, level, straight edge, utility knife with sharp blades, notched trowel (for applying adhesive), seam roller, caulk gun, and safety glasses. Additional materials include the selected vinyl flooring, adhesive, primer, patching compound, sandpaper, painter's tape, and a damp cloth for cleaning up excess adhesive.
Step-by-Step Installation Process
Following a methodical and precise installation process is vital for achieving a professional-looking and durable vinyl wall covering. Each step plays a crucial role in ensuring the vinyl adheres correctly and maintains its appearance over time.
Accurate Measurements and Planning: Begin by precisely measuring the wall area to be covered. Add a few extra inches to each dimension to allow for trimming and adjustments. Create a detailed plan that outlines the placement of each vinyl sheet or tile, paying attention to pattern matching and alignment. It's often advantageous to start the installation from a corner or a prominent feature, ensuring a symmetrical layout. Consider the visibility of seams and plan their placement to minimize their impact on the overall aesthetic. Using a laser level can help maintain a straight and level line for the initial row of vinyl flooring.
Applying the Adhesive: Using the notched trowel, apply a thin, even layer of adhesive to the back of the vinyl sheet or tile according to the adhesive manufacturer's instructions. The notch size on the trowel determines the amount of adhesive applied. Avoid applying too much adhesive, as this can lead to oozing and difficulty in positioning the vinyl. Conversely, insufficient adhesive can result in a weak bond and eventual peeling. Allow the adhesive to "tack up" slightly, as recommended by the manufacturer, before applying the vinyl to the wall. This allows the adhesive to become stickier and improve its initial grab.
Positioning and Securing the Vinyl: Carefully align the vinyl sheet or tile with the planned position on the wall. Press it firmly against the surface, starting from the center and working outwards to eliminate any air bubbles or wrinkles. Use the seam roller to apply consistent pressure across the entire surface, ensuring complete contact between the vinyl and the wall. For larger sheets of vinyl, it may be necessary to use painter's tape to temporarily hold the vinyl in place while the adhesive cures. Pay close attention to the seams between adjacent pieces of vinyl, ensuring they are tightly butted together without any gaps or overlaps. Avoid stretching the vinyl during installation, as this can lead to shrinkage and seam separation over time.
Trimming and Finishing: Once the adhesive has cured sufficiently, use a sharp utility knife to trim any excess vinyl around edges, corners, and fixtures. Make clean, precise cuts to create a professional finish. Use a straight edge as a guide to ensure accurate and straight lines. Apply a bead of caulk along the edges of the vinyl where it meets the ceiling, floor, or adjacent walls. This will create a watertight seal and prevent moisture from penetrating behind the vinyl. Choose a caulk color that complements the vinyl flooring for a seamless appearance. Wipe away any excess caulk with a damp cloth.
Troubleshooting Common Issues
Even with careful planning and execution, certain challenges might arise during or after the vinyl flooring installation. Being prepared to address these issues will help ensure a successful outcome.
Air Bubbles and Wrinkles: These can occur if the adhesive is not applied evenly, if the vinyl is not properly smoothed during installation, or if there are imperfections in the underlying wall surface. To address air bubbles, use a utility knife to make a small slit in the bubble and then press the vinyl firmly to release the trapped air. For wrinkles, try gently lifting the vinyl and reapplying it, ensuring it is stretched evenly. If the wrinkles are persistent, it may be necessary to remove the vinyl and reapply the adhesive, taking extra care to smooth the surface during installation.
Adhesive Oozing: This can happen if too much adhesive is applied or if the vinyl is pressed too hard against the wall. Immediately wipe away any excess adhesive with a damp cloth. If the adhesive has already started to dry, use a solvent recommended by the adhesive manufacturer to remove it. Avoid using harsh chemicals that could damage the vinyl flooring.
Seam Gaps: Gaps between seams can detract from the overall appearance and allow moisture to penetrate behind the vinyl. To minimize seam gaps, ensure the edges of the vinyl are cut cleanly and precisely. Use a seam roller to apply consistent pressure to the seams during installation. If gaps appear after installation, use a color-matched caulk to fill them.
Peeling or Lifting: This is typically caused by inadequate surface preparation, using the wrong adhesive, or exposure to excessive moisture. To repair peeling or lifting vinyl, carefully remove the affected area and clean the underlying surface. Reapply adhesive and press the vinyl firmly against the wall. For larger areas of peeling, it may be necessary to replace the entire sheet or tile.
By carefully considering the necessary precautions and following the outlined steps meticulously, achieving a professional and visually appealing vinyl flooring installation on walls is attainable. Proper preparation, careful selection of materials, and attention to detail are crucial for a long-lasting and aesthetically pleasing result.

How To Install Vinyl Plank Flooring On Walls Europine

Vinyl Plank Installation Tips For Doorways Halls Walls And Closets

How To Install Vinyl Plank Flooring On Wall Step By Tutorial Walls Wood Planks

How To Install Sheet Vinyl Flooring

How To Install Vinyl Plank Flooring As A Beginner Home Renovation

A Beginner S Guide To Installing Vinyl Plank Flooring Dumpsters Com

Diy Garage Accent Wall With E Z Vinyl Plank Flooring

How To Install Waterproof Vinyl Plank Flooring Four Generations One Roof

How To Install Vinyl Flooring And Wall Panels Properly

How To Install Vinyl Plank Flooring The Home Depot
Related Posts