How To Install Vinyl Plank Flooring on Concrete
Vinyl plank flooring has become a popular choice for homeowners due to its durability, water resistance, ease of maintenance, and relatively straightforward installation process. Installing vinyl plank flooring over concrete requires careful preparation and adherence to best practices to ensure a long-lasting and aesthetically pleasing result. This article outlines the steps involved in successfully installing vinyl plank flooring on a concrete subfloor.
Preparation is Key
The most critical aspect of any flooring installation is the preparation of the subfloor. A poorly prepared subfloor can lead to numerous problems, including uneven flooring, compromised adhesive bonds, and premature wear. The first step involves assessing the concrete slab's condition and addressing any issues that could impede the installation process.
The initial assessment should involve a thorough visual inspection looking for cracks, holes, or other surface imperfections. Small cracks (less than 1/8 inch) are common in concrete and can often be filled with a concrete patching compound. Larger cracks, or those that exhibit movement, may indicate a more serious structural problem requiring professional evaluation and repair. Holes and gouges also need to be filled with a suitable concrete patching material.
Another critical aspect of preparation involves testing the concrete's moisture content. Excessive moisture can cause vinyl plank flooring to buckle, warp, or develop mold and mildew underneath. Several methods can be used to test moisture levels, including the calcium chloride test (also known as the anhydrous calcium chloride test) and the relative humidity (RH) test. The calcium chloride test involves placing a measured amount of calcium chloride on the concrete surface under a sealed dome for a specified period. The weight gain of the calcium chloride is used to calculate the moisture vapor emission rate (MVER). The RH test involves drilling small holes in the concrete and inserting probes to measure the relative humidity within the slab. Most vinyl plank flooring manufacturers specify maximum allowable moisture levels for their products; adhering to these guidelines is crucial for warranty compliance and long-term performance.
Once the moisture testing is complete and any necessary repairs have been made, the concrete subfloor needs to be thoroughly cleaned. This involves removing any dirt, debris, paint, adhesive residue, or other contaminants that could interfere with the adhesion of the vinyl plank flooring. Sweeping, vacuuming, and scrubbing with a neutral pH cleaner are usually sufficient for routine cleaning. For stubborn residue, chemicals designed to remove adhesives or coatings might be necessary, but always consulting the flooring manufacturer and adhesive instructions is paramount.
Finally, ensuring the concrete is level is essential. Significant deviations in levelness can cause the vinyl plank flooring to flex and eventually come apart. A self-leveling compound can be used to correct minor variations in levelness. This compound is poured onto the concrete and spreads out to fill low spots, creating a smooth, even surface. The self-leveling compound must be allowed to dry completely before proceeding with the flooring installation, following the manufacturer's instructions carefully.
Selecting the Right Materials and Tools
Choosing the appropriate materials and tools is essential for a successful vinyl plank flooring installation. The selection of vinyl plank flooring itself is determined by factors such as budget, desired aesthetic, intended use of the space, and performance requirements. Vinyl plank flooring comes in a variety of thicknesses, wear layers, and installation methods. Thicker planks and thicker wear layers generally offer greater durability and resistance to wear and tear. Installation methods include click-lock (also known as floating) and glue-down. Click-lock planks interlock together, forming a floating floor that is not directly adhered to the subfloor. Glue-down planks are adhered to the concrete using a special adhesive.
For glue-down installations, selecting the correct adhesive is crucial. The adhesive must be compatible with both the vinyl plank flooring and the concrete subfloor. Manufacturers typically recommend specific adhesives for their products; using a non-recommended adhesive could compromise the bond strength and void the warranty. The adhesive application rate is also important; applying too little adhesive can result in loose planks, while applying too much can prevent proper bonding. Manufacturers' instructions will specify the recommended application rate.
Beyond the flooring and adhesive, various tools are needed for the installation. These tools typically include a measuring tape, a straight edge, a utility knife or scoring tool, a tapping block, a rubber mallet, spacers, and safety glasses. A measuring tape is used to accurately measure the room and plan the layout of the flooring. A straight edge is used to guide the utility knife or scoring tool when cutting planks. A tapping block and rubber mallet are used to gently tap the planks together to ensure a tight, seamless fit. Spacers are placed around the perimeter of the room to allow for expansion and contraction of the flooring due to temperature and humidity changes. Safety glasses should always be worn to protect the eyes from debris.
Depending on the size and complexity of the room, additional tools may be helpful, such as a knee pad for comfort during installation, a jigsaw or circular saw for making complex cuts, and a moisture meter to verify the subfloor's dryness. A self-leveling compound applicator may also be beneficial when using self-leveling compounds to ensure uniform application.
The Installation Process
Once the subfloor is properly prepared and the necessary materials and tools are on hand, the actual installation process can begin. The initial step involves acclimating the vinyl plank flooring to the room's temperature and humidity for at least 48 hours before installation. This allows the flooring to expand or contract, preventing future issues such as buckling or gaps. The flooring should be stored flat in the room where it will be installed.
Next, planning the layout is essential. This involves determining the direction in which the planks will be installed and how they will be arranged. It is generally recommended to install the planks parallel to the longest wall of the room to create a more visually appealing effect. Planning the layout also involves calculating how many rows of planks will be needed to cover the room and how wide the last row of planks will need to be cut. It's generally favorable to avoid very narrow strips along the edges of the room, so adjusting the starting point of the first row of planks accordingly is conducive.
For click-lock installations, the first row of planks is typically installed along a straight edge, such as a wall. Spacers are placed between the planks and the wall to allow for expansion and contraction. The planks are then interlocked together, following the manufacturer's instructions. A tapping block and rubber mallet are used to gently tap the planks together to ensure a tight, seamless fit.
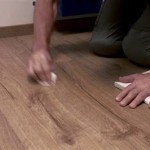
For glue-down installations, the adhesive is applied to the concrete subfloor using a trowel with the appropriate notch size, as specified by the adhesive manufacturer. The vinyl planks are then carefully placed onto the adhesive, ensuring they are properly aligned. A roller is often used to press the planks firmly into the adhesive, ensuring a strong bond. Excess adhesive should be wiped away immediately with a damp cloth.
As each row of planks is installed, it is essential to check for alignment and levelness. Any misaligned or uneven planks should be corrected immediately. When cutting planks to fit around obstacles such as pipes or doorways, a template can be helpful. A template can be made from cardboard or paper and used to trace the shape of the obstacle onto the plank. The plank can then be cut using a utility knife or scoring tool, jigsaw or circular saw.
After the flooring has been installed, the spacers are removed, and baseboards or molding is installed to cover the expansion gap around the perimeter of the room. This provides a finished look and protects the edges of the flooring. The flooring should be allowed to cure for at least 24 hours before heavy furniture or foot traffic is allowed.
Proper installation of vinyl plank flooring on concrete requires meticulous preparation, careful material selection, and adherence to manufacturer's instructions. By following these guidelines, a durable and attractive flooring installation can be achieved, enhancing the aesthetic appeal and functionality of the space.

How To Prepare A Concrete Floor For Vinyl Flooring Parrys

How To Install Vinyl Plank Flooring On Concrete Step By Guide

How To Install Vinyl Plank Flooring On Concrete Step By Tutorial

Tips For Installing Vinyl Plank Over Concrete Floors Lemon Thistle

Easy Ways To Install Vinyl Plank Flooring On Concrete

Tips And Tricks For Installing Vinyl Plank Over Concrete Floors Riverbend Interiors

10 Beginner Mistakes Installing Vinyl Plank Flooring

How To Install Vinyl Or Laminate Floors In A Basement Over Concrete Slab

How To Install Vinyl Plank Flooring On Concrete Base

Laying Vinyl Planks The Right Way Expert Guide By Fantastic Handyman
Related Posts