How to Install Non-Adhesive Vinyl Flooring
Non-adhesive vinyl flooring is a popular choice for DIY homeowners because it is easy to install and maintain. It is also a durable and affordable option that can last for many years. If you are considering installing non-adhesive vinyl flooring, here is a step-by-step guide to help you get started.
Materials and Tools You'll Need:
- Non-adhesive vinyl flooring
- Underlayment
- Utility knife
- Straight edge
- Tape measure
- Chalk line
- Tapping block
- Hammer
Step 1: Prepare the Subfloor
The first step is to prepare the subfloor. The subfloor should be clean, dry, and level. If the subfloor is not level, you will need to level it using a self-leveling compound.
Step 2: Install the Underlayment
Once the subfloor is prepared, you need to install the underlayment. The underlayment will help to protect the vinyl flooring from moisture and wear and tear. It will also help to reduce noise and improve the sound quality of the room.
Step 3: Cut the Vinyl Flooring
The next step is to cut the vinyl flooring to size. You can use a utility knife and a straight edge to cut the flooring. Be sure to measure the room carefully before cutting the flooring. You do not want to cut the flooring too short or too long.
Step 4: Lay the Vinyl Flooring
Once the flooring is cut to size, you can start laying it down. Start by laying down the first row of flooring along one wall of the room. Be sure to leave a small gap between the wall and the flooring. This gap will allow the flooring to expand and contract as the temperature changes.
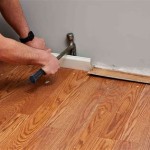
Step 5: Tap the Vinyl Flooring into Place
Once the first row of flooring is laid down, you can start tapping the rest of the flooring into place. Use a tapping block and a hammer to tap the flooring into place. Be sure to tap the flooring evenly so that it is properly secured.
Step 6: Trim the Excess Flooring
Once the flooring is installed, you will need to trim the excess flooring around the edges of the room. You can use a utility knife to trim the flooring. Be sure to cut the flooring carefully so that you do not damage the flooring.
Step 7: Clean the Floor
The final step is to clean the floor. You can use a vacuum cleaner or a mop to clean the floor. Be sure to use a cleaner that is specifically designed for vinyl flooring.
Congratulations! You have now successfully installed non-adhesive vinyl flooring.

10 Beginner Mistakes Installing Vinyl Plank Flooring

Laying Vinyl Planks The Right Way Expert Guide By Fantastic Handyman

How To Install L And Stick Vinyl Plank Flooring The Nifty Nester

A Beginner S Guide To Installing Vinyl Plank Flooring Dumpsters Com

How To Lay Vinyl Flooring Sheets Tiles And Planks Tarkett

How To Install Vinyl Plank Flooring The Home Depot

Trafficmaster Ceramica 12 X 24 Vinyl Tile Floor Installation

What Is Loose Lay Vinyl Flooring A Plank Guide Reallyfloors America S Est Hardwood

Installing Vinyl Plank Flooring For Beginners Anika S Diy Life

How To Install L And Stick Vinyl Tiles Houseful Of Handmade
Related Posts