Glue Down Wood Flooring On Concrete: A Comprehensive Guide
Installing wood flooring on concrete is a popular choice for homeowners, offering a beautiful and durable finish. While there are various methods for installing wood flooring on concrete, glue-down installation is a favored option for its strength, stability, and ease of installation. This article provides a comprehensive guide to the process, exploring its benefits, considerations, and step-by-step instructions.
Benefits of Glue-Down Wood Flooring on Concrete
Choosing glue-down installation for wood flooring on concrete presents several benefits: *
Durability:
The strong adhesive bond between the flooring and concrete subfloor creates a robust and stable installation, resisting movement and wear. *Stability:
The adhesive helps to prevent the floorboards from shifting, warping, or buckling, ensuring a long-lasting and even surface. *Noise Reduction:
Glue-down installation can effectively reduce sound transmission, making it an ideal choice for multi-story homes or spaces where noise control is crucial. *Versatility:
Glue-down wood flooring can be used in various applications, from residential homes to commercial spaces. *Moisture Barrier:
The glue-down method acts as a moisture barrier, protecting the wood flooring from moisture rising from the concrete subfloor.Considerations for Glue-Down Wood Flooring on Concrete
Before embarking on a glue-down wood flooring installation, it's crucial to carefully consider the following factors: *
Subfloor Condition:
The concrete subfloor should be clean, dry, flat, and free of cracks or unevenness. Any imperfections can affect the installation and the longevity of the flooring. *Moisture Levels:
The concrete subfloor must meet specific moisture content levels to prevent warping and damage to the wood flooring. Depending on your location and climate, you may need to perform a moisture test. *Type of Flooring:
Not all wood flooring is suitable for glue-down installation. Consult with a flooring specialist to verify the compatibility of your chosen flooring type. *Environmental Conditions:
Ensure the room temperature and humidity levels are suitable for both the glue and the wood flooring during installation. *Tools and Materials:
You'll need specific tools and materials for glue-down installation, including a moisture meter, a concrete scraper, a trowel, a rubber mallet, and the appropriate adhesive.Step-by-Step Guide to Glue-Down Wood Flooring on Concrete
The following steps outline the process of installing glue-down wood flooring on concrete:
1. Prepare the Concrete Subfloor:
*Clean the Subfloor:
Remove all dust, debris, dirt, and existing coatings using a vacuum cleaner or a damp cloth. *Repair Imperfections:
Fill any cracks or holes in the concrete using a suitable patching compound. *Level the Subfloor:
If the subfloor is uneven, level it using a self-leveling compound or a concrete screed. *Address Moisture Issues:
If the concrete subfloor exhibits high moisture levels, consider using a moisture barrier or a vapor retarder.2. Acclimate the Wood Flooring:
*Store the flooring:
Store the wood flooring in the room where it will be installed for at least 48 hours to allow it to acclimate to the temperature and humidity levels. *Avoid direct sunlight:
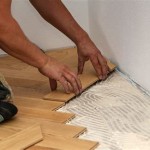
Protect the flooring from direct sunlight and heat sources.3. Apply the Adhesive:
*Choose the right adhesive:
Select a high-quality, moisture-resistant adhesive specifically designed for wood flooring on concrete. *Use a trowel:
Apply the adhesive to the concrete subfloor using a notched trowel, ensuring an even spread. *Follow manufacturer instructions:
Refer to the adhesive manufacturer's instructions for drying time and application specifics.4. Install the Wood Flooring:
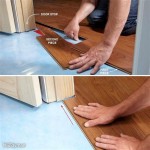
*Start at a wall:
Begin installing the wood flooring from a wall, leaving a small expansion gap between the flooring and the wall. *Use a tapping block:
Use a rubber mallet or tapping block to gently tap the flooring into place. *Maintain spacing:
Ensure consistent spacing between the flooring boards using spacers. *Check for level:
Regularly check the level of the flooring using a leveler to ensure an even surface.5. Secure the Edges:
*Use cleats or nails:
Secure the perimeter pieces of flooring using cleats or nails designed for glue-down installations. *Cut and fit:
Cut any remaining pieces of flooring to fit the remaining areas.6. Allow the Adhesive to Cure:
*Follow manufacturer instructions:
Allow the adhesive to fully cure according to the manufacturer's recommendations, typically 24-48 hours. *Avoid heavy traffic:
Minimize foot traffic on the flooring during the curing process.7. Finishing Touches:
*Apply sealant:
Once the adhesive has cured, apply a sealant to protect the flooring from scratches, stains, and moisture damage. *Install trim:
Install baseboards or other trim pieces to complete the installation.
Installing Hardwood Floors On Concrete Subfloors

How To Install Engineered Wood Flooring On Concrete

Can You Glue Hardwood Flooring To Concrete

How To Install Engineered Wood Flooring On Concrete

Can You Glue Down Solid Wood Flooring Hardwood Guide Reallyfloors America S Est

Fitting Hardwood Floor To Concrete Wood And Beyond Blog

Installing Engineered Hardwood On Concrete Twenty Oak

Installing Engineered Hardwood On Concrete Twenty Oak

Is It Possible To Put Hardwood Over A Concrete Subfloor Quora

Glue Wood Flooring To A Concrete Slab Fine Homebuilding
Related Posts