Brown Paper Bag Flooring On Concrete Slab: A Comprehensive Guide
Brown paper bag flooring, a unique and increasingly popular alternative to traditional flooring materials, offers an appealing blend of rustic aesthetics, affordability, and relative ease of installation. This flooring type, particularly when applied over a concrete slab, presents a distinctive and durable surface treatment. This article aims to provide a comprehensive understanding of brown paper bag flooring on concrete slabs, covering preparation, installation, sealing, and maintenance.
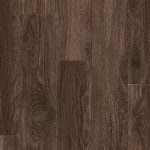
The allure of brown paper bag flooring lies in its textured, mottled appearance, resembling leather or aged parchment. It provides a warm, inviting atmosphere, making it suitable for various interior design styles, from farmhouse to modern industrial. Furthermore, the use of readily available materials, like brown paper bags and readily available adhesives, contributes to its cost-effectiveness. While the process requires patience and attention to detail, it is a manageable DIY project for those with basic construction skills.
Preparing the Concrete Slab
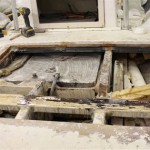
Proper preparation of the concrete slab is crucial for the longevity and success of brown paper bag flooring. The concrete surface must be clean, level, and free from any contaminants that could interfere with adhesion. This involves a multi-step process to ensure optimal conditions for the paper application.
The first step is cleaning. This typically involves sweeping the slab to remove loose debris, followed by scrubbing with a concrete cleaner to eliminate dirt, grease, and other surface impurities. It is essential to choose a cleaner specifically formulated for concrete to avoid damaging the surface or leaving behind residues that could impede bonding. Thorough rinsing with clean water is necessary after cleaning to remove any remaining cleaner.
Leveling the concrete slab is equally important. Any cracks, holes, or uneven areas must be addressed before applying the brown paper. Minor imperfections can be filled with a concrete patching compound. For larger cracks or significant unevenness, self-leveling concrete may be required. This ensures a smooth, consistent surface for the paper bag flooring, preventing future cracking or peeling.
After cleaning and leveling, the concrete slab should be allowed to dry completely. This may take several days, depending on the humidity and temperature. The moisture content of the concrete is crucial; excessive moisture can lead to mold growth and adhesive failure. A moisture meter can be used to verify that the concrete is sufficiently dry before proceeding.
Finally, priming the concrete slab is recommended to improve adhesion. A concrete primer or bonding agent creates a stronger bond between the concrete and the adhesive used to adhere the paper bags. The primer should be applied according to the manufacturer’s instructions and allowed to dry completely before beginning the installation process.
Installing the Brown Paper Bag Flooring
The installation of brown paper bag flooring is a multi-stage process that involves preparing the paper bags, applying the adhesive, laying the paper, and compressing the surface. Each step requires precision and attention to detail to achieve a durable and aesthetically pleasing result.
The first step involves preparing the paper bags. This involves crumpling the brown paper bags to create texture and soften the paper. The extent of crumpling depends on the desired aesthetic; more crumpling will result in a more textured, rustic appearance. The bags are then torn into various sizes and shapes. Consistency in size and shape is not crucial; in fact, variations contribute to the natural, organic look of the flooring. Removing any excessive tape or labels from the bags is also necessary.
Next, the adhesive is applied to the concrete slab. A thin, even layer of adhesive is crucial for proper bonding. A good quality construction adhesive or wallpaper paste is typically used. The adhesive should be applied to a manageable section of the floor at a time, usually a few square feet, to prevent it from drying out before the paper is applied. The type of adhesive should be carefully selected to ensure compatibility with both the concrete and the paper bags.
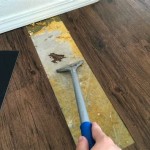
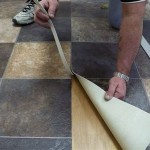
The torn pieces of brown paper bag are then carefully laid onto the adhesive-covered surface. Overlapping the edges of the paper pieces is essential to create a seamless and durable surface. The amount of overlap will influence the overall texture and appearance of the floor. It is important to vary the placement of the paper pieces to avoid creating a repetitive pattern. During this step, air bubbles should be carefully removed by smoothing the paper with hands or a roller.
Once the paper is laid, it needs to be compressed into the adhesive to ensure proper bonding. This is typically done using a heavy roller or a hand roller. Applying consistent pressure across the entire surface flattens the paper and eliminates any air pockets. This step is critical for preventing the paper from lifting or peeling over time.
After compressing the paper, allow the adhesive to dry completely, as recommended by the manufacturer. This may take several hours or even overnight, depending on the adhesive type and environmental conditions. Avoid walking on the flooring during the drying process to prevent damage or distortion.
Sealing and Maintaining the Flooring
Sealing the brown paper bag flooring is essential to protect it from moisture, stains, and wear. The sealer creates a durable, waterproof barrier that extends the lifespan of the flooring and makes it easier to clean. Regular maintenance is also necessary to keep the flooring looking its best for years to come.
Prior to sealing, ensure the adhesive is fully cured and the paper is completely dry. Clean the surface thoroughly to remove any dust, debris, or imperfections. A light sweep or vacuum is usually sufficient. It is important to avoid using harsh cleaners or solvents that could damage the paper or interfere with the sealer.
The selection of the sealer is a critical decision. Polyurethane sealers are a popular choice due to their durability and water resistance. Water-based polyurethane sealers are often preferred for their low odor and ease of application. Epoxy sealers offer exceptional durability and chemical resistance but may require professional application due to their complex mixing and application requirements. The chosen sealer should be specifically formulated for use on floors and compatible with the adhesive used in the installation process.
Apply the first coat of sealer according to the manufacturer's instructions. Typically, this involves using a brush, roller, or sprayer to apply a thin, even coat across the entire surface. Avoid applying the sealer too thickly, as this can lead to uneven drying and potential bubbling. Allow the first coat to dry completely before applying subsequent coats, typically 2-3 coats are recommended.
Between coats, lightly sand the surface with fine-grit sandpaper to create a smooth, even finish and improve adhesion for the next coat. Remove any sanding dust before applying the next coat of sealer. This step is particularly important for achieving a professional-looking result.
After the final coat of sealer has dried, allow the flooring to cure for the recommended duration before heavy use. This curing period allows the sealer to fully harden and develop its maximum durability. Avoid placing heavy furniture or walking on the flooring excessively during the curing process.
Regular maintenance of brown paper bag flooring involves sweeping or vacuuming regularly to remove dirt and debris. Damp-mopping with a mild detergent is also recommended to clean the surface. Avoid using harsh chemicals or abrasive cleaners, as these can damage the sealer and the paper underneath. Promptly wipe up any spills to prevent staining. Applying a fresh coat of sealer every few years can help maintain the flooring's appearance and protect it from wear and tear.
Addressing potential problems such as scratches or damaged areas is also important. Minor scratches can often be repaired with a touch-up pen or by applying a small amount of sealer to the affected area. More significant damage may require replacing the damaged section of paper bag and resealing the area.

How To Make A Paper Bag Floor Diy Instructions

Paper Bag Floors A Step By Tutorial Wildfire Interiors

Paper Bag Floors A Step By Tutorial Wildfire Interiors

Brown Paper Bag Floor On Concrete And Wood A Simple Guide To Inexpensive Be New York By Home Houzz Ie

A Simple Guide To Inexpensive And Beautiful Floor Techniques Home

Simple Brown Paper Bag Floor Diy Projects The Budget Decorator

Paper Bag Flooring

Paper Bag Floors A Step By Tutorial Wildfire Interiors

Diy Paper Bag Floors That Look Like Stained Concrete

Diy Earth Bag Patio With Paper Floor
Related Posts