Installing Sheet Vinyl Flooring Over Concrete
Sheet vinyl flooring is a popular choice for many homeowners due to its durability, water resistance, and relatively low cost. It is a versatile flooring solution suitable for various areas, including kitchens, bathrooms, laundry rooms, and basements. Installing sheet vinyl over concrete requires careful preparation and adherence to specific techniques to ensure a long-lasting and aesthetically pleasing result. This article provides a comprehensive guide to the process, covering essential steps from assessing the concrete subfloor to the final finishing touches.
Successful sheet vinyl installation begins with a thorough evaluation of the concrete subfloor. Concrete, being a porous material, can retain moisture, which can lead to adhesion problems and promote mold or mildew growth beneath the vinyl flooring. Identifying and addressing any existing issues is paramount for a durable and successful installation.
Before commencing any installation work, it is crucial to ensure that the concrete surface is completely clean. Remove any existing flooring materials, adhesives, paint, or debris. This usually involves scraping, sweeping, and vacuuming the surface thoroughly. If there are stubborn adhesive residues, use an appropriate adhesive remover specifically designed for concrete surfaces. Follow the manufacturer's instructions and safety precautions when using any chemical products.
After cleaning, inspect the concrete slab for cracks, holes, or uneven areas. Small cracks (less than 1/8 inch) can often be filled with a concrete crack filler. Larger cracks and holes should be repaired with a concrete patching compound. Use a trowel to apply the patching compound smoothly, ensuring it is flush with the surrounding concrete surface. Allow the patching compound to dry completely according to the manufacturer's instructions before proceeding.
Leveling the concrete subfloor is essential for a professional-looking sheet vinyl installation. Sheet vinyl is thin and will conform to any imperfections in the underlying surface. Use a self-leveling concrete compound to create a smooth and even surface. This compound is typically a pourable mixture that spreads easily and levels itself. Follow the manufacturer's instructions carefully regarding mixing ratios and application techniques. Allow the self-leveling compound to cure completely before moving on to the next step.
Importance of Moisture Testing
Moisture testing is a critical step in preparing concrete for sheet vinyl installation. Concrete is porous and can absorb moisture from the ground, leading to problems with adhesion and potential mold growth. Perform a moisture test to determine the moisture content of the concrete slab. Several methods can be used for moisture testing, including the calcium chloride test (anhydrous calcium chloride test) and the relative humidity (RH) test. The calcium chloride test involves placing a measured amount of calcium chloride on the concrete surface under a sealed container for a specific period. The amount of moisture absorbed by the calcium chloride is then measured to determine the moisture vapor emission rate (MVER). The RH test involves drilling small holes into the concrete and inserting probes to measure the relative humidity within the slab. Consult with flooring professionals or testing equipment manufacturers to determine the appropriate moisture testing method and acceptable moisture levels for your specific sheet vinyl product.
If the moisture test reveals excessive moisture levels, moisture mitigation measures must be taken. This may involve applying a moisture barrier to the concrete surface. Moisture barriers are typically epoxy-based coatings or liquid-applied membranes that create a waterproof layer, preventing moisture from migrating to the vinyl flooring. Ensure the moisture barrier is compatible with both the concrete and the sheet vinyl adhesive. Follow the manufacturer's instructions for application and curing times.
Preparing the Sheet Vinyl
Once the concrete subfloor is properly prepared, the sheet vinyl needs to be prepared for installation. Unroll the sheet vinyl in a clean, dry area and allow it to acclimate to the room temperature for at least 24 to 48 hours. This allows the vinyl to expand or contract, preventing buckling or gapping after installation. The temperature of the room and the vinyl should be consistent during this acclimation period. Avoid exposing the vinyl to direct sunlight or extreme temperatures.
After acclimation, carefully measure the dimensions of the room where the sheet vinyl will be installed. Add a few extra inches to each measurement to allow for trimming and fitting. Transfer these measurements to the sheet vinyl and use a utility knife and a straight edge to cut the vinyl to the approximate size and shape. Always cut slightly larger than needed; it is easier to trim excess material than to add more.
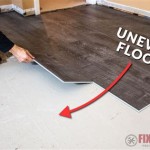
Dry-fit the sheet vinyl over the prepared concrete subfloor. Carefully position the vinyl and make any necessary adjustments to ensure a proper fit. Pay close attention to the corners, doorways, and any other architectural features. Use a utility knife to trim the vinyl as needed, leaving a small gap (approximately 1/8 inch) along the perimeter of the room for expansion and contraction.
Adhesive Application and Installation
The adhesive used to install sheet vinyl over concrete is crucial for a successful and long-lasting installation. Choose an adhesive that is specifically designed for sheet vinyl flooring and is compatible with concrete subfloors. Consult the sheet vinyl manufacturer's recommendations for the appropriate adhesive type. Water-based adhesives are generally preferred for their low VOC content and ease of use, but solvent-based adhesives may be necessary in certain situations, such as in areas with high moisture levels.
Apply the adhesive to the concrete subfloor using a notched trowel. Follow the adhesive manufacturer's instructions for the recommended trowel notch size and application rate. Apply the adhesive evenly and consistently, working in small sections to prevent it from drying out. Avoid applying adhesive to areas that will not be covered by the sheet vinyl.
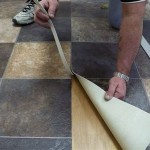
Carefully lay the sheet vinyl over the adhesive-covered concrete. Start at one edge of the room and gradually roll the vinyl out, pressing it firmly into the adhesive. Use a flooring roller to apply even pressure to the entire surface, ensuring that the vinyl is fully bonded to the adhesive. Work from the center of the vinyl outwards, removing any air pockets or bubbles. Wipe up any excess adhesive immediately with a damp cloth.
Once the sheet vinyl is fully adhered, use a utility knife and a straight edge to trim the excess vinyl along the perimeter of the room. Cut the vinyl carefully, leaving a small gap (approximately 1/8 inch) between the vinyl and the wall. This gap allows for expansion and contraction and prevents buckling or gapping. Use a seam roller to press the edges of the vinyl firmly against the wall.
For seams in large rooms, use a seam sealer to create a waterproof and durable bond between the vinyl sheets. Follow the seam sealer manufacturer's instructions for application and curing times. Clean up any excess seam sealer immediately with a damp cloth.
After the adhesive has fully cured (typically 24 to 72 hours), install baseboards or quarter-round molding around the perimeter of the room to cover the expansion gap and provide a finished look. Use nails or adhesive to attach the baseboards to the wall, ensuring they are securely fastened. Caulk the top edge of the baseboards to create a seamless transition between the baseboards and the wall.
Inspect the finished installation for any imperfections or problem areas. Address any issues promptly to prevent further damage or problems. Clean the sheet vinyl floor with a mild detergent and water. Avoid using harsh chemicals or abrasive cleaners, as these can damage the surface of the vinyl. Regular cleaning and maintenance will help keep the sheet vinyl floor looking its best for years to come.
By following these steps, homeowners or professionals can successfully install sheet vinyl flooring over concrete, creating a durable, water-resistant, and aesthetically pleasing surface. Proper preparation, careful installation techniques, and regular maintenance are essential for ensuring a long-lasting and satisfactory result.

Tips For Installing Vinyl Plank Over Concrete Floors Lemon Thistle

How To Prepare A Concrete Floor For Vinyl Flooring Parrys

How To Install Vinyl Or Laminate Floors In A Basement Over Concrete Slab

How To Install Sheet Vinyl Flooring

Concrete Subfloor Preparation For The Vinyl Floor Installation How To Diy Mryoucandoityourself

How To Install Vinyl Sheet Flooring Over Existing And Concrete

How To Install Sheet Vinyl Floor Decor Adventures

How To Lay Vinyl Sheet Flooring On Concrete

How To Lay Vinyl Flooring Sheets Tiles And Planks Tarkett
:strip_icc()/SCF_158_05-dfffc96f85aa46f19a8458e342856d97.jpg?strip=all "How To Install Vinyl Sheet Flooring That S Loose Lay In Hours")
How To Install Vinyl Sheet Flooring That S Loose Lay In Hours
Related Posts