How To Install Engineered Wood Flooring On Stairs
Installing engineered wood flooring on stairs can significantly enhance the aesthetic appeal and value of your home. This project, while achievable for the experienced DIYer, requires careful planning, precise measurements, and attention to detail. This guide provides a comprehensive overview of the process, outlining the necessary tools, materials, and steps involved in successfully installing engineered wood flooring on stairs.
Prior to commencing the installation, a thorough assessment of the existing staircase is crucial. Identify any structural weaknesses, uneven surfaces, or squeaks that need addressing. Addressing these issues beforehand ensures a stable and professional-looking final result. The existing stair treads and risers must be clean, dry, and level before any installation begins.
Key Point 1: Preparation is Paramount
The success of any flooring project, especially on stairs, hinges on meticulous preparation. This involves gathering the right tools, selecting appropriate materials, and thoroughly prepping the existing staircase. Rushing through this phase can lead to costly mistakes and an unsatisfactory finished product.
Tools and Materials Required:
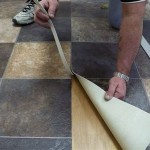
* Engineered wood flooring (sufficient quantity considering waste) * Stair treads and risers (engineered wood or matching material) * Construction adhesive specifically designed for wood flooring * Measuring tape * Pencil * Circular saw or miter saw * Jigsaw * Hammer or rubber mallet * Nail gun (optional, but recommended) * Level * Square * Safety glasses * Dust mask * Caulk gun * Wood filler * Sandpaper * Sealer (optional) * Stair tread gauge (optional, but highly recommended for curved or irregular stairs) * Shims (for leveling) * Painter's tapePreparing the Existing Staircase:
Begin by removing any existing flooring, such as carpet, vinyl, or old wood. Use a pry bar carefully to avoid damaging the underlying structure. Remove all staples, nails, and debris. Once the surface is clear, inspect the treads and risers for any damage or unevenness.
If the treads are uneven, use leveling compound to create a smooth, flat surface. Allow the leveling compound to dry completely according to the manufacturer's instructions. If the risers are not flush with the treads, use shims to create a consistent surface. Secure the shims with construction adhesive and screws.
For squeaky stairs, identify the source of the noise. Often, it's due to loose treads or risers. Apply construction adhesive between the tread and the stringer (the side support of the staircase) and then secure with screws. Repeat this process for the risers. Ensure the screws are countersunk to avoid interfering with the flooring installation.
Clean the entire staircase thoroughly, removing all dust and debris. A clean surface ensures proper adhesion of the new flooring. Consider applying a wood primer to the subfloor to enhance adhesion and prevent moisture absorption. This is particularly important in areas with high humidity.
Key Point 2: Precise Measurement and Cutting
Accuracy in measurement and cutting is crucial for a professional-looking installation. Incorrect measurements can lead to gaps, uneven edges, and wasted material. Taking the time to measure precisely and cut carefully will save time and money in the long run.
Measuring the Treads and Risers:
Measure each tread and riser individually. Staircases are rarely perfectly uniform, so avoid assuming that all treads and risers are the same size. Use a measuring tape to determine the length and width of each tread and the height of each riser. Record these measurements accurately.
For treads, measure the overall length from the front edge to the back. Also, measure the depth of the tread from the front edge to the riser. For risers, measure the height from the top of the tread below to the underside of the tread above. Remember to account for any overhang or nosing on the existing treads.
For stairs with curved or irregular shapes, consider using a stair tread gauge. This tool allows you to create a template of the tread, which can then be transferred to the engineered wood flooring for precise cutting. Alternatively, you can create a cardboard template by tracing the outline of the tread.
Cutting the Engineered Wood Flooring:
Using the measurements obtained, cut the engineered wood flooring to size using a circular saw or miter saw. Ensure the blade is sharp and appropriate for cutting wood flooring to minimize splintering. For curved or irregular shapes, use a jigsaw to cut along the template.
When cutting, always err on the side of caution by cutting slightly larger than the required size. You can then fine-tune the fit with a block plane or sandpaper. This allows for adjustments to ensure a perfect fit.
Before applying any adhesive, dry-fit the cut pieces to ensure they fit properly. Check for any gaps or uneven edges. Make any necessary adjustments before proceeding to the next step. Label each piece with its corresponding tread or riser number to avoid confusion during installation.
Key Point 3: Installation Techniques
Proper installation techniques are essential for achieving a durable and aesthetically pleasing result. Choosing the right adhesive, securing the flooring properly, and finishing the edges neatly are all critical aspects of the installation process.
Applying the Adhesive:
Apply a generous bead of construction adhesive to the back of the engineered wood flooring. Follow the manufacturer's instructions regarding the amount of adhesive to use and the recommended application pattern. Ensure the adhesive is specifically designed for wood flooring and is compatible with the type of engineered wood you are using.
Spread the adhesive evenly over the surface using a notched trowel. This creates a uniform layer of adhesive that ensures proper bonding. Pay particular attention to the edges and corners, ensuring they are adequately covered. Avoid applying too much adhesive, as this can squeeze out along the edges and create a mess.
Securing the Flooring:
Carefully position the engineered wood flooring on the tread or riser, aligning it with the edges and corners. Press firmly to ensure the adhesive makes full contact with the subfloor. Use a rubber mallet to gently tap the flooring into place. Work from the center outwards to avoid trapping air bubbles.
For added security, consider using a nail gun to secure the flooring to the subfloor. Use finishing nails and drive them at an angle to minimize visibility. Ensure the nails are countersunk to avoid interfering with the surface of the flooring. This is especially important for treads, which will be subjected to more wear and tear.
Finishing the Edges:
Once the flooring is secured, clean up any excess adhesive that may have squeezed out along the edges. Use a damp cloth to wipe away the adhesive before it dries. Fill any small gaps or imperfections with wood filler. Allow the wood filler to dry completely and then sand it smooth.
Caulk the edges of the flooring where it meets the wall or stringer. This creates a waterproof seal and provides a clean, finished look. Choose a caulk that matches the color of the flooring. Apply the caulk evenly using a caulk gun and then smooth it with your finger or a caulk smoothing tool.
Consider applying a sealer to the finished flooring to protect it from moisture and wear. Follow the manufacturer's instructions regarding the application of the sealer. Apply multiple coats for added protection. Allow the sealer to dry completely before using the stairs.
Addressing Nosing:
Stair nosing is the rounded edge that protrudes slightly over the riser. When installing engineered wood, you have several options for handling the nosing. You can purchase engineered wood nosing pieces that match your flooring, or you can create a custom nosing using the same engineered wood planks.
If using engineered wood nosing pieces, attach them to the edge of the tread using construction adhesive and finishing nails. Ensure the nosing is flush with the tread and riser. Caulk the edges to create a seamless transition.
If creating a custom nosing, carefully cut the engineered wood planks to the desired shape and size. Use a router to create a rounded edge. Attach the nosing to the tread using construction adhesive and finishing nails. Sand the edges smooth and caulk the seams.
Safety Precautions:
Throughout the installation process, prioritize safety. Wear safety glasses to protect your eyes from flying debris. Use a dust mask to avoid inhaling dust and fumes. Work in a well-ventilated area. Follow the manufacturer's instructions for all tools and materials.
Be careful when working with power tools. Use appropriate safety guards and practice proper techniques. Avoid distractions and take breaks when needed. If you are not comfortable with any aspect of the installation, consider hiring a professional.
Allow the adhesive and sealer to dry completely before using the stairs. This will ensure a strong bond and prevent damage to the finished flooring. Consider placing temporary stair treads or carpet runners to protect the flooring during the drying process.
By following these steps and taking your time, you can successfully install engineered wood flooring on stairs and create a beautiful and durable addition to your home.

Cladding A Staircase With Engineered Wood Flooring And Beyond Blog

Engineered Wood Flooring Up Close With Mikasa Staircase Solution Blog By

How To Make Stair Treads With Prefinished Flooring And Floormade Nosing Rw Supply Design

How To Install Laminate Flooring On Stairs Direct Wood

How To Install Wood Flooring On Stairs Esb

You Want To Install Hardwood On Stairs Reallyfloors America S Est Flooring

How To Install Laminate Flooring On Stairs Direct Wood

How To Install Laminate Flooring On Stairs 13 Steps

Can You Put Hardwood Flooring On Stairs Ll

How To Clad A Staircase Esb Flooring
Related Posts