How To Install Vinyl Plank Flooring on Concrete Steps
Installing vinyl plank flooring on concrete steps can dramatically elevate the look and feel of your home. This DIY project offers a durable, stylish, and relatively easy alternative to traditional carpet or tile. The process requires careful planning and preparation, including proper measurements, material selection, and tools. This article will provide a comprehensive guide on how to install vinyl plank flooring on concrete steps, ensuring a successful outcome.
1. Preparation and Measurement
Before beginning the installation, it's crucial to prepare the steps and gather the necessary materials.
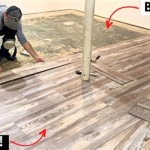
Step 1: Clean and Prep the Concrete:
Thoroughly clean the concrete steps with a degreaser and scrub brush to remove dirt, grime, and any loose debris. Allow the steps to dry completely before proceeding.Step 2: Assess the Condition:
Inspect the concrete steps for any cracks, uneven surfaces, or significant imperfections. Repair any cracks with a concrete patching compound and sand down any uneven areas to ensure a smooth surface.Step 3: Measure and Plan:
Accurately measure the width and depth of each step. Determine the number of vinyl planks needed, factoring in any waste or cuts required for fitting around corners or edges. Remember to add a few extra planks as a buffer for potential errors or future replacements.Step 4: Gather Materials and Tools:
Purchase premium quality vinyl planks, underlayment, and adhesive. Choose a high-quality adhesive designed for vinyl plank flooring on concrete. Gather essential tools, including a utility knife, tape measure, level, pencil, saw, and a rubber mallet.2. Underlayment and Adhesive Application
The underlayment acts as a cushion between the vinyl planks and the concrete, providing a more comfortable walking surface and reducing noise transmission. Adhesive is crucial for securing the planks to the concrete, ensuring a durable and long-lasting installation.
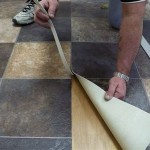
Step 1: Install the Underlayment:
Unroll the underlayment on each step, ensuring it's properly aligned and secured. Use a utility knife to trim the underlayment to the desired size, leaving a slight overlap between each section. Secure the underlayment with adhesive tape, ensuring overlapping edges are firmly taped to prevent gaps or movement.Step 2: Apply the Adhesive:
Apply the adhesive to the underlayment, following the manufacturer's instructions. Use a notched trowel to distribute the adhesive evenly, ensuring full coverage. Allow the adhesive to cure slightly, following the adhesive product's instructions.3. Vinyl Plank Installation
With the underlayment and adhesive prepared, you can now begin installing the vinyl planks on the steps.
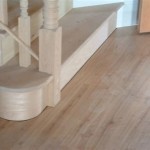
Step 1: Start at the Bottom:
Begin installing the first plank at the bottom of the first step, aligning it with the edge of the step. Use a level to ensure the plank is straight and horizontal. Secure the plank to the adhesive, pressing firmly along its entire length.Step 2: Install Subsequent Planks:
Install the subsequent planks in a staggered pattern, ensuring each plank’s joint aligns with the center of the previous plank. This staggered pattern prevents gaps and creates a more aesthetically pleasing look. Use a rubber mallet to tap the planks into place, gently ensuring a tight fit against adjacent planks.Step 3: Cut and Fit Planks around Corners and Edges:
Use a utility knife or saw to cut the planks to fit around corners, edges, or any irregular shapes. Measure carefully and cut the planks to ensure a precise fit.Step 4: Secure the Planks:
Once all the planks are laid, apply pressure to the planks, starting at the bottom step and working your way up. This ensures all planks are firmly adhered to the adhesive. Allow the adhesive to cure completely according to the manufacturer's instructions.4. Finishing Touches
After the adhesive has cured, it's time to add the finishing touches to your newly installed vinyl plank flooring.
Step 1: Clean and Protect:
Clean the floor thoroughly to remove any adhesive residue or debris. Apply a sealant or protective coating, following the manufacturer's instructions. This will help to protect the vinyl planks from scratches, stains, and wear.Step 2: Add Transition Strips:
Install transition strips to match the existing flooring in adjacent areas. These strips provide a smooth transition between the vinyl plank flooring and other floor coverings.Step 3: Enjoy Your New Flooring:
Now that your vinyl plank flooring is installed, you can stand back and admire your newly renovated steps. Enjoy the durability, style, and easy maintenance of your new flooring.
Easy Ways To Install Vinyl Plank Flooring On Concrete

Easy Ways To Install Vinyl Plank Flooring On Concrete

Easy Ways To Install Vinyl Plank Flooring On Concrete

Easy Ways To Install Vinyl Plank Flooring On Concrete

Easy Ways To Install Vinyl Plank Flooring On Concrete

How To Prepare A Concrete Floor For Vinyl Flooring Parrys

Installing Vinyl Plank Flooring For Beginners Anika S Diy Life

Easy Ways To Install Vinyl Plank Flooring On Concrete

How To Install L And Stick Vinyl Plank Flooring The Nifty Nester

How To Install Vinyl Plank Flooring As A Beginner Home Renovation
Related Posts