Nailing Wood Flooring to Concrete: A Comprehensive Guide
Installing wood flooring directly to concrete is a practical and durable solution for many homes. By adhering to the proper techniques and using the correct materials, you can achieve a beautiful and long-lasting floor that will enhance your living space.
Preparation:
To ensure a successful installation, thorough preparation is crucial. Begin by cleaning and inspecting the concrete slab to remove any dirt, debris, or imperfections. Next, apply a vapor barrier to prevent moisture from seeping into the flooring from the concrete. This step is especially important in areas with high humidity or moisture levels.
Underlayment:
An underlayment layer provides cushioning and insulation beneath the wood flooring. It helps to distribute weight evenly, reducing the risk of squeaking or damage. Choose an underlayment compatible with your flooring and the concrete surface. Installing it according to the manufacturer's instructions is essential.
Nailed Installation:
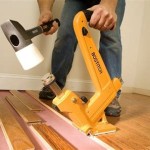
To nail wood flooring to concrete, you will need a brad nailer and appropriate nails. Ensure that the nails are designed for both wood and concrete. Start by securing the first row of planks along the longest wall, leaving a small gap around the perimeter for expansion. Use a spacer block to maintain an even gap between the planks.
Continue nailing each row, staggering the joints to enhance the floor's strength. Drive the nails at a slight angle, approximately 45 degrees, and countersink them just below the surface of the wood. Ensure that the nails are spaced evenly and penetrate the concrete sufficiently without overdriving them.
Glue Down Installation (Optional):
For added stability, you can choose to glue down the wood flooring to the concrete in addition to nailing it. Apply a high-quality wood flooring adhesive to the underlayment before placing the planks. Follow the adhesive manufacturer's instructions carefully to ensure optimal bonding.
Sanding and Finishing:
Once the flooring is installed, allow it to cure for the specified period before sanding and finishing. This process involves removing any imperfections, smoothing the surface, and preparing it for the final finish. Use a drum sander or a floor sander to sand the floor, starting with coarse grit and progressively moving to finer grits to achieve a smooth finish.
Finally, apply a protective finish to protect the floor from wear and tear. You can choose from various options such as polyurethane, oil-based finishes, or water-based finishes. Follow the manufacturer's instructions for application and ensure proper ventilation during the process.

Installing Wood Flooring Over Concrete Diy

Installing Engineered Hardwood On Concrete Twenty Oak

Installing Hardwood Floors On Concrete Subfloors

Q A Solid Wood Floors Over Concrete Slabs Jlc

How To Install Engineered Wood Flooring On Concrete

Installing Engineered Hardwood On Concrete Twenty Oak
Can You Put Wood Flooring Over A Concrete Slab Instead Of Using Cement Board Quora

Installing Wood Flooring On A Concrete Sub Floor Esb

Hardwood Floors Over Concrete

Installing Wood Subfloors Over Concrete Hardwood Floors
Related Posts


