Laying Parquet Flooring on Chipboard: A Complete Guide
Parquet flooring, with its timeless elegance and durability, is a popular choice for both residential and commercial spaces. While it is traditionally laid on plywood subfloors, chipboard offers a reliable alternative. In this comprehensive guide, we will delve into the essential aspects of laying parquet flooring on chipboard, ensuring a seamless and professional-looking installation.
1. Preparing the Chipboard Subfloor
Before installing the parquet flooring, it is crucial to prepare the chipboard subfloor to ensure a level and stable base. Begin by checking the subfloor for any unevenness, gaps, or loose boards. Sand or plane the subfloor as necessary, creating a smooth and level surface. Fill any gaps or cracks with a suitable filler and allow it to dry completely.
2. Installing a Moisture Barrier
Moisture can wreak havoc on parquet flooring, causing warping and buckling. Installing a moisture barrier between the chipboard subfloor and the parquet is essential for preventing moisture penetration. Use a polyethylene plastic sheeting with a minimum thickness of 0.15 mm (6 mils). Overlap the sheeting by at least 150 mm (6 inches) at all joints and tape the seams with strong tape.
3. Laying the Parquet Flooring
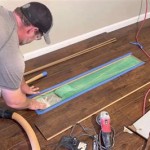
Now it's time to lay the parquet flooring. Start by determining the desired orientation and layout of the boards. Use a chalk line or laser level to mark the starting line on the subfloor. Apply a thin layer of flooring adhesive to the subfloor using a notched trowel. Begin laying the parquet boards from the starting line, ensuring they fit snugly together.
4. Tapping and Spacing
Once the parquet boards are in place, use a tapping block and a hammer to gently tap them into position. This will ensure a tight fit and eliminate any gaps between the boards. Use spacers to maintain consistent spacing between the rows and columns of parquet boards.
5. Cutting and Trimming
To fit the parquet flooring around obstacles or irregular areas, you may need to cut or trim some boards. Use a sharp utility knife or a miter saw for clean and precise cuts. Measure and mark the boards carefully before cutting. Always wear appropriate safety gear when operating power tools.
6. Sanding and Finishing
After the parquet flooring is installed, sand the entire surface to remove any unevenness or imperfections. Use a sanding machine equipped with sandpaper of varying grits, starting with a coarse grit and gradually moving to finer grits. Finally, apply an appropriate sealant or finish to protect the parquet flooring from wear and tear.
Conclusion
Laying parquet flooring on chipboard requires careful preparation and precision. By following the steps outlined in this guide, you can achieve a beautiful and long-lasting parquet flooring installation that will enhance the aesthetics of your space for years to come. Remember to use high-quality materials, wear appropriate safety gear, and take your time throughout the process.

Laying Parquet Flooring On Birch Plywood Sfk

Nail Or Glue Wood Flooring Installation Method

Diy Laying Engineered Oak Parquet Flooring Swoon Worthy

How To Install Parquet Tile The Home Depot

How To Install Parquet Tile The Home Depot

Diy Laying Engineered Oak Parquet Flooring Swoon Worthy

Installation Methods For Wooden Floor Craftedforlife

Diy Laying Engineered Oak Parquet Flooring Swoon Worthy
.jpg?strip=all)
Why Preparation Work Is So Important When Installing Parquet Flooring

Why Preparation Work Is So Important When Installing Parquet Flooring

