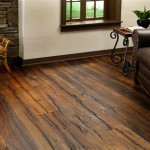
Lifescapes Premium Hardwood Flooring Installation Instructions: A Comprehensive Guide
Installing Lifescapes premium hardwood flooring is a rewarding project that can transform the look and feel of your home. To ensure a successful installation, it's crucial to follow the manufacturer's instructions carefully. Here's a comprehensive guide to help you through the process:
Pre-Installation Preparations
Before getting started, prepare the subfloor by ensuring it's level, flat, and free of any protrusions or defects. The moisture content of the subfloor and hardwood flooring should be within the manufacturer's recommended range. Allow the hardwood flooring to acclimate to the installation environment for 3 to 7 days by storing it in the same room where it will be installed.
Installation Steps
1. Underlayment Installation
If desired, install an underlayment to provide additional moisture protection, sound absorption, or thermal insulation. Follow the underlayment manufacturer's instructions for installation.
2. Plank Arrangement
Stagger the planks by at least 6 inches to ensure a strong and durable floor. Avoid installing planks directly opposite one another to reduce any potential weaknesses.
3. Start Row Installation
Begin laying the first row of planks along the longest wall of the room. Use a spacer or pull bar to maintain a consistent gap between the planks and the wall (approximately 1/4 inch to 3/8 inch). Secure the planks to the subfloor using the recommended fasteners.
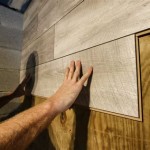
4. Continue Laying Planks
Continue laying the planks row by row, following the staggering pattern and nailing or stapling each plank securely. Ensure that the planks are tightly fitted together and there are no gaps or inconsistencies.
5. Final Row Installation
For the final row, cut the planks to the appropriate width to fit the space. Tap or pry the planks into place using a tapping block or pry bar. Secure the planks to the subfloor with the appropriate fasteners.
6. Trim and Molding Installation
Once the flooring is installed, install any necessary trim and molding to cover the expansion gap and enhance the overall appearance of the floor.
Post-Installation Care
After installation, allow the floor to rest undisturbed for 24 to 48 hours before walking or moving heavy objects on it. Clean the floor regularly using a microfiber cloth or a pH-neutral cleaner specifically designed for hardwood floors. Avoid using abrasive cleaning products or excessive moisture, as these can damage the finish.
By following these instructions carefully, you can ensure a successful Lifescapes premium hardwood flooring installation that will enhance the beauty and durability of your home for many years to come.

How To Install Lock Engineered Hardwood Flooring

How To Install Lock Engineered Hardwood Flooring

Lifescape Device Database

How To Install Lock Engineered Hardwood Flooring

How To Install Engineered Hardwood Floors 4 Easy Installation Options

How To Install Solid Hardwood Floors

3 Methods For How To Install Engineered Hardwood Flooring

How To Install Engineered Hardwood Flooring

Your Flooring Source Lifescape Designs

How To Install Engineered Hardwood Flooring
Related Posts