How to Install Armstrong No Glue Vinyl Flooring
Armstrong No Glue Vinyl Flooring is an excellent choice for homeowners because it is durable, easy to clean, and simple to install. The innovative no-glue system makes installation quick and easy, even for DIYers with little experience. Here is a step-by-step guide on how to install Armstrong No Glue Vinyl Flooring in your home:
1. Prepare the Subfloor
The first step is to prepare the subfloor by making sure it is level, smooth, and clean. Remove any existing flooring, baseboards, and quarter round. Repair any cracks or holes in the subfloor using a patching compound. Sweep the floor to remove any dust or debris.
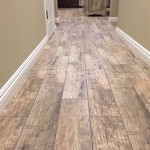
2. Layout the Flooring
Once the subfloor is prepared, you can start laying out the flooring. Start by placing planks in the center of the room and working your way out towards the walls. Make sure that the planks are securely clicked together and that the edges are flush. Use a tapping block and hammer to gently tap the planks into place.
3. Install the Edge Pieces
Once the main flooring is installed, you need to install the edge pieces. Cut the edge pieces to the desired size and insert them into the corresponding grooves around the perimeter of the room. Use a tapping block and hammer to tap the edge pieces into place.
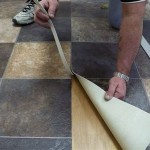
4. Trim Around Obstacles
If you have any obstacles in the room, such as cabinets or appliances, you will need to trim the flooring around them. Use a utility knife to score the flooring and then snap it off. You can also use a jigsaw to make more intricate cuts.
5. Install the Baseboards and Quarter Round
Once the flooring is installed, you can install the baseboards and quarter round. Cut the baseboards and quarter round to the desired size and nail them into place. Use a caulk gun to seal any gaps between the flooring, baseboards, and quarter round.
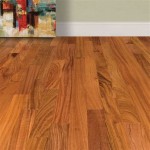
6. Enjoy Your New Floor!
Congratulations on your new Armstrong No Glue Vinyl Flooring! Enjoy your new floor for years to come.
Additional Tips
- Use a level to make sure the subfloor is level before installing the flooring. This will help prevent the flooring from buckling or warping.
- Make sure the subfloor is smooth and clean before installing the flooring. This will help prevent the flooring from being scratched or damaged.
- Use a tapping block and hammer to gently tap the planks into place. This will help prevent the planks from being damaged.
- Trim the flooring around obstacles using a utility knife or jigsaw. This will help ensure a clean and professional finish.
- Install the baseboards and quarter round to finish off the installation. This will help protect the flooring from damage and give it a finished look.

Vinyl Plank Flooring Tutorial No Nails Glue Real Estate Kier

Sheet Vinyl Installation Made Easy

Trafficmaster Ceramica 12 X 24 Vinyl Tile Floor Installation

Free Floating Vinyl Floors Continental Flooring Company

Vinyl Plank Flooring Prep Installation Centsational Style

L And Stick Vinyl Plank Flooring 101 Floorings

L And Stick Vinyl Plank Flooring 101 Floorings

Armstrong Flooring Sample Pro Mark Shadow Gray Waterproof Wood Look Glue Down Luxury Vinyl Plank In The Samples Department At Com

How To Install Your Vinyl Floor

Armstrong Flooring Renovantage Pro Silver Dawn 12 Mil 6 5 In W X 48 L Glue Down Waterproof Vinyl Tile 38 88 Sq Ft Ctn 211ap641 The Home Depot
Related Posts