Laying Tongue And Groove Laminate Flooring For A Stunning Finish
Transforming your floors with tongue and groove laminate flooring is a rewarding endeavor that can enhance the aesthetics and value of your home. With careful preparation and meticulous execution, you can achieve a professional-looking finish that will last for years to come. Here's a comprehensive guide to guide you through the essential aspects of laying tongue and groove laminate flooring:
- Prepare The Subfloor: A level, smooth, and dry subfloor is crucial for a successful installation. Ensure that any existing flooring or uneven surfaces are removed or leveled using self-leveling compound. The subfloor should be free of moisture, so check for any leaks and address them beforehand.
- Plan The Layout: Before you start laying the planks, determine the direction and layout of your flooring. Consider the size and shape of the room and any obstacles like doorways or furniture. Plan the layout to minimize cuts and ensure a visually appealing pattern.
- Install An Underlayment: An underlayment not only provides a layer of cushioning and sound absorption but also helps level out any minor imperfections in the subfloor. Choose an underlayment that is compatible with your laminate flooring and provides the desired level of insulation.
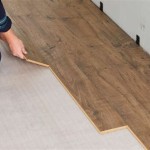
- Start Laying The First Row: Begin by laying the first plank along one of the longest walls of the room. Use spacers to ensure a consistent gap between the wall and the plank. Align the tongue of the plank with the groove of the next plank, gently tapping them together with a tapping block and hammer.
- Continue Laying The Planks: Continue laying the planks row by row, carefully aligning the tongues and grooves. Stagger the joints between the rows to avoid creating weak points in the flooring. Use a tapping block and hammer to ensure a tight fit, but avoid overstriking as it can damage the planks.
- Cut And Fit Around Obstacles: When you encounter obstacles like doorways or pipes, measure and cut the planks to fit around them. Use a jigsaw or circular saw for precise cuts. Carefully fit the cut planks around the obstacles, ensuring a tight fit.
- Install The Last Row: The last row may require some trimming to fit the remaining space. Measure and cut the planks to the required width and tap them into place. Use a pull bar or tapping block to gently force the last row into position.
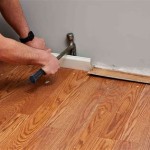
- Install Trim And Moldings: Once the flooring is laid, install baseboards, quarter rounds, or other moldings around the perimeter of the room. Trim and moldings not only cover the expansion gap but also add a finished touch to your flooring.
By following these steps carefully, you can successfully lay tongue and groove laminate flooring and create a stunning new look for your home. Remember to take your time, work with precision, and pay attention to detail to achieve a professional-looking finish that will last for many years to come.

All You Need To Know About Tongue And Groove Flooring Installation Reallyfloors America S Est Hardwood

Should You Install Tongue And Groove Laminate Flooring Ozburn Hessey

What Is The Tongue And Groove On Laminate Flooring

Tongue Or Groove Which To Install First

Pergo Installation Laminate Flooring Sawdust Girl

Installing Laminate Engineered Wood Floating Floors Home Improvement Stack Exchange Blog

Standard Tongue And Groove Flooring Installation

Thinking About Installing Tongue And Groove Flooring Here S What You Need To Know Veneer

Tongue And Groove Vs Wood Flooring Direct

5 Essential Tips For Tongue And Groove Flooring District Floor Depot
Related Posts