Wood Plank Flooring Installation Instructions
Wood plank flooring is a popular choice for homeowners seeking a durable and aesthetically pleasing flooring solution. Its natural beauty and versatility make it suitable for a wide range of interior design styles, from rustic and traditional to modern and contemporary. Successful wood plank flooring installation requires careful planning, preparation, and execution. This document provides a comprehensive guide to the process, ensuring a professional and long-lasting result.
Preparation: Subfloor Assessment and Conditioning
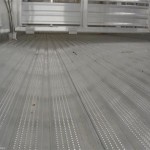
The foundation upon which the wood plank flooring is installed is the subfloor. Its condition and preparation are paramount to a successful installation, preventing issues like unevenness, squeaking, and premature wear. The subfloor must be structurally sound, clean, dry, and level. If the subfloor is concrete, it should be thoroughly inspected for cracks and moisture issues. Cracks should be filled with a concrete patching compound, and moisture levels should be tested using a concrete moisture meter. Acceptable moisture levels will vary depending on the type of wood flooring being installed and the manufacturer's recommendations. If moisture levels are too high, a moisture barrier may be required.
For plywood or OSB subfloors, inspection focuses on potential water damage, warping, and rot. Any damaged sections must be replaced. All subfloors should be thoroughly cleaned, removing debris, nails, staples, and any other contaminants that could interfere with the bonding of the flooring. Leveling the subfloor is crucial. Minor imperfections can be addressed using self-leveling compound or by sanding down high spots. Significant unevenness may require more extensive subfloor repair or replacement.
Acclimation of the wood plank flooring is a critical step often overlooked. Wood is a hygroscopic material, meaning it absorbs and releases moisture from the surrounding environment. Acclimating the flooring to the room's temperature and humidity levels before installation minimizes expansion and contraction after installation, preventing gaps and buckling. The acclimation period varies depending on the type of wood, its moisture content, and the ambient conditions of the room. Generally, 3-5 days is a recommended minimum acclimation time. The flooring should be laid out in the room where it will be installed, allowing air to circulate around the planks. Maintaining a consistent temperature and humidity level during the acclimation period is essential for optimal results. Consult the flooring manufacturer's instructions for specific acclimation guidelines.
Gather all necessary tools and materials before commencing the installation. These include: a moisture meter, measuring tape, chalk line, circular saw or miter saw, jig saw, tapping block, rubber mallet, pry bar, spacers, wood adhesive (if required), safety glasses, and knee pads. Having all materials readily available streamlines the installation process and minimizes delays.
Installation Techniques: Floating, Glue-Down, and Nail-Down
Wood plank flooring can be installed using various methods, each suited to different subfloor types and project requirements. The three primary installation techniques are floating, glue-down, and nail-down.
Floating Installation: This method involves interlocking the planks together without directly attaching them to the subfloor. A thin foam underlayment is typically placed between the flooring and the subfloor to provide cushioning and reduce noise transmission. Floating floors are relatively easy to install and are a good option for DIY projects, especially on concrete subfloors where nailing may not be feasible. The key to a stable floating floor is maintaining consistent expansion gaps around the perimeter of the room and at any vertical obstructions, such as pipes or door frames. These gaps allow the flooring to expand and contract without putting pressure on the walls, which can lead to buckling. Use spacers to maintain the correct gap size during installation.
Glue-Down Installation: The glue-down method involves applying a specialized wood flooring adhesive to the subfloor and then pressing the planks firmly into the adhesive. This method provides a secure and stable bond, making it suitable for high-traffic areas and areas prone to moisture. It is often used with engineered wood flooring. Selecting the correct adhesive is crucial, as different adhesives are formulated for different types of wood and subfloors. The adhesive should be applied according to the manufacturer's instructions, ensuring even coverage and proper open time. Rolling the flooring after installation helps to create a strong bond between the planks and the adhesive.
Nail-Down Installation: The nail-down method is traditionally used for solid hardwood flooring. It involves using a pneumatic flooring nailer to drive nails or staples through the planks and into the subfloor. This method requires a wood or plywood subfloor and is not suitable for concrete. When using a nail-down installation, it is important to use the correct type and size of nail or staple and to set the nailer to the appropriate pressure to avoid damaging the flooring. Proper spacing of the nails is critical to ensure a secure and stable installation. Blind nailing, where the nails are driven at an angle through the tongue of the plank, is the preferred method as it conceals the nail heads. Ensure that nails are properly set and not protruding above the surface of the flooring.
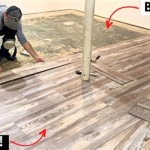
Regardless of the chosen installation method, planning the layout of the flooring is essential. Start by determining the direction in which the planks will run, typically the longest dimension of the room. Consider the placement of seams and how they will appear in relation to doorways and other architectural features. It is often advisable to start the installation along a straight wall, using a chalk line as a guide. When cutting planks to fit around obstacles, use a jigsaw or miter saw for precise cuts. Always wear safety glasses when cutting wood.
Finishing Touches: Trim Installation and Maintenance
Once the wood plank flooring is installed, finishing touches are necessary to complete the project and protect the investment. These include installing trim, cleaning the flooring, and establishing a maintenance routine.
Trim, such as baseboards, quarter round, and shoe molding, covers the expansion gaps along the perimeter of the room and provides a finished look. The trim should be carefully cut to fit snugly against the walls and corners, using a miter saw for precise angles. Attach the trim to the wall using finishing nails, ensuring that the nails are countersunk and filled with wood putty. Caulking the top edge of the baseboard creates a seamless transition between the wall and the trim. Choose trim that complements the flooring and the overall design of the room.
After installing the trim, thoroughly clean the flooring to remove any dust, debris, or adhesive residue. Vacuum the floor and then clean it with a damp mop using a pH-neutral wood floor cleaner. Avoid using excessive water, as it can damage the wood. Allow the flooring to dry completely before placing furniture back in the room. Consider using felt pads under furniture legs to protect the flooring from scratches and dents.
Establishing a regular maintenance routine is critical to preserving the beauty and longevity of wood plank flooring. Sweep or vacuum the floor regularly to remove dirt and debris. Clean spills immediately with a damp cloth. Avoid using harsh chemicals or abrasive cleaners, as they can damage the finish. Occasionally, use a wood floor cleaner specifically designed for the type of finish on the flooring. Over time, the finish may become worn or scratched, requiring refinishing. Refinishing involves sanding down the existing finish and applying a new coat of sealant, restoring the flooring to its original condition. Consult with a professional flooring contractor for advice on refinishing.
Maintaining consistent humidity levels in the home also helps to prevent excessive expansion and contraction of the wood flooring. During dry winter months, consider using a humidifier to increase the humidity level. Conversely, during humid summer months, use a dehumidifier to reduce the humidity level. Aim for a relative humidity level between 30% and 50%.
By following these detailed instructions and taking the necessary precautions, a successful wood plank flooring installation is achievable, providing a beautiful and durable floor for years to come. Remember to always consult the manufacturer's instructions for specific recommendations regarding the type of flooring being installed and the subfloor conditions.

Rigid Max Installation Instructions Floors

How To Install Hardwood Flooring Step By Forbes Home

Wooden Flooring Installation A Step By Guide

Mohawk Flooring Hard Surface Installation Information From

A Beginner S Guide To Installing Vinyl Plank Flooring Dumpsters Com

Dry Back Vinyl Plank Flooring Installation Instructions Builddirect

How To Install Vinyl Plank Flooring As A Beginner Home Renovation

Engineered Flooring Installation Instruction

Installation Baroque Flooring

Parquet And Laminate Flooring Installation Instructions Meister Masterclic Gb
Related Posts