Wood Plank Flooring DIY: A Comprehensive Guide
Installing wood plank flooring can be a rewarding do-it-yourself (DIY) project, enhancing the aesthetic appeal and value of a home. While it requires time, patience, and a moderate level of skill, the cost savings and personal satisfaction gained from completing the project oneself make it an attractive option for many homeowners. This article provides a detailed guide to installing wood plank flooring, covering essential preparations, installation techniques, and important considerations for a successful outcome.
Planning and Preparation: The Foundation of a Successful Installation
Proper planning and preparation are crucial for a successful wood plank flooring installation. This phase involves accurate measurements, material selection, subfloor assessment, and acclimatization of the wood planks.
First, calculate the square footage of the room or area to be floored. This calculation should include any closets or alcoves. Add an extra 5-10% to the total square footage to account for waste from cuts and potential errors. It is better to overestimate slightly than to run short on materials mid-project.
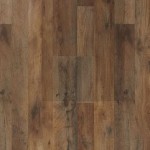
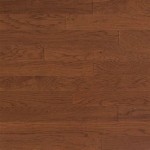
Next, consider the type of wood plank flooring to use. Options include solid hardwood, engineered hardwood, and laminate. Solid hardwood offers durability and longevity but is more susceptible to moisture damage and requires professional installation in many cases. Engineered hardwood consists of a thin layer of hardwood bonded to a plywood core, providing greater dimensional stability and making it suitable for basements and other areas with fluctuating humidity levels. Laminate flooring is a synthetic product that mimics the look of wood at a lower cost and with greater resistance to scratches and stains. The choice depends on budget, desired appearance, and environmental conditions.
The subfloor, the foundation upon which the wood plank flooring is installed, must be structurally sound, clean, and level. Inspect the subfloor for any signs of damage, such as water stains, mold, or rot. Repair or replace any damaged sections. For concrete subfloors, ensure they are free of cracks and seal them with a concrete sealer to prevent moisture transmission. For wood subfloors, ensure they are securely fastened to the joists. Any squeaks or loose boards should be addressed before proceeding. Leveling the subfloor is essential for a professional-looking installation. Use a self-leveling compound for concrete subfloors or shims for wood subfloors to correct any unevenness. Minor imperfections can be handled with flooring underlayment.
Acclimatization is a critical step often overlooked. Wood planks need time to adjust to the temperature and humidity levels of the installation environment. Store the planks in the room where they will be installed for at least 72 hours, or preferably longer, before installation. This allows the wood to expand or contract, minimizing the risk of gaps or buckling after installation.
Gather all necessary tools and materials before starting the project. Essential tools include a measuring tape, pencil, circular saw or miter saw, flooring nailer or stapler (for solid or engineered hardwood), tapping block, pull bar, hammer, safety glasses, knee pads, and a moisture meter. Other helpful tools include a jigsaw, utility knife, and a level.
Installation Techniques: Achieving a Professional Finish
The specific installation technique depends on the type of wood plank flooring selected. Solid hardwood and some engineered hardwood floors are typically installed using a nail-down or staple-down method, while other engineered hardwood and laminate floors can be installed using a floating method.
For nail-down or staple-down installations, start by installing a moisture barrier underlayment. This underlayment helps to protect the wood planks from moisture rising from the subfloor. Roll out the underlayment and overlap the seams by a few inches, taping them securely. Begin installing the first row of planks along a straight wall, leaving a 1/4-inch expansion gap between the wall and the planks. This gap allows for the natural expansion and contraction of the wood. Use a flooring nailer or stapler to fasten the planks to the subfloor, ensuring the nails or staples are driven at the correct angle and depth. Continue installing the planks row by row, staggering the end joints to create a visually appealing and structurally sound floor. Use a tapping block and hammer to gently tap the planks together, ensuring a tight fit. When reaching the opposite wall, measure and cut the planks to fit, again leaving a 1/4-inch expansion gap.
For floating installations, an underlayment is also required. The underlayment serves as a moisture barrier and provides cushioning. Many laminate and engineered hardwood floors are designed with a click-lock system, which allows the planks to be joined together without nails or glue. Start by installing the first row of planks along a straight wall, leaving a 1/4-inch expansion gap. Connect the planks by aligning the tongue and groove edges and clicking them together. Use a tapping block and hammer to gently tap the planks together, ensuring a tight fit. Continue installing the planks row by row, staggering the end joints. When reaching the opposite wall, measure and cut the planks to fit, leaving a 1/4-inch expansion gap. For difficult areas, such as doorways and corners, use a jigsaw to cut the planks to the desired shape.
When installing around obstacles, such as pipes or door frames, precise measurements and cuts are essential. Use a combination square and pencil to accurately mark the location of the obstacle on the plank. Use a jigsaw or utility knife to carefully cut out the required shape. For door frames, it may be necessary to undercut the frame to allow the planks to slide underneath. Use a jamb saw or oscillating multi-tool to undercut the frame.
Throughout the installation process, regularly check the alignment of the planks and ensure they are level. Use a level to identify any high or low spots. If necessary, use shims or self-leveling compound to correct any imperfections. Remove any excess glue or debris from the surface of the flooring as you work.
Finishing Touches and Important Considerations
Once the wood plank flooring is installed, several finishing touches are necessary to complete the project and protect the new floor.
Install baseboards or quarter-round molding along the perimeter of the room to cover the expansion gap and create a finished look. Use a nail gun to attach the baseboards or molding to the walls. Caulk any gaps between the baseboards or molding and the walls with paintable caulk.
Install transition strips at doorways and where the wood plank flooring meets other types of flooring. Transition strips provide a smooth and safe transition between different floor surfaces and help to protect the edges of the flooring. Choose transition strips that match or complement the color of the wood plank flooring.
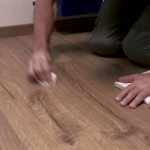
Clean the new floor thoroughly by sweeping or vacuuming to remove any dust, debris, or construction materials. Use a damp mop with a mild cleaning solution specifically designed for wood floors to clean the surface. Avoid using excessive water, as it can damage the wood.
Consider applying a protective finish to the wood plank flooring. Solid hardwood floors and some engineered hardwood floors may require a protective finish, such as polyurethane, to protect against scratches, stains, and wear. Laminate floors typically do not require a protective finish, as they are already coated with a durable wear layer. Follow the manufacturer's instructions for applying the finish.
Maintaining the appropriate humidity levels in the home is crucial for the longevity of wood plank flooring. Excessive humidity can cause the wood to expand and buckle, while low humidity can cause the wood to shrink and crack. Use a humidifier or dehumidifier to maintain a relative humidity level between 30% and 50%.
Protect the wood plank flooring from scratches and dents by using furniture pads under the legs of chairs, tables, and other furniture. Avoid wearing shoes with high heels on the wood floor. Place mats or rugs in high-traffic areas to protect the flooring from wear and tear.
Regularly clean the wood plank flooring by sweeping or vacuuming to remove dust and debris. Use a damp mop with a mild cleaning solution to clean the surface. Avoid using harsh chemicals, abrasive cleaners, or excessive water. Promptly clean up any spills to prevent staining.
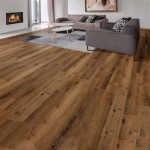
By following these guidelines, homeowners can successfully install wood plank flooring and enjoy the beauty and durability of a professionally installed floor.

Make Your Own Plank Flooring Using 1 X 12 Lumber Hallstrom Home

Make Your Own Plank Flooring Using 1 X 12 Lumber Hallstrom Home

Diy Wide Plank Pine Floors Part 1 Installation The Roots Of Home

Diy Wide Plank Pine Floors Part 1 Installation The Roots Of Home

Make Your Own Plank Flooring Using 1 X 12 Lumber Hallstrom Home

Low Budget Diy Plywood Plank Floors Diydork Com

Wide Plank Floor Diy Rough Cut To Tongue And Groove 10 Steps With S Instructables

Diy Wood Floors Flooring

Diy Rustic Wide Plank Plywood Flooring Our Project Ideas

Diy Rustic Wide Plank Plywood Flooring Our Project Ideas
Related Posts