Whitewash Wood Floors: A Guide to Achieving a Light and Airy Aesthetic
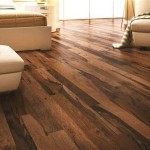
Whitewash wood floors have become a popular choice for homeowners seeking a bright, open, and contemporary aesthetic. This finish involves applying a light pigment to wood, typically white, to create a semi-transparent effect that allows the natural grain and character of the wood to remain visible. Unlike opaque paints, whitewash stains preserve the texture and warmth of the wood while lightening its overall tone. This technique can transform a dark and dated space into a luminous and inviting environment.
The appeal of whitewashed floors extends beyond aesthetics. They can visually expand the dimensions of a room, making it feel larger and more airy. The light color reflects sunlight, illuminating the space and reducing the need for artificial lighting during the day. Whitewashed floors are also versatile, complementing a wide range of interior design styles, from Scandinavian and coastal to farmhouse and modern.
Several factors contribute to the success of a whitewashing project. The type of wood, the existing finish (if any), the chosen whitewash product, and the application technique all play crucial roles. It's essential to understand these factors to achieve the desired result and ensure the longevity of the finish. Failure to properly prepare the wood or apply the whitewash can lead to uneven coverage, peeling, or other undesirable issues.
Understanding the Different Types of Wood for Whitewashing
The type of wood being whitewashed significantly impacts the final appearance. Some woods, such as oak and pine, have prominent grain patterns that become accentuated by the whitewash. This can create a rustic and textured look. Other woods, like maple and birch, have a finer grain and result in a more uniform and subtle whitewashed effect. The natural color of the wood also influences the outcome.
Hardwoods like oak, maple, and hickory are generally more durable and resistant to wear and tear, making them excellent choices for high-traffic areas. Softwoods, such as pine, are more susceptible to dents and scratches, but they can still be used with appropriate care and maintenance. Redwood offers a warm undertone that can peek through the whitewash, adding depth to the look.
Consider the existing wood floor if you're refinishing. Identifying the wood type is crucial for selecting the appropriate whitewash product and application method. Different woods absorb stains and finishes at different rates, so testing a sample area before committing to the entire floor is highly recommended. This allows you to assess how the whitewash interacts with the specific wood and adjust the application accordingly.
New wood floors offer the advantage of a clean slate. You can choose the wood type and install it specifically for whitewashing. This provides greater control over the final appearance and ensures that the wood is properly prepared before applying the finish. However, even with new wood, it's still essential to test the whitewash in an inconspicuous area to confirm the desired effect.
Preparing the Wood Floor for Whitewashing
Proper preparation is arguably the most critical step in the whitewashing process. This involves thoroughly cleaning the floor, removing any existing finish, and sanding the surface to create a smooth and even base. A poorly prepared floor will result in an uneven and unprofessional-looking whitewash. This stage is crucial to achieving a durable and aesthetically pleasing finish.
The first step is to remove any furniture, rugs, or other obstructions from the room. Then, vacuum or sweep the floor to remove loose dirt and debris. Next, clean the floor with a wood cleaner to remove any grease, wax, or other contaminants. Avoid using harsh cleaners that could damage the wood or interfere with the adhesion of the whitewash.
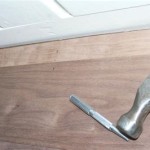
If the floor has an existing finish, such as polyurethane or varnish, it must be removed. This can be done using a chemical stripper or by sanding. Chemical strippers can be effective, but they require careful handling and proper ventilation. Sanding is a more labor-intensive method, but it allows for greater control over the removal process. Start with a coarse-grit sandpaper (e.g., 40-grit) to remove the bulk of the finish, then gradually move to finer grits (e.g., 80-grit, 100-grit, and finally 120-grit) to smooth the surface.
After sanding, vacuum the floor thoroughly to remove all sanding dust. Then, wipe the floor with a tack cloth to pick up any remaining dust particles. This step is essential for ensuring a smooth and even whitewash. Any remaining dust could create imperfections in the final finish.
Finally, consider applying a wood conditioner before whitewashing. Wood conditioners help to even out the wood's porosity, which can prevent blotchy or uneven stain absorption. This is especially important for softwoods like pine, which tend to absorb stain unevenly. Follow the manufacturer's instructions for applying the wood conditioner and allow it to dry completely before proceeding with the whitewashing.
Applying the Whitewash and Sealing the Floor
Once the floor is properly prepared, the next step is to apply the whitewash. Several different types of whitewash products are available, including stains, paints, and tinted sealers. The choice of product depends on the desired level of transparency and the type of wood being used. Stain usually soaks into the wood and offers greater transparency, paint usually offers a more opaque finish, and tinted sealers offer a blend of both.
Before applying the whitewash, test it in an inconspicuous area to ensure that the color and transparency are to your liking. This is especially important if you're using a custom-mixed whitewash. Apply the whitewash to a small section of the floor and allow it to dry completely. This will give you a realistic preview of the finished product.
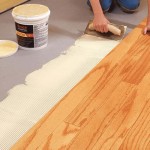
Apply the whitewash using a brush, roller, or rag, depending on the desired effect. For a more opaque finish, use a brush or roller to apply a thin, even coat of whitewash. For a more transparent finish, use a rag to wipe the whitewash onto the floor, then immediately wipe off the excess. This will allow the wood grain to show through more prominently.
Work in small sections and overlap each section slightly to avoid streaks or uneven coverage. Follow the direction of the wood grain when applying the whitewash. Allow the whitewash to dry completely according to the manufacturer's instructions. The drying time will vary depending on the product and the humidity levels.
Once the whitewash is dry, apply a sealant to protect the floor from wear and tear. Polyurethane is a popular choice for sealing wood floors, as it is durable and water-resistant. However, it can yellow over time, which can alter the appearance of the whitewash. Water-based polyurethanes are less likely to yellow, making them a better choice for maintaining the true color of the whitewash.
Apply two or three coats of sealant, following the manufacturer's instructions for application and drying time. Lightly sand between coats with a fine-grit sandpaper (e.g., 220-grit) to smooth the surface. Vacuum the floor thoroughly after each sanding to remove all sanding dust. Allow the sealant to cure completely before replacing furniture or rugs. Proper sealing ensures the long-term durability and beauty of the whitewashed floor.
Regular maintenance is essential for preserving the appearance of whitewashed floors. Sweep or vacuum the floor regularly to remove dirt and debris. Clean the floor with a wood cleaner as needed, avoiding harsh chemicals or abrasive cleaners. Place rugs in high-traffic areas to protect the finish from wear and tear. With proper care and maintenance, whitewashed wood floors can provide a beautiful and durable flooring option for years to come.

Wood Floor Refinishing And Whitewashing The Honeycomb Home

Diy Whitewashed Wood Floors Renovation Semi Pros

Sanding And Whitewashing Wood Floors

Whitewash Hardwood Floors Wood Flooring La

60 Cozy Whitewashed Floors Décor Ideas Digsdigs

Diy Whitewashed Wood Floors Renovation Semi Pros

Nostalgiecat How To Whitewash Wooden Flooring

Studio Hardwood Flooring Stained Or Whitewashed Addicted 2 Decorating

How To Whitewash Hardwood Floors The Right Way Flooring Girl
:strip_icc()/10194750920whitewash20floors20step202-99eae86a2dd746d9b89b35a639a0973a.jpg?strip=all "How To Whitewash Hardwood Flooring For A Fresher Aesthetic")
How To Whitewash Hardwood Flooring For A Fresher Aesthetic
Related Posts