What Kind Of Nails For Wood Floor
When it comes to installing a wood floor, choosing the right nails is essential. The type of nails you use will affect the strength, durability, and appearance of your floor. There are a few different types of nails that are commonly used for wood flooring, and each type has its own advantages and disadvantages.
Common Nails
Common nails are the most basic type of nail and are available in a variety of sizes. They are made from steel and have a flat head and a sharp point. Common nails are inexpensive and easy to use, but they are not as strong as other types of nails. They are also more likely to split the wood, so it is important to pre-drill holes before driving them in.
Ring-Shank Nails
Ring-shank nails are similar to common nails, but they have a ring-shaped shank that helps to prevent them from pulling out of the wood. Ring-shank nails are stronger than common nails and are less likely to split the wood. They are also more expensive than common nails.
Screw-Shank Nails
Screw-shank nails have a spiral-shaped shank that helps to screw them into the wood. Screw-shank nails are the strongest type of nail and are the least likely to split the wood. They are also the most expensive type of nail.
Size of Nails
The size of the nails you need will depend on the thickness of the wood flooring. For 3/4-inch thick flooring, you will need 1-1/2-inch nails. For 5/8-inch thick flooring, you will need 1-1/4-inch nails. For 1/2-inch thick flooring, you will need 1-inch nails.
Pre-Drilling Holes
Pre-drilling holes before driving in nails will help to prevent the wood from splitting. To pre-drill a hole, use a drill bit that is slightly smaller than the diameter of the nail. Drill a hole about 1/2-inch deep into the wood.
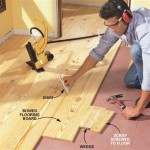
Driving Nails
When driving nails, use a hammer that is the right size for the nails. A hammer that is too small will not drive the nails in all the way, and a hammer that is too large can damage the wood. Hold the nail straight and drive it in until the head is flush with the surface of the wood.
By following these tips, you can choose the right nails for your wood floor and install them correctly. This will help to ensure that your floor is strong, durable, and beautiful for years to come.

Cleat Nails Vs Staples An Overview Hardwood Floors

Fitting Wood Flooring Nail Vs Staples And Beyond Blog

How Many Nails Staples For Hardwood Floor Installation

Top Nail 5 16 Inch Strip How We Did And Still Do These Floors Wood Floor Business

Cleat Nails Vs Staples An Overview Hardwood Floors

How To Properly Mechanically Fasten Nail A Wood Floor Business

Back Tracking

How To Install Wood Flooring Lowe S

Passive Refinishing Solves A Tennessee Conundrum Rosebud Floors

Engineered Hardwood Floors Installation Floor Refinishing New Jersey Repair Sanding
Related Posts