Vinyl Snap-In Flooring Installation: Essential Considerations for a Perfect Finish
Vinyl snap-in flooring has gained immense popularity as a versatile and stylish flooring solution for both residential and commercial Spaces. Installing this type of flooring involves precise techniques to ensure a durable and aesthetically pleasing result. Here are some crucial aspects to consider for a successful vinyl snap-in flooring installation:
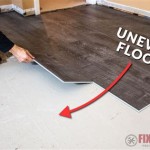
1. Subfloor Preparation:
A level and stable subfloor is crucial for a flawless vinyl snap-in flooring installation. Ensure that the subfloor is flat, dry, and free from any imperfections or debris. If necessary, level the subfloor using a self-leveling compound or install an underlayment to provide a smooth base.
2. Acclimation:
Before installing vinyl snap-in flooring, allow the planks to acclimate to the installation environment for at least 24-48 hours. This process will help the planks adjust to the temperature and humidity levels in the room, minimizing potential expansion or contraction issues after installation.
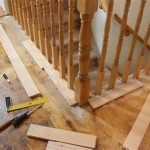
3. Proper Expansion Gap:
To prevent buckling or warping, it's essential to maintain an expansion gap around the perimeter of the installation and between fixed objects like walls, stairs, and cabinets. The recommended expansion gap is typically 1/4 inch to 1/2 inch, depending on the manufacturer's specifications.
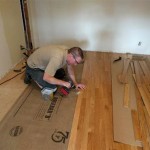
4. Starting Point and Layout:
Determine the starting point of the installation and plan the layout to minimize cuts and waste. Begin by installing a full plank along the longest wall of the room, using spacers to maintain the expansion gap. Continue adding planks row by row, ensuring they snap securely into place.
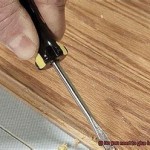
5. Cutting and Fitting:
For areas that require cutting, measure and mark the planks accurately. Use a sharp utility knife or a flooring cutter to make clean cuts. When fitting planks around obstacles like pipes or door frames, make precise cuts using a jigsaw or oscillating tool.
6. Angle Cuts:
To accommodate corners or angles, angle cuts may be necessary. Use a miter saw or a hand saw with a miter box to make precise 45-degree angle cuts on the planks. Test the fit before gluing or snapping the angled pieces into place.
7. Adhesive and Seam Sealing:
For added durability and moisture resistance, some vinyl snap-in flooring planks may require adhesive or seam sealer. Apply the adhesive or sealer according to the manufacturer's instructions, ensuring a secure bond between the planks and the subfloor.
Conclusion:
Installing vinyl snap-in flooring requires attention to detail, precision, and proper techniques. By following these essential aspects, you can achieve a professional-looking and long-lasting flooring solution. Remember to consult the manufacturer's instructions for specific product recommendations and installation guidelines. With proper planning and execution, you can enjoy the beauty and functionality of vinyl snap-in flooring for years to come.

How To Install Vinyl Plank Flooring As A Beginner Home Renovation

How To Install Vinyl Plank Flooring As A Beginner Home Renovation

Installing Vinyl Plank Flooring How To Fixthisbuildthat

20 Tips For A Great Vinyl Plank Flooring Installation

How To Lay Lvt Flooring A Step By Guide Factory Direct

10 Beginner Mistakes Installing Vinyl Plank Flooring

How To Install Vinyl Plank Flooring In A Bathroom Fixthisbuildthat

A Beginner S Guide To Installing Vinyl Plank Flooring Dumpsters Com

Lvp Flooring Installation How To Install Luxury Vinyl Plank In A Basement Diy

In Flooring Systems Everything You Need To Know
Related Posts