Vinyl Plank Flooring Over Existing Tiles: A Practical Guide
Vinyl plank flooring, a popular choice for its durability, aesthetic appeal, and affordability, can be installed over existing tile flooring. This approach offers a convenient way to update the look of your space without the hassle of removing the old tiles. However, it is crucial to understand the factors involved and the steps required to ensure a successful and long-lasting installation.
Understanding the Basics
Before embarking on a vinyl plank flooring project over existing tiles, it's essential to consider the existing tile condition and the underlying subfloor. The success of the installation depends on the stability and smoothness of the underlying surface.
Firstly, assess the tile floor. If the tiles are cracked, chipped, or loose, they need to be addressed before installing planks. This could involve replacing damaged tiles or securing loose tiles with appropriate adhesive.
Secondly, check the subfloor under the tile. If the subfloor is uneven or warped, it will need to be leveled before proceeding. This is crucial for a smooth installation and to prevent future problems.
Preparing the Existing Tile Surface
Once the existing tiles are assessed and any necessary repairs are made, the next step is to prepare the surface for the vinyl planks. This involves several key steps:
1. Thorough Cleaning: Remove any dirt, grime, or debris from the tile surface. This ensures the adhesive bonds correctly.
2. Filling Gaps: Fill any gaps or cracks between the tiles with grout or a suitable filler. This creates a smooth and even surface for the planks.
3. Sanding: The tile surface might need sanding to smooth out any irregularities or inconsistencies. This helps prevent the vinyl planks from being damaged or misaligned.
4. Priming: Applying a primer specifically designed for tile surfaces enhances the adhesive's bond and ensures a long-lasting installation.
Choosing the Right Vinyl Plank Flooring
Selecting the right vinyl plank flooring is crucial for a successful outcome. Several factors need to be considered:
1. Thickness: Vinyl planks come in various thicknesses. For installation over existing tiles, opt for thicker planks (at least 4mm) to minimize the risk of showing any inconsistencies in the tile surface underneath.
2. Click-Lock Installation: Click-lock systems offer a convenient and easy installation method. They require less adhesive and allow for easy removal if necessary.
3. Waterproof Core: If your space is prone to moisture or spills, consider vinyl planks with a waterproof core. This provides an added layer of protection against water damage.
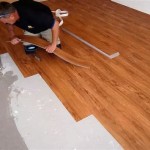
Installing Vinyl Plank Flooring Over Existing Tiles
Once the surface is prepared, you can begin installing the vinyl planks.
1. Laying the First Row: Start with a full plank along one wall and ensure it's aligned with the wall and any existing molding. Use spacers to maintain even gaps.
2. Click-Lock Installation: Carefully align and connect the planks, using the click-lock system, ensuring tight connections.
3. Cutting and Trimming: Use a utility knife or a specialized vinyl plank cutter to cut planks to fit around obstacles and corners.
4. Finishing Touches: Install transition strips where the vinyl flooring meets other floor coverings, and add baseboards for a polished look.
Benefits of Installing Vinyl Plank Flooring Over Existing Tiles
Installing vinyl plank flooring over existing tiles offers several advantages:
1. Cost-Effective: It saves the expense and labor involved in removing old tiles, making it a budget-friendly option.
2. Time-Saving: The installation process is generally faster than removing tiles and installing new flooring.
3. Minimal Disruption: Less dust and debris are generated compared to removing and replacing existing tiles.
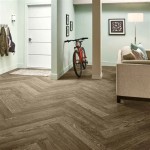
4. Aesthetic Appeal: Vinyl plank flooring provides a wide range of styles and colors, allowing you to revamp your space without major renovations.

How To Lay Tile Over An Existing Vinyl Floor Today S Homeowner

Can I Install Vinyl Tiles Over Laminate Flooring Comprehensive Guide

Can You Install Vinyl Plank Over Tile Flooring America

Lvt Flooring Over Existing Tile The Easy Way Vinyl Floor Installation Diy Luxury Plank Bathroom

How To Install Luxury Vinyl Plank Over Tile Flooring

How To Install Vinyl Plank Flooring Over Tile

Lvt Flooring Over Existing Tile The Easy Way Vinyl Floor Installation Diy Bathroom Floors Luxury

What Type Of Flooring Can You Install Over Ceramic Tile

Lvt Flooring Over Existing Tile The Easy Way Vinyl Floor Installation Diy

Installing Lifeproof Vinyl Planks Over Existing Tile
Related Posts