Tongue And Groove Hardwood Flooring Installation: A Comprehensive Guide
Tongue and groove (T&G) hardwood flooring is a classic and durable flooring option that adds warmth and elegance to any space. Characterized by its interlocking design, where the tongue of one board fits snugly into the groove of another, T&G flooring provides a seamless and stable surface. Installing T&G hardwood requires careful planning, precise execution, and adherence to best practices to ensure a long-lasting and aesthetically pleasing result. This article provides a comprehensive overview of the T&G hardwood flooring installation process.
Preparing for the Installation: Subfloor Assessment and Acclimation
Before commencing the installation, thorough preparation of the subfloor is paramount. The subfloor serves as the foundation for the hardwood flooring and must be structurally sound, clean, and level. Different types of subfloors, such as concrete slabs or plywood, require specific preparation techniques.
For concrete subfloors, a moisture test is essential to determine the moisture vapor emission rate (MVER) or relative humidity (RH). Excessive moisture can lead to warping, cupping, and other problems with the hardwood flooring. If moisture levels are too high, a moisture barrier should be applied to the concrete surface before installation. Furthermore, any cracks or imperfections in the concrete should be filled and leveled to ensure a smooth and even surface.
Plywood subfloors should be inspected for any signs of damage, such as rot or delamination. Loose or squeaky areas should be secured with screws or nails. Unevenness in the plywood can be addressed by sanding down high spots or applying leveling compound to low spots. It’s recommended to install a layer of underlayment over the plywood to provide a smoother surface and reduce noise transmission.
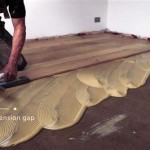
Acclimation is the process of allowing the hardwood flooring to adjust to the temperature and humidity conditions of the room in which it will be installed. Hardwood flooring is a natural product that expands and contracts with changes in moisture content. Acclimating the flooring for several days or even weeks prior to installation helps minimize the risk of warping or gapping after installation. The flooring should be stacked in the room where it will be installed, with spacers between the boards to allow for air circulation. Following the manufacturer's recommendations for acclimation time is crucial.
Essential Tools and Materials for T&G Flooring Installation
Successful T&G hardwood flooring installation requires a specific set of tools and materials. Having these readily available will streamline the process and ensure a professional finish.
Essential tools include:
- Measuring Tape: Used for accurate measurements of the room and flooring boards.
- Pencil: For marking cut lines and reference points.
- Circular Saw or Miter Saw: Used for making precise cuts on the flooring boards.
- Jigsaw: For cutting around irregular shapes and obstacles.
- Hammer or Mallet: Used for tapping the boards into place.
- Tapping Block: Protects the tongue of the boards during installation.
- Pull Bar: Used for tightening the last few rows of flooring against the wall.
- Spacer Blocks: To maintain a consistent expansion gap around the perimeter of the room.
- Moisture Meter: To measure the moisture content of the subfloor and flooring.
- Level: To ensure the subfloor is flat and the flooring is installed evenly.
- Safety Glasses and Hearing Protection: To protect against potential hazards during the installation process.
Essential materials include:
- Hardwood Flooring: The primary material for the flooring installation.
- Underlayment: Provides a moisture barrier, sound dampening, and a smoother surface.
- Fasteners: Nails or staples specifically designed for hardwood flooring.
- Wood Glue: To provide additional bonding between the boards (optional).
- Caulk or Wood Filler: To fill any gaps around the perimeter of the room or around obstacles.
- Baseboards or Quarter Round: To cover the expansion gap and provide a finished look.
Step-by-Step Installation Process
The installation process of T&G hardwood flooring requires meticulous attention to detail. The following steps provide a general guideline for a successful installation, but always refer to the manufacturer's specific instructions for the particular product being installed.
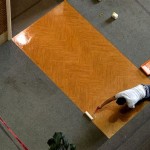
1. Establish a Starting Point: Determine the direction in which the flooring will be installed. Ideally, the boards should run parallel to the longest wall in the room or parallel to the direction of the incoming light. Establish a straight starting line along one of the walls using a chalk line or a straight edge. Leave an expansion gap of approximately ¼ to ⅜ inch between the flooring and the wall, using spacer blocks to maintain the gap.
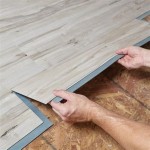
2. Installing the First Row: Place the first row of boards with the tongue facing the wall. Ensure the boards are aligned with the starting line and that the expansion gap is maintained. Fasten the boards to the subfloor using nails or staples, following the manufacturer's recommended nailing pattern. If using wood glue, apply a thin bead of glue to the tongue and groove of each board before installing.
3. Installing Subsequent Rows: Position the next row of boards, aligning the tongue with the groove of the previous row. Use a tapping block and hammer or mallet to gently tap the boards together, ensuring a tight fit. Continue fastening the boards to the subfloor, maintaining the proper nailing pattern. Stagger the end joints of the boards in each row to create a more visually appealing pattern and increase the structural integrity of the floor.
4. Cutting Around Obstacles: When encountering obstacles such as pipes, door frames, or cabinets, use a jigsaw to carefully cut the boards to fit around the obstacle. Ensure the cut is precise and that the expansion gap is maintained. For pipes, drill a hole slightly larger than the diameter of the pipe and then make a relief cut to allow the board to fit around the pipe.
5. Installing the Final Rows: As the installation progresses towards the opposite wall, it may be necessary to rip the boards to the appropriate width. Use a circular saw to cut the boards to size, ensuring that the expansion gap is maintained. Use a pull bar to tighten the final rows of flooring against the wall, and fasten the boards securely to the subfloor.
6. Finishing the Installation: Once the flooring is installed, remove the spacer blocks and install baseboards or quarter round to cover the expansion gap around the perimeter of the room. Fill any gaps around the perimeter of the room or around obstacles with caulk or wood filler. Clean the floor thoroughly to remove any dust or debris. Allow the glue (if used) to dry completely before walking on the floor.
Addressing Common Installation Challenges
While T&G hardwood flooring installation is a manageable project for experienced DIYers, several common challenges can arise. Understanding these potential issues and knowing how to address them can help ensure a successful installation.
Uneven Subfloor: An uneven subfloor is a common problem that can lead to squeaking, bouncing, and an uneven flooring surface. To address this, level the subfloor by sanding down high spots or applying leveling compound to low spots. In severe cases, it may be necessary to replace sections of the subfloor.
Gapping Between Boards: Gapping between boards can occur due to insufficient acclimation, improper installation techniques, or excessive moisture changes. To minimize gapping, ensure the flooring is properly acclimated before installation and use a tapping block and hammer or mallet to ensure a tight fit between the boards. If gapping occurs after installation, it may be possible to fill the gaps with wood filler that matches the color of the flooring.
Squeaking Floors: Squeaking floors are often caused by loose subfloor, improper fastening, or movement between the flooring and the subfloor. To address squeaking floors, tighten any loose subfloor screws or nails. Ensure the flooring is properly fastened to the subfloor, following the manufacturer's recommended nailing pattern. Underlayment can also help reduce squeaking by providing a barrier between the flooring and the subfloor.
Warped or Cupped Boards: Warped or cupped boards are usually caused by excessive moisture exposure. To prevent warping or cupping, ensure the subfloor is dry and that the flooring is properly acclimated before installation. Address any moisture issues in the room, such as leaks or high humidity. If warping or cupping occurs after installation, it may be necessary to replace the affected boards.
Difficulty Tightening the Last Rows: Getting the last few rows of flooring tightly against the wall can be challenging. A pull bar is an essential tool for this task. Place the pull bar against the wall and use a hammer or mallet to pull the boards tightly against the wall. Ensure the boards are securely fastened to the subfloor.

5 Essential Tips For Tongue And Groove Flooring District Floor Depot

All You Need To Know About Tongue And Groove Flooring Installation Reallyfloors America S Est Hardwood

Home Owners Guide To Installing Tongue And Groove Flooring

Tongue And Groove Vs Wood Flooring Direct

3 How To Installation Methods For Installing Engineered Hardwood Reallyfloors America S Est Flooring

Install Tongue And Groove Wood Veneer Flooring

How To Install Tongue And Groove Flooring Blog

How To Install Hardwood Flooring Step By Forbes Home

Patching Hardwood Floors Wood Floor Techniques Pete S

How To Install Tongue And Groove Flooring Blog
Related Posts