Snap-Together Laminate Flooring Installation: A Comprehensive Guide
Snap-together laminate flooring, also known as click-lock flooring, has gained immense popularity due to its ease of installation and its durable, aesthetically pleasing surface. This type of flooring offers homeowners a DIY-friendly alternative to traditional laminate flooring, eliminating the need for glue or nails. This article provides a comprehensive guide to installing snap-together laminate flooring, outlining key steps, tools, and tips for a successful project.
1. Preparing the Subfloor
The foundation for a successful laminate flooring installation lies in a properly prepared subfloor. This is crucial to ensure a level and stable surface that prevents squeaks, unevenness, and potential damage to the flooring. Here are key steps involved in subfloor preparation:
- Inspect the Subfloor: Assess the existing subfloor for any issues such as cracks, gaps, or unevenness. Address these issues by repairing cracks, filling gaps with wood filler, or planing uneven areas.
- Clean the Subfloor: Thoroughly clean the subfloor to remove dirt, debris, and any loose material. This ensures a clean surface for the underlayment and the laminate planks.
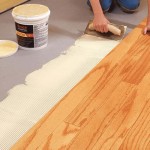
- Install Underlayment: Underlayment provides a moisture barrier, sound insulation, and protects the flooring from minor subfloor imperfections. Choose an appropriate underlayment compatible with your laminate flooring type. Install it according to the manufacturer's instructions.
2. Acclimate the Flooring
Before beginning installation, it's crucial to acclimate the flooring to the room's temperature and humidity. This minimizes potential problems such as warping or expansion after installation. Allow the flooring to sit in the room for at least 48 hours, ideally in the unopened packaging. This allows the flooring to adjust to the environment.
3. Measuring and Laying the First Row
Once the subfloor is prepared and the flooring acclimated, you can begin laying the first row. Start by measuring the length of the room and cutting the first plank to fit. The first row should be laid against the wall, with a small expansion gap (generally 1/4 inch) between the wall and the plank. This gap allows for expansion and contraction of the flooring due to temperature and humidity changes.
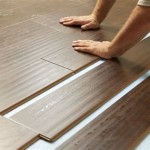
When laying the first row, use a tapping block and a rubber mallet to gently tap the planks into place. Ensure the planks are tightly interlocked and aligned with each other. Some snap-together laminate flooring features a click-and-lock system, which makes installation even easier.
4. Installing Subsequent Rows
After laying the first row, you can begin installing subsequent rows. Each plank should be staggered, like bricks, to prevent a straight line of joints. The tongue of each plank should be inserted into the groove of the previously laid plank, creating a tight, secure connection. Use a tapping block and mallet to gently tap the planks into place, ensuring they are tightly interlocked.
If necessary, cut planks to fit in corners or around obstacles using a circular saw or a hand saw. Measure the space carefully and cut the planks accordingly. Remember to leave the expansion gap around the perimeter of the room.
5. Finishing Touches
Once all the planks are installed, you need to finish touches to complete the project. This includes installing transition strips, moldings, and baseboards. Transition strips are used to transition between different flooring types, such as carpet and laminate flooring. Moldings and baseboards provide a decorative finish and cover the expansion gap between the flooring and the wall.
For a more polished look, consider installing shoe moldings or quarter-round moldings around the perimeter of the room. These moldings help hide any minor gaps between the flooring and the wall, creating a seamless finish.
Tools You Will Need
To install snap-together laminate flooring, you will need the following tools:
- Tape measure
- Circular saw or hand saw
- Utility knife
- Tapping block
- Rubber mallet
- Level
- Pencil
- Safety glasses
- Gloves
Key Points to Remember
- Proper Subfloor Preparation: A level and stable subfloor is essential for a successful installation. Address any subfloor issues before laying down the flooring.
- Acclimate the Flooring: Allow the flooring to adjust to the room's temperature and humidity before installing. This prevents potential problems like warping or expansion.
- Stagger the Planks: Avoid a continuous line of joints by staggering the planks, similar to brickwork.
- Use Expansion Gaps: Leave an expansion gap of 1/4 inch around the perimeter of the room to allow for movement of the flooring.
- Use the Right Tools: Ensure you have the necessary tools for a smooth and efficient installation.

How To Install Laminate Floors

Guide To Installing Laminate Flooring Diy Family Handyman

How To Install Lock Engineered Hardwood Flooring

How To Install Laminate Flooring

Why You Should Consider Snap Together Laminate Homeadvisor

Guide To Installing Laminate Flooring Diy Family Handyman

How To Install Laminate Floors

How To Install Flooring Project Tutorial Bob Vila

Guide To Installing Laminate Flooring Diy Family Handyman

Laminate Wood Flooring Ideas Cost
Related Posts