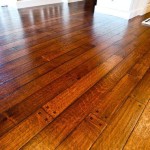
Shaw Vinyl Plank Flooring Installation Instructions
Shaw vinyl plank flooring is a popular choice for homeowners due to its durability, water resistance, and stylish appearance. Installing Shaw vinyl plank flooring is a relatively straightforward DIY project that can be completed by most homeowners with basic carpentry skills. This article will guide you through the steps of installing Shaw vinyl plank flooring.
Prepare the Subfloor
A properly prepared subfloor is crucial for a successful Shaw vinyl plank flooring installation. The subfloor should be flat, level, and free of debris, moisture, and any significant imperfections. Here's how to prepare your subfloor:
- Remove Existing Flooring: Remove any existing flooring, such as carpet, tile, or wood. Ensure you remove all nails, staples, and other debris from the subfloor.
- Inspect for Moisture: Check for moisture issues in the subfloor using a moisture meter. High moisture levels can damage the vinyl planks and lead to warping or buckling.
- Level the Subfloor: Fill any gaps or uneven areas with a self-leveling compound or wood filler. This will create a smooth and level surface for the vinyl planks.
- Clean and Dry: Thoroughly clean the subfloor to remove any dirt, dust, or debris. Allow the subfloor to dry completely before proceeding with the installation.
Install the Underlayment
Underlayment is a thin layer of material placed between the subfloor and the vinyl planks. It provides additional cushioning, sound insulation, and moisture protection.
- Choose the Right Underlayment: Select an underlayment specifically designed for vinyl plank flooring. The type of underlayment will depend on your specific needs and the type of subfloor.
- Unroll and Cut: Unroll the underlayment and cut it to the desired length and width using a utility knife. Make sure to overlap the seams by at least 6 inches.
- Secure the Underlayment: Secure the underlayment to the subfloor using staples or tape. Follow the manufacturer's instructions for proper installation.
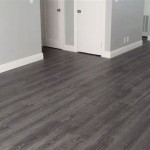
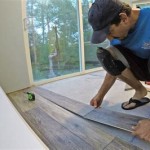
Install the Vinyl Planks
The installation process for Shaw vinyl plank flooring is straightforward. It typically involves a floating installation method, meaning the planks are not glued or nailed down. Here are the steps to follow:
- Start in a Corner: Begin the installation in a corner of the room, leaving a small expansion gap between the planks and the wall.
- Click and Lock: Shaw vinyl planks typically have a click-and-lock system. Align the edges of the planks and click them together to secure them in place.
- Stagger the Seams: Stagger the seams of the planks to create a more visually appealing and stable floor. It's like building a brick wall, so no seams are aligned.
- Cut Planks as Needed: Use a utility knife or a miter saw to cut the planks to fit around obstacles or in tight spaces.
- Install Transition Strips: Use transition strips to connect the vinyl planks to other flooring types, such as carpet or tile.
- Maintain Expansion Gaps: Leave an expansion gap of about 1/4 inch between the planks and the walls, allowing for movement and preventing buckling.
Cut Out for Fixtures
Sometimes you will need to cut out areas for plumbing fixtures, vents, or other objects. Use a utility knife or jigsaw to carefully cut out these areas in the vinyl planks. When cutting, ensure you have a straight edge or template to keep the cuts precise.
Finish the Installation
The final steps of the installation involve adding baseboards and other trim pieces to complete the look of the floor.
- Install Baseboards: Install the baseboards around the perimeter of the room to hide the expansion gaps and create a finished look.
- Add Trim: If needed, add any additional trim pieces, such as transition strips or molding, to complete the installation.
- Clean Up: Vacuum or sweep the floor to remove any debris or dust left behind during the installation process.
Installing Shaw vinyl plank flooring can be a rewarding DIY project. By following these steps, you can create a beautiful and durable floor that will enhance your home's style and value. If you are unsure about any aspect of the installation, it's always best to consult with a professional. Remember to refer to the specific instructions provided by the manufacturer for the particular Shaw vinyl plank flooring you are installing.

Glueless Laminate Installation Instructions Wood Shaw Floors

Shaw Luxury Vinyl Installation Diy Project For Beginners

How To Install Floorté Vinyl Flooring

Install Luxury Vinyl Tile

Shaw Lvt Flooring Installation The Easy Way Instructions Are Horrible

Shaw Floorte Vinyl Flooring Installation Getting Started Job Preview Floor Prep Plank

Shaw Laminate Flooring Installation

Overview Of How To Install Luxury Vinyl Plank

Shaw Matrix With Advanced Flex Technology Instruction Manual

Lvt Versalock Install
Related Posts