Self-Stick Laminate Wood Flooring: A Comprehensive Guide
Self-stick laminate wood flooring, also known as peel-and-stick laminate, presents a flooring solution characterized by its ease of installation and accessibility. This type of flooring distinguishes itself from traditional laminate by eliminating the need for adhesives, simplifying the laying process significantly. The flooring typically comprises a core layer, a decorative print layer mimicking wood grain, and a wear layer for durability, all backed by a self-adhesive base covered with a protective film.
The primary advantage of self-stick laminate lies in its DIY-friendly installation. Unlike click-lock or glue-down laminate options, self-stick variants require minimal specialized tools or expertise. This facilitates quicker and potentially less expensive installation compared to alternatives. However, the product's performance and longevity often depend critically on the quality of the subfloor and the preparation undertaken before installation.
Understanding the Composition and Construction
Self-stick laminate flooring is generally constructed with several layers, each serving a specific purpose. The core layer often consists of high-density fiberboard (HDF) or a similar composite material that provides the flooring's structural integrity. This core is responsible for resisting indentation and contributing to the overall stability of the plank. The decorative layer, positioned above the core, is a high-resolution printed image designed to replicate the appearance of natural wood, stone, or other materials. This layer is crucial for the product's aesthetic appeal.
Over the decorative layer sits the wear layer, a transparent protective coating meant to shield the print from scratches, stains, and fading caused by sunlight and foot traffic. The thickness and composition of the wear layer directly influence the flooring's resistance to damage and its lifespan. Lastly, the underside of the flooring features a pressure-sensitive adhesive covered by a release liner. Removing this liner exposes the adhesive, allowing the plank to be directly applied to the subfloor.
The quality of each of these layers is essential to consider when evaluating self-stick laminate flooring. Opting for products with thicker wear layers and denser core materials generally translates to better performance and increased durability. The adhesive quality is also critical; a strong, reliable adhesive ensures the flooring remains securely bonded to the subfloor, preventing issues like lifting or shifting over time.
Key Advantages of Self-Stick Laminate Flooring
Several key advantages make self-stick laminate flooring an appealing option for certain applications. Foremost among these is the ease of installation. The absence of glue or specialized tools dramatically simplifies the laying process, making it accessible to homeowners with limited experience in flooring installation. This can result in significant cost savings by eliminating professional installation fees.
Another advantage is the flooring's relatively thin profile. This makes it a suitable choice for renovations where maintaining existing floor heights is essential. The lower profile also reduces potential issues with door clearances or transitions to adjacent flooring types. Furthermore, self-stick laminate often exhibits good dimensional stability, minimizing expansion and contraction due to temperature and humidity fluctuations. This stability is particularly important in areas prone to environmental changes.
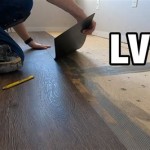
Furthermore, self-stick laminate is generally more affordable than other flooring options like hardwood or luxury vinyl plank (LVP). This makes it a budget-friendly solution for covering large areas or for use in rental properties where cost is a primary consideration. The availability of a wide range of styles and patterns allows homeowners to achieve the desired aesthetic look without breaking the bank.
Finally, self-stick laminate is typically easy to maintain. Routine cleaning usually involves sweeping or vacuuming to remove debris, followed by occasional damp mopping with a mild detergent. The wear layer protects the decorative layer from most household stains and spills, making cleanup relatively straightforward.
Potential Drawbacks and Considerations
Despite its advantages, self-stick laminate flooring also has potential drawbacks that should be carefully considered before making a purchase. Arguably the most significant is its sensitivity to subfloor conditions. The subfloor must be perfectly clean, level, and dry for the adhesive to properly bond. Any imperfections, such as unevenness, dirt, or moisture, can compromise the adhesion and lead to premature failure of the flooring.
Inadequate subfloor preparation is a common cause of problems with self-stick laminate. This often involves patching cracks, filling holes, and sanding down high spots to create a smooth, even surface. In some cases, the subfloor may require a self-leveling compound to achieve the necessary flatness. Additionally, it's crucial to ensure the subfloor is thoroughly cleaned and completely dry before installing the flooring.
Another potential drawback is the durability of the adhesive bond. While some high-quality self-stick laminates feature durable adhesives, others may be prone to weakening over time, especially in areas with high traffic or exposure to moisture. This can lead to planks lifting or shifting, requiring repairs or even complete replacement of the flooring. The long-term performance of the adhesive is directly related to the quality of the product and the thoroughness of the subfloor preparation.
Furthermore, self-stick laminate may not be the best choice for areas with high moisture levels, such as bathrooms or laundry rooms. While some products are water-resistant, prolonged exposure to moisture can eventually weaken the adhesive and damage the core layer. In these areas, waterproof flooring options like LVP or tile are generally more suitable.
Proper Subfloor Preparation Techniques
The success of any self-stick laminate flooring installation hinges on meticulous subfloor preparation. The subfloor provides the foundation to which the laminate adheres, and any deficiencies in its condition will inevitably impact the performance and longevity of the flooring. Therefore, understanding and executing proper subfloor preparation techniques is paramount.
The first step in subfloor preparation is a thorough inspection. This involves visually examining the subfloor for any signs of damage, such as cracks, holes, or unevenness. A level and straightedge should be used to identify any dips or high spots that need to be addressed. Any loose or damaged areas of the subfloor should be repaired or replaced before proceeding.
Next, the subfloor must be thoroughly cleaned. This typically involves sweeping or vacuuming to remove loose debris, followed by scrubbing with a suitable cleaner to remove any dirt, grease, or adhesives residue. It's crucial to ensure the subfloor is completely dry before proceeding to the next step. Moisture meters can be used to verify the moisture content of the subfloor is within acceptable limits.
Any cracks or holes in the subfloor should be filled with a patching compound designed for flooring applications. The patching compound should be allowed to dry completely before sanding it smooth to create a seamless surface. High spots can be sanded down using a floor sander or hand sander, depending on the severity of the unevenness.
In cases where the subfloor is significantly uneven, a self-leveling compound may be necessary. This compound is poured onto the subfloor and allowed to spread and level itself, creating a perfectly flat surface for the laminate flooring. The self-leveling compound should be allowed to cure completely before installing the flooring.
Finally, a primer specifically designed for use with self-stick flooring may be applied to the subfloor. This primer enhances the adhesion of the adhesive and improves the overall bond strength. The primer should be applied according to the manufacturer's instructions and allowed to dry completely before installing the flooring.
Installation Best Practices
Even with a properly prepared subfloor, following best practices during installation is crucial for achieving a professional-looking and long-lasting result. Careful planning, precise measurements, and attention to detail are essential for avoiding common installation errors.
Before starting the installation, it's important to plan the layout of the flooring. This involves determining the direction in which the planks will be laid and calculating the amount of flooring needed to cover the entire area. It's also a good idea to dry-lay a few rows of planks to ensure the desired aesthetic effect is achieved.
Accurate measurements are essential for avoiding gaps or overlaps. Use a measuring tape and a straightedge to cut the planks to the correct size and shape. A utility knife or a specialized laminate cutter can be used for making clean, precise cuts.
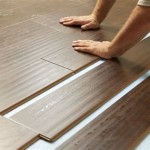
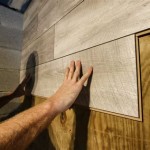
When installing the planks, start in a corner of the room and work your way across, ensuring each plank is properly aligned and securely bonded to the subfloor. Remove the release liner from the adhesive and carefully position the plank, pressing firmly to ensure full contact with the subfloor. Use a roller or a hand roller to apply even pressure to the entire surface of the plank, ensuring a strong bond.
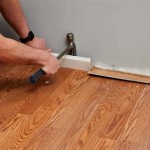
Leave a small expansion gap around the perimeter of the room to allow for natural expansion and contraction of the flooring. This gap can be covered with baseboards or quarter-round molding after the installation is complete.
Immediately clean up any adhesive residue or spills to prevent them from drying and becoming difficult to remove. Use a damp cloth and a mild cleaner to wipe away any excess adhesive.

L And Stick Vinyl Plank Flooring 101 Floorings

7 Things To Know About L And Stick Flooring

How To Install L And Stick Vinyl Plank Flooring The Nifty Nester

L And Stick Vinyl Plank Flooring 101 Floorings

Decotalk L And Stick Floor Tile Wood Flooring Planks 6 X36 Vinyl Self Adhesive Brown Tiles Waterproof Laminate 3pcs Bathroom Look

L Stick Floor Tile Wood Flooring Waterproof Temu

Livelynine 4pcs L And Stick Floor Tile Cherry Wood 6in X 3ft Red Vinyl Plank Flooring Adhesive Tiles Waterproof Laminate For Bathroom Kitchen Walls

Art3d L And Stick Floor Tile Vinyl Wood Plank 36 X 6 Light Grey Rigid Surface Hard Core Easy Diy Self Adhesive Flooring

Vinyl Vs Laminate Flooring Pros Cons And Differences Forbes Home

Dc Fix Rustic Oak Self Adhesive Vinyl Floor Tile Kitchen Wraps
Related Posts