Removing Laminate Flooring Before Installing Hardwood: A Comprehensive Guide
Many homeowners choose to replace existing laminate flooring with hardwood to enhance the aesthetic appeal and increase the value of their properties. While hardwood provides a classic and durable flooring option, the process often necessitates the removal of the old laminate. Understanding the steps and considerations involved in removing laminate flooring is crucial for a successful hardwood installation. This article will provide a detailed guide on the process, covering preparations, necessary tools, removal techniques, and subfloor considerations.
Preparing for Laminate Flooring Removal
Before commencing the removal process, adequate preparation is paramount. This involves gathering the necessary tools, ensuring personal safety, and preparing the workspace. The selection of appropriate tools significantly impacts the efficiency and ease of the removal process. Safety precautions are critical to prevent injury, and workspace preparation minimizes potential damage to surrounding areas.
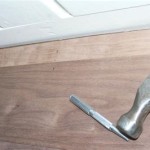
First, acquire the following tools: a utility knife, a pry bar or crowbar, a hammer, a tapping block (optional), safety glasses, work gloves, a dust mask, and garbage bags or containers for disposal. The utility knife will be used to cut through any adhesive or caulking. The pry bar and hammer serve to lift the laminate planks. The tapping block can be used to gently dislodge planks that are tightly interlocked. Safety glasses and work gloves are essential for protecting eyes and hands from debris and sharp edges. A dust mask protects against airborne particles. Finally, robust garbage bags are necessary for efficient waste disposal.
Next, prioritize personal safety by donning safety glasses, work gloves, and a dust mask. These protective measures safeguard against potential hazards such as flying debris, sharp edges, and dust inhalation. Failure to use appropriate personal protective equipment can lead to eye injuries, cuts, and respiratory problems.
The final step in preparing for removal is to clear the workspace. Remove all furniture, rugs, and other obstructions from the room. Cover any exposed areas, such as walls and baseboards, with protective sheeting or painter's tape to prevent scratches or dents during the removal process. Ensure adequate ventilation in the room by opening windows or using a fan. This will help to minimize dust buildup and improve air quality during the removal process.
The Laminate Flooring Removal Process
The actual removal of laminate flooring typically involves a systematic approach, starting with identifying the starting point and carefully disassembling the planks. The method used depends on the installation type: floating or glued-down laminate. Regardless of the method, patience and attention to detail are crucial to avoid damage to the subfloor.
To remove floating laminate flooring, identify the starting point, usually along a wall or near a doorway. Carefully examine the edges of the planks to identify the tongue-and-groove connections. Use a utility knife to score along the edges of the first row of planks to separate them from the baseboards or walls. This prevents the planks from binding and makes them easier to remove.
Insert the pry bar between the first plank and the subfloor, applying gentle pressure to lift the plank. Use a hammer to tap the pry bar if necessary. Once the first plank is partially lifted, grip it firmly and carefully pull it away from the adjacent planks. The tongue-and-groove connections should disengage relatively easily. Continue removing the planks row by row, working methodically across the room. Use a tapping block and hammer to gently dislodge planks that are tightly interlocked. This prevents damage to the planks and makes the removal process smoother.
For glued-down laminate flooring, the removal process is more challenging due to the adhesive bond between the laminate and the subfloor. Begin by identifying the starting point, as with floating laminate. Use a utility knife to score along the edges of the first row of planks to break the adhesive bond. Insert the pry bar between the first plank and the subfloor, applying significant force to lift the plank. A hammer may be required to drive the pry bar under the plank.
As the plank begins to lift, use the utility knife to cut through the adhesive as needed. Continue prying and cutting until the plank is completely detached from the subfloor. Repeat this process for each plank, working methodically across the room. Be prepared to encounter stubborn areas where the adhesive is particularly strong. In these cases, use a heat gun to soften the adhesive before prying. Apply heat sparingly and carefully to avoid damaging the subfloor.
During the removal process, regularly dispose of removed planks in garbage bags or containers. This helps to keep the workspace clean and organized, reducing the risk of accidents. Avoid creating large piles of debris, which can be a tripping hazard.
Subfloor Inspection and Preparation
After removing the laminate flooring, a thorough inspection of the subfloor is essential. The subfloor provides the foundation for the new hardwood flooring, and any imperfections or damage can compromise the integrity and longevity of the installation. Addressing any issues with the subfloor before installing hardwood is crucial for a professional and lasting result.
Begin by visually inspecting the subfloor for any signs of damage, such as cracks, holes, or water stains. Pay particular attention to areas where the laminate flooring was difficult to remove, as these areas may have suffered more stress. Check for unevenness or variations in height across the subfloor surface. Use a level to identify any high or low spots.
After the visual inspection, test the subfloor for moisture content. Excessive moisture can cause hardwood flooring to warp, buckle, or develop mold. Use a moisture meter to measure the moisture content in several areas of the subfloor. The ideal moisture content for installing hardwood flooring typically ranges from 6% to 12%, depending on the type of wood and the manufacturer's recommendations. If the moisture content is too high, take steps to dry the subfloor before proceeding with the hardwood installation. This may involve using dehumidifiers or increasing ventilation in the room.
Next, prepare the subfloor surface by removing any residual adhesive, nails, or staples. Use a scraper to remove stubborn adhesive residue. Hammer down any protruding nails or staples. Fill any cracks or holes with a patching compound designed for subfloors. Allow the patching compound to dry completely before sanding the subfloor surface to create a smooth and even surface. Remove any dust or debris from the subfloor surface using a vacuum cleaner. A clean and smooth subfloor is essential for proper adhesion and a level hardwood flooring installation.
Consider applying a subfloor leveling compound if significant variations in height are present. This compound is a self-leveling material that can be poured onto the subfloor to create a perfectly flat surface. Follow the manufacturer's instructions carefully when applying the leveling compound. Allow it to dry completely before proceeding with the hardwood installation. If the subfloor is severely damaged or uneven, it may be necessary to replace it entirely. Consult with a professional flooring contractor to determine the best course of action. Replacing a damaged subfloor is a significant undertaking, but it is essential for ensuring a stable and long-lasting hardwood flooring installation.
Once the subfloor is properly inspected, prepared, and, if necessary, repaired, one can finally proceed with the installation of the new hardwood flooring. Proper subfloor preparation significantly contributes to the success and longevity of the new flooring, preventing potential issues such as unevenness, warping, and moisture damage. Rushing this step can lead to costly repairs down the line.

How To Remove Hardwood Flooring The Easy Way

How To Remove Laminate Flooring Bob Vila

How To Remove Laminate Flooring The Home Depot

A Comprehensive Guide To Removing Floors Discount Dumpster

Wood Floor Removal Glued Down Jbl Flooring

How To Remove Hardwood Floor Floors Depot

Home Improvement How To Remove Hardwood Flooring The Best Way

How To Remove Hardwood Flooring The Easy Way

How Do I Remove Laminate Flooring Factory Direct

Home Improvement How To Remove Hardwood Flooring The Best Way
Related Posts