Plywood Sheet Flooring DIY: A Comprehensive Guide
Transform your flooring with the versatile and affordable option of plywood sheet flooring. Embark on a rewarding DIY project by following this comprehensive guide that covers every essential aspect, from preparation to installation and finishing.
Preparing for Plywood Sheet Flooring Installation
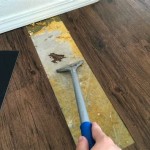
1. Remove Existing Flooring:
Begin by removing any existing flooring, including carpets, tiles, or old vinyl. Ensure the subfloor is level, clean, and dry.
2. Level the Subfloor:
If necessary, level the subfloor using self-leveling compound or plywood shims. This will create a smooth base for the plywood sheets.
Installing Plywood Sheet Flooring
3. Choose Plywood Grade and Thickness:
Select plywood with the appropriate grade and thickness for your specific project requirements. Marine-grade or exterior-grade plywood is recommended for moisture resistance.
4. Lay Out and Cut the Plywood Sheets:
Plan the layout of the plywood sheets to minimize waste. Cut the sheets to size using a circular saw or jigsaw, ensuring straight and clean cuts.
5. Apply Adhesive and Install the Plywood:
Apply plywood adhesive to the subfloor and place the first sheet of plywood. Use a hammer or nailer to secure the plywood into place. Repeat for the remaining sheets, ensuring tight joints.
6. Install Underlayment (Optional):
Consider adding a layer of underlayment between the plywood and the finished flooring for additional sound insulation and comfort.
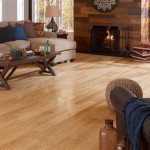
7. Sand and Finish:
Once the plywood is installed, sand the surface to remove any splinters or irregularities. Then, apply a protective finish such as polyurethane, varnish, or sealant to enhance durability and aesthetics.
Essential Tips for a Successful Plywood Sheet Flooring Project
1. Allow for Expansion:
Provide gaps between the plywood sheets and walls to allow for natural expansion and contraction due to humidity changes.
2. Use Quality Adhesives:
Invest in high-quality plywood adhesives that provide a strong and long-lasting bond.
3. Maintain Proper Temperature and Humidity:
During installation and finishing, ensure optimal temperature and humidity levels to prevent warping or buckling of the plywood.
4. Protect the Finished Floor:
After installation, protect the finished floor from heavy traffic and moisture to ensure its longevity.

Diy Plywood Plank Floors Centsational Style

Wide Plank Plywood Flooring An Economical Solution Remodelando La Casa

Plywood Flooring Diy Examples And Inspiration Of Floors Using Sheets

Diy Rustic Wide Plank Plywood Flooring Our Project Ideas

Low Budget Diy Plywood Plank Floors Diydork Com

Diy Plywood Flooring This Affordable Floor Option Could Save You Thousands Remodelaholic

Diy Plywood Plank Floors Hometalk

Low Budget Diy Plywood Plank Floors Diydork Com

Diy Plywood Plank Floors Flooring Inexpensive

Diy Plywood Flooring This Affordable Floor Option Could Save You Thousands Remodelaholic
Related Posts