Mohawk Laminate Flooring Installation: A Comprehensive Guide
Mohawk laminate flooring stands as a popular choice for homeowners seeking a durable, aesthetically pleasing, and cost-effective flooring solution. Its realistic wood and tile visuals, coupled with ease of maintenance, make it a compelling alternative to natural materials. However, the longevity and performance of Mohawk laminate flooring are inextricably linked to proper installation. This article provides a detailed guide to installing Mohawk laminate flooring, covering essential preparation steps, installation techniques, and troubleshooting tips.
Before embarking on a Mohawk laminate flooring installation project, thorough planning and preparation are paramount. This phase sets the foundation for a successful and long-lasting installation, minimizing potential issues and ensuring a professional finish. Neglecting these initial steps can result in uneven floors, gaps, and other structural problems that compromise the flooring's integrity and appearance.
1. Subfloor Preparation: Ensuring a Level and Solid Base
The subfloor is the underlying structural layer upon which the laminate flooring will rest. Its condition directly influences the stability and flatness of the finished floor. A properly prepared subfloor is clean, dry, level, and structurally sound. Any imperfections in the subfloor will telegraph through the laminate, leading to unevenness, squeaking, and potentially damaging the flooring over time.
The first step is to thoroughly inspect the subfloor. Look for signs of moisture damage, such as water stains, mold, or rot. Address any moisture issues immediately, as laminate flooring is susceptible to water damage. Common subfloor materials include concrete and plywood. Each requires specific preparation techniques.
Concrete Subfloors: Concrete subfloors are prone to moisture. Perform a moisture test using a calcium chloride test kit or a plastic sheet test. If moisture levels exceed the manufacturer's specifications, a moisture barrier must be installed. Clean the concrete surface thoroughly, removing any debris, paint, or adhesive residue. Level the floor using a self-leveling compound to fill in any cracks, holes, or uneven areas. Allow the compound to dry completely according to the manufacturer's instructions.
Plywood Subfloors: Plywood subfloors should be inspected for structural integrity. Replace any damaged or rotting sections. Secure loose plywood sheets with screws. Sand down any raised areas or uneven joints. Fill any gaps or holes with wood filler and sand smooth. Ensure the plywood is clean and free of debris.
Regardless of the subfloor material, a crucial step is to ensure it is level within acceptable tolerances. Most Mohawk laminate flooring manufacturers specify a maximum allowable variation of 3/16 inch over a 10-foot span. Use a long level or a laser level to identify any high or low spots. Correct these imperfections by sanding down high spots or filling low spots with patching compound.
2. Acclimation: Allowing the Laminate to Adapt to the Environment
Acclimation is the process of allowing the laminate flooring to adjust to the temperature and humidity conditions of the room where it will be installed. This is a critical step in preventing expansion and contraction issues after installation. Laminate flooring is a wood-based product, and it will naturally expand and contract in response to changes in moisture and temperature.
Before installation, store the unopened boxes of laminate flooring in the room where they will be installed for at least 48 to 72 hours. This allows the planks to reach equilibrium with the ambient conditions. The ideal temperature range for acclimation is typically between 60°F and 80°F (16°C and 27°C), with a relative humidity level between 30% and 60%. Consult the manufacturer's specific recommendations for acclimation requirements, as these may vary depending on the product.
Proper acclimation minimizes the risk of gapping, buckling, or cupping after the flooring is installed. Skipping this step can lead to significant problems that require costly repairs or even replacement of the entire floor.
3. Installation Techniques: Achieving a Professional Finish
Once the subfloor is properly prepared and the laminate flooring has acclimated, the actual installation process can begin. A successful installation requires careful attention to detail, proper use of tools, and adherence to the manufacturer's instructions.
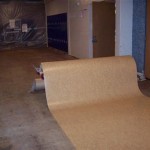
Underlayment Installation: Most Mohawk laminate flooring installations require an underlayment. The underlayment provides cushioning, reduces noise transmission, and acts as a vapor barrier (depending on the type). Roll out the underlayment according to the manufacturer's instructions, overlapping the seams and taping them securely with moisture-resistant tape. The underlayment should cover the entire subfloor area.
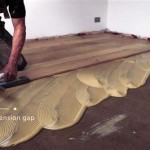
Starting the First Row: Begin the installation along the longest straight wall in the room. Leave an expansion gap of approximately ¼ to ⅜ inch between the flooring and the wall. This gap allows for expansion and contraction of the flooring due to changes in temperature and humidity. Use spacers to maintain a consistent gap. The first row is crucial because it establishes the alignment for the rest of the floor. Ensure it is perfectly straight and parallel to the wall.
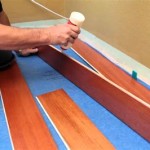
Plank Connection: Mohawk laminate flooring typically features a click-lock system that allows the planks to be easily connected without the need for glue or nails. Angle the new plank into the existing plank at a slight angle and then rotate it down until it clicks into place. Ensure the planks are securely locked together. Use a tapping block and a hammer to gently tap the planks together if necessary. Avoid excessive force, which can damage the locking mechanism.
Cutting Planks: When you reach the end of a row or need to fit around obstacles, you will need to cut the planks. Use a measuring tape, a square, and a pencil to accurately mark the cutting line. A laminate flooring cutter or a jigsaw with a fine-tooth blade can be used to cut the planks. When using a jigsaw, cut with the decorative side facing up to minimize chipping. Always wear safety glasses when cutting laminate flooring.
Staggering the Seams: To create a visually appealing and structurally sound floor, stagger the seams between rows. The end joints of adjacent rows should not align. A minimum stagger of 6 inches is generally recommended. This helps to distribute the weight and stress evenly across the floor, preventing weak points. Use the cut-off piece from the end of one row to start the next row, as long as it meets the minimum length requirement.
Doorways and Obstacles: When installing laminate flooring around doorways, pipes, or other obstacles, use a jigsaw to carefully cut the planks to fit. Use a coping saw or a multi-tool for intricate cuts. Ensure the cuts are clean and precise. Leave an expansion gap around all vertical objects. Cover the expansion gaps with baseboards or quarter-round molding.
Final Row Installation: The final row may require ripping the planks to fit the remaining space. Measure the distance between the second-to-last row and the wall, subtracting the expansion gap. Use a table saw or a circular saw to rip the planks to the required width. Install the final row as you did the previous rows, using a pull bar to lock the planks into place if necessary. Ensure the expansion gap is maintained.
Finishing Touches: Once the flooring is completely installed, remove the spacers. Install baseboards or quarter-round molding to cover the expansion gaps along the walls. These moldings provide a finished look and help to protect the edges of the flooring. Clean the floor thoroughly with a damp mop and a laminate floor cleaner. Avoid using excessive water, which can seep into the seams and damage the flooring.
By following these installation techniques carefully, you can achieve a professional-looking Mohawk laminate floor that will provide years of beauty and durability.

Mohawk Uniclic Laminate Installation With Chip Wade

How To Install Costco Mohawk Laminate Flooring

Mohawk Flooring

Mohawk Laminate Flooring

Mohawk Revwood Diy Laminate Installation How To Install For Beginners

Mohawk Laminate Instaform Profile 84 5 Inch Sandcastle Oak Onflooring

Mohawk Laminate Flooring Reviews S Pros Cons Vs Other Brands 2024 Clarity Flo

Mohawk Revwood Premier Ivey Gates Natural Bark Oak Cdl47 03

Mohawk Revwood Plus Adler Place Laminate Malted Oak Floorzz

Mohawk Revwood Plus Adler Place Laminate Stones Throw Oak Floorzz
Related Posts