Mannington Vinyl Plank Flooring Installation: A Comprehensive Guide
Mannington vinyl plank flooring offers a durable, stylish, and water-resistant flooring solution for your home or commercial space. Installing vinyl plank flooring can be a DIY project with proper preparation and attention to detail. Here's a comprehensive guide to help you achieve a professional-looking installation.
Pre-Installation Preparation
Before starting the installation, ensure that the subfloor is dry, level, and free of debris. The planks require a subfloor flatness tolerance of 1/8" over a 10' radius. If necessary, level the subfloor using a self-leveling compound or plywood underlayment.
Tools and Materials You'll Need
- Mannington vinyl plank flooring
- Measuring tape
- Chalk line
- Utility knife
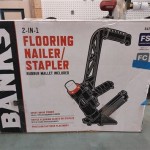
- Tapping block
- Spacer blocks
- Pry bar
- Adhesive (for glue-down installation)
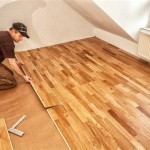
Step 1: Planning the Layout
Determine the starting point, typically the center of the room. Measure and snap a chalk line perpendicular to the longest wall. This will serve as your reference line for installing the first row of planks.
Step 2: Installing the First Row
Spread adhesive on the subfloor if using the glue-down method. Place the first plank along the chalk line and tap it into position using a tapping block. Insert spacer blocks between the planks for consistent spacing. Continue installing planks along the first row, ensuring the end joints are staggered for stability.
Step 3: Installing Subsequent Rows
Start the second row by cutting the first plank to fit the remaining space on the first row. Insert the cut plank and tap it into place. Continue installing subsequent rows in a staggered pattern, ensuring the planks are tightly interlocked.
Step 4: Cutting Around Obstacles
When encountering obstacles such as doorways or cabinets, make a template by tracing the shape on a piece of paper. Transfer the template to the plank and cut around the shape using a utility knife.
Step 5: Trimming and Edging
Once all the planks are installed, trim any excess material around the perimeter using a utility knife. Install transition strips or molding for a finished look and to protect the edges.
Step 6: Final Inspection and Cleanup
Thoroughly inspect the installation to ensure all planks are securely fastened and the flooring is level. Remove any spacer blocks and clean the surface with a damp cloth. Avoid using harsh chemicals or abrasive cleaners.
By following these steps and paying attention to detail, you can confidently install Mannington vinyl plank flooring and enjoy its durability and aesthetic appeal for years to come.

How To Install A Mannington Adura Flex Glue Down Vinyl Plank Floor

How To Install Adura Max Vinyl Plank Floors

How To Install A Mannington Restoration Collection Laminate Floor

Ultimate Guide To Vinyl Plank Flooring Mannington

Sundries Mannington

Adura Max Vinyl Plank From Hassleffree Flooring

Mannington Adura Max Rigid Vinyl Plank Flooring Calico Fox Weshipfloors

Vinyl Flooring With Mannington Adura Plank Installation

Ultimate Guide To Vinyl Plank Flooring Mannington

Mannington Adura Rigid Waterproof Plank
Related Posts