Essential Aspects of Locking Wood Flooring Installation
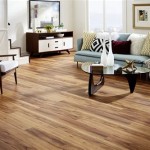
Locking wood flooring, also known as floating floor, is a popular choice for homeowners due to its ease of installation and stylish appearance. Unlike傳統木地板 that requires nailing or gluing, locking wood flooring planks simply snap together, creating a floating floor that rests on top of a foam or plastic underlayment. While the installation process is relatively straightforward, there are several essential aspects that homeowners should consider to ensure a successful and durable installation.
Subfloor Preparation
The subfloor is the foundation of your locking wood flooring, so it's crucial to ensure it is level, dry, and free of debris. Any unevenness or moisture can cause the flooring to buckle or warp over time. If the subfloor is uneven, it may need to be leveled using a self-leveling compound or plywood underlayment. It's also important to check the subfloor for moisture using a moisture meter and address any issues before installing the flooring.
Underlayment Installation
Underlayment is a thin layer of material placed between the subfloor and the locking wood flooring. It provides a moisture barrier, adds cushioning, and helps reduce noise. Choose an underlayment that is compatible with your flooring and the subfloor conditions. Some types of underlayment, such as cork or foam, also provide additional thermal insulation.
Plank Placement
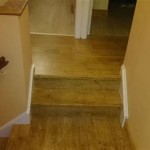
When laying the locking wood flooring planks, start from a corner of the room and work your way out. Each plank has a tongue and groove edge that interlocks with the adjacent planks. To lock the planks together, simply insert the tongue of one plank into the groove of the adjacent plank and press down. Use a tapping block and a hammer if necessary to ensure a tight fit.
Expansion Gaps
It's important to leave expansion gaps around the perimeter of the room to allow the flooring to expand and contract with changes in temperature and humidity. The size of the expansion gap will depend on the type of flooring and the room conditions. Typically, a gap of 1/4 to 1/2 inch is sufficient.
Trim and Accessories
Once the flooring is installed, it's time to add trim and accessories. Baseboards and moldings will cover the expansion gaps and give the flooring a finished look. Transition strips can be used to connect different types of flooring or to create thresholds at doorways. Quarter rounds can be used to cover gaps between the flooring and vertical surfaces, such as walls or cabinets.
By following these essential aspects, homeowners can ensure a successful and durable locking wood flooring installation. With proper planning and execution, locking wood flooring can enhance the beauty and value of your home for years to come.

How To Install Lock Engineered Hardwood Flooring

How To Install Lock Engineered Hardwood Flooring

How To Install Lock Engineered Hardwood Flooring

How To Install Flooring Project Tutorial Bob Vila

How To Fit Engineered Flooring With Locking System Blog Floorsave

How To Install Lock Engineered Hardwood Flooring

How To Install Lock Engineered Hardwood Flooring

How To Install Hardwood Flooring The Home Depot

Lock Wood Flooring Kährs

How To Install Lock Engineered Hardwood Flooring