Locking Vinyl Plank Flooring: Essential Aspects for a Successful Installation
Vinyl plank flooring has gained popularity due to its durability, ease of maintenance, and aesthetically pleasing visuals. However, the locking mechanism plays a crucial role in ensuring a successful installation. Understanding the essential aspects of locking vinyl plank flooring is paramount for a seamless and professional-looking finish.
Types of Locking Systems
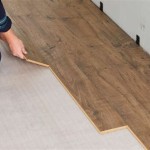
Vinyl plank flooring features two primary types of locking systems: click-lock and fold-down. Click-lock systems utilize a series of interlocking tongues and grooves that snap together with a simple click. Fold-down systems involve folding one plank over another, creating a secure connection. Both systems provide a tight and durable bond, allowing for plank replacement if necessary.
Installation Considerations
Proper installation is essential for a successful vinyl plank flooring project. Begin by preparing the subfloor, ensuring it is level, dry, and free of imperfections. Use a moisture barrier to prevent moisture penetration and install a vapor barrier if required. Determine the direction of the planks and lay them accordingly, staggering the ends to minimize the appearance of seams.
Angle and Pressure
When locking the planks, apply the correct angle and pressure. For click-lock systems, hold the plank at a 20-30 degree angle and press down firmly until the tongue snaps into the groove. For fold-down systems, carefully line up the edges and gently fold one plank over the other, ensuring the connection is secure.
Tapping and Alignment
After locking each plank, gently tap it into place using a tapping block or mallet. Avoid over-tapping, as this can damage the interlocking mechanism. Continuously check the alignment of the planks, making adjustments as needed to maintain a straight and level installation. Use spacers along the edges to ensure even spacing between planks.
Expansion Gap
Vinyl plank flooring expands and contracts with temperature fluctuations. Therefore, it is crucial to leave a small expansion gap around the perimeter of the installation. This gap allows for movement without buckling or warping. Typically, a 1/4-inch expansion gap is sufficient for most installations.
Conclusion
Locking vinyl plank flooring requires attention to detail and adherence to proper installation techniques. Understanding the different locking systems, following the correct installation procedures, and paying attention to angle, pressure, and alignment ensure a successful and aesthetically pleasing outcome. By considering these essential aspects, you can confidently achieve a professional-looking vinyl plank flooring installation that will enhance your living space for years to come.

How To Install A Lock Vinyl Floor

Luxury Vinyl Locking Systems 101 Nufloors

Xl Ridge Waterproof 8 5mm Lock Luxury Vinyl Plank Flooring Builddirect

Learn How To Choose Vinyl Flooring And Install It In Your Home

How The Locking System On Vinyl Plank And Laminate Works So That S You Do

Interlocking Vinyl Plank At Com

Vista Mario Oak Waterproof Lock Vinyl Plank Flooring 7 1 In W Dekorman

A Surfaces Balsam 20 Mil X 7 In 48 Waterproof Lock Luxury Vinyl Plank Flooring 23 8 Sq Ft Case Hd Lvr5015 0011 The Home Depot

Dekorman Vista Hyde Oak Waterproof Lock Vinyl Plank Flooring

Quick Vinyl Plank Drop And Lock Installation Demo
Related Posts