Laying Wooden Floor On Existing Tiles: A Comprehensive Guide
The decision to install a wooden floor atop existing tiles presents a viable option for homeowners seeking to upgrade their interiors without the extensive labor and cost associated with tile removal. This approach offers a blend of aesthetic improvement and practical benefits, including enhanced insulation and sound dampening. However, successful execution hinges on a thorough understanding of the preparatory steps, material considerations, and installation techniques. Ignoring these factors can lead to structural problems, aesthetic disappointments, and diminished longevity of the new wooden floor.
Before proceeding with the installation, a comprehensive assessment of the existing tile floor is paramount. This evaluation will determine the suitability of the surface as a subfloor and identify any potential issues that must be addressed before the wood floor can be laid. Neglecting this initial assessment can introduce significant complications down the line, compromising the integrity and appearance of the finished product.
Preparing the Existing Tile Surface
The first step in preparing the existing tile surface involves a thorough cleaning. This process removes dirt, grime, and any loose debris that could impede the adhesion of underlayment or the wooden floor itself. A heavy-duty cleaner specifically designed for tile and grout is recommended, followed by a thorough rinsing with clean water. Allow the tile surface to dry completely before proceeding to the next stage.
Following the cleaning, a careful inspection of the tiles is required. Any cracked, loose, or damaged tiles must be repaired or replaced. Small cracks can often be filled with epoxy-based tile repair compounds. Loose tiles should be carefully removed, the underlying adhesive scraped away, and new adhesive applied before re-setting the tile. For severely damaged tiles, complete replacement is necessary to ensure a stable and level surface.
Leveling discrepancies are often a common issue when laying a new floor over existing tiles. Even minor variations in height can create unevenness in the finished wooden floor, leading to creaking, instability, and an unappealing aesthetic. Self-leveling compound can be used to address these height differences. This compound is poured over the tile surface and spreads to create a perfectly level plane. It is crucial to follow the manufacturer's instructions carefully when applying self-leveling compound, paying particular attention to mixing ratios and drying times.
Once the self-leveling compound has fully cured, a primer should be applied to the tile surface. This primer enhances the adhesion of the underlayment, creating a stronger bond and preventing movement between the layers. Choose a primer specifically designed for use with tile and underlayment materials, and apply it according to the manufacturer's recommendations. Proper priming is especially crucial in areas prone to moisture or heavy traffic.
Selecting the Right Underlayment and Wood Flooring
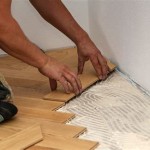
The choice of underlayment is crucial for the long-term performance and comfort of the wooden floor. The underlayment serves several important functions, including providing a level surface, cushioning the floor, reducing noise transmission, and providing a moisture barrier. The specific type of underlayment required will depend on the type of wood flooring being installed and the specific conditions of the subfloor.
For engineered wood flooring, a thin foam or cork underlayment is often sufficient. These materials provide a degree of cushioning and noise reduction without adding excessive height. For solid hardwood flooring, a thicker underlayment may be required to provide adequate support and prevent movement. Some underlayments also incorporate a moisture barrier to protect the wood floor from moisture rising from the tile subfloor.
Selecting the appropriate type of wood flooring is equally important. Engineered wood flooring is generally preferred for installation over tile, as it is more stable and less susceptible to warping or expansion due to moisture fluctuations. Solid hardwood flooring can be used, but it requires careful acclimation to the environment and a robust moisture barrier to prevent problems.
Consider the thickness of the wooden flooring during the selection process. A thicker floor will provide greater durability and a more substantial feel. However, it will also raise the overall floor height, potentially creating issues with door clearances and transitions to adjoining rooms. It is essential to factor in these considerations when choosing the thickness of the wood flooring.
The choice between pre-finished and unfinished wood flooring is another important decision. Pre-finished flooring comes with a factory-applied finish, offering convenience and consistency. Unfinished flooring allows for custom staining and finishing, providing greater design flexibility. However, finishing unfinished flooring requires additional time, effort, and expertise.
Installation Techniques and Best Practices
Before beginning the installation, carefully acclimate the wood flooring to the environment. This involves storing the flooring in the room where it will be installed for several days, allowing it to adjust to the temperature and humidity levels. Proper acclimation minimizes expansion and contraction after installation, reducing the risk of warping, gapping, and other issues.
When installing the wood flooring, follow the manufacturer's instructions meticulously. Most engineered wood flooring is installed using a floating method, where the planks are joined together without being directly attached to the subfloor. Solid hardwood flooring may be glued, nailed, or stapled to the subfloor, depending on the type of flooring and the manufacturer's recommendations.
Maintain consistent expansion gaps around the perimeter of the room and around any fixed objects, such as pipes or support columns. These gaps allow the wood flooring to expand and contract with changes in temperature and humidity without putting pressure on adjacent walls or structures. Covering these gaps with baseboards or quarter-round molding will conceal them while allowing for necessary movement.
Use spacers to maintain consistent gaps between the planks during installation. This ensures a uniform appearance and prevents the planks from shifting or becoming misaligned. Regular checks with a level are essential to ensure that the floor remains level throughout the installation process.
Pay close attention to transition areas between different flooring types. Use transition strips or moldings to create a smooth and aesthetically pleasing transition between the wooden floor and any adjacent flooring materials. These transitions should be carefully installed to prevent tripping hazards and to protect the edges of the flooring from damage.
After the flooring is installed, thoroughly clean the surface to remove any dust, debris, or adhesive residue. Apply a protective coating or sealant, if recommended by the manufacturer, to protect the finish and enhance the durability of the floor. Regular cleaning and maintenance will help to preserve the appearance and longevity of the wooden floor for years to come.
Addressing potential issues proactively, selecting appropriate materials, and adhering to established installation best practices are crucial for ensuring a successful and aesthetically pleasing outcome when laying a wooden floor over existing tiles. A well-executed project will not only enhance the visual appeal of the space but also add lasting value to the home.

Can You Put Wood Floorboards Over Tiles Havwoods

Discover How To Lay Wood Floors Over Tile Discount Flooring Depotdiscount Depot Blog

Can You Put Wood Floorboards Over Tiles Havwoods

Install Hardwood Flooring Over Tile Floor Double Glue Down Method

Wood Look Tile Flooring How To Lay That Looks Like

Blog Expert Advice How To Tile Onto Wood Plywood Or Chipboard

Tiling Onto Wood Weber

Installing Luxury Vinyl Over Existing Tiles Choices Flooring
:strip_icc()/101206833-2e499ef612434b6b8ab6e5b62422a78f.jpg?strip=all "How To Install Hardwood Floors")
How To Install Hardwood Floors

How To Install Wood Look Tile
Related Posts