Laying Vinyl Flooring On Laminate: A Comprehensive Guide
Vinyl flooring has become increasingly popular due to its durability, ease of maintenance, and versatility. With its wide range of colors and styles, vinyl flooring can complement any interior design scheme. If you're considering installing vinyl flooring over an existing laminate floor, here's a comprehensive guide to help you achieve a seamless and professional-looking finish.
1. Preparation
Before you begin laying the vinyl flooring, it's crucial to prepare the laminate surface thoroughly. Ensure that the laminate floor is clean, dry, level, and free from any dirt, dust, or debris. Remove any baseboards or molding that may obstruct the installation. If there are any cracks, gaps, or uneven areas on the laminate floor, repair them using a suitable filler or leveling compound.
2. Measure and Cut the Vinyl Flooring
Measure the area where you intend to install the vinyl flooring and cut the planks or tiles accordingly. Use a sharp utility knife and a straight edge to ensure precise cuts. Make sure to leave a small gap around the perimeter of the room for expansion and contraction.
3. Apply Adhesive
Apply a thin and even layer of adhesive to the back of the vinyl flooring planks or tiles. Use a notched trowel to spread the adhesive evenly and avoid any air pockets. Follow the manufacturer's instructions regarding the specific adhesive and application method.
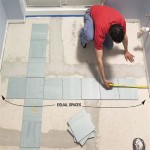
4. Lay the Vinyl Flooring
Starting from one corner of the room, carefully lay the vinyl flooring planks or tiles in place. Press them firmly onto the adhesive-covered laminate floor to ensure a secure bond. Stagger the joints between the planks or tiles to minimize the appearance of seams.
5. Roll the Floor
Once the vinyl flooring is laid, use a heavy roller to apply pressure over the entire surface. This will help to eliminate any air bubbles and ensure a smooth and even finish. Roll the floor in multiple directions to distribute the pressure evenly.
6. Trim the Edges
After rolling the floor, trim any excess vinyl flooring around the perimeter of the room using a utility knife. Use a straight edge to guide your cuts and ensure clean and precise edges. Reinstall the baseboards or molding to conceal the edges.
7. Allow for Curing
Allow the vinyl flooring to cure for the recommended time specified by the manufacturer. This will ensure that the adhesive bonds properly and the flooring achieves its full strength and durability.
Tips:
* Use a moisture barrier under the vinyl flooring to prevent moisture from damaging the laminate floor. * Allow the laminate floor to acclimate to the room temperature for at least 48 hours before installing the vinyl flooring. * If you encounter any difficulties during the installation, refer to the manufacturer's instructions or consult a professional flooring installer. * Regular cleaning and maintenance will help preserve the beauty and longevity of your vinyl flooring.
Elfloors 2 Can You Install Loose Lay Vinyl On Top Of Laminate

Can I Install Vinyl Tiles Over Laminate Flooring Comprehensive Guide

Can I Lay Vinyl Over Laminate Flooring Metwest Building Supplies Blog

How To Lay Vinyl Flooring Checkatrade

A Beginner S Guide To Installing Vinyl Plank Flooring Dumpsters Com

Laying Vinyl Planks The Right Way Expert Guide By Fantastic Handyman

What Is Loose Lay Vinyl Flooring A Plank Guide Reallyfloors America S Est Hardwood

How To Install Vinyl Plank Flooring As A Beginner Home Renovation

Installing Vinyl Floors A Do It Yourself Guide The Honeycomb Home

Vinyl Tile Installation A Comprehensive Guide Gc Flooring Pros
Related Posts