Laying Tongue and Groove Flooring on Joists: A Step-by-Step Guide
Installing tongue and groove flooring on joists is a relatively straightforward task that can be completed in a day or two. By following these step-by-step instructions, you can ensure that your flooring is installed correctly and will last for many years to come.
Materials You Will Need
- Tongue and groove flooring planks
- Joists
- Underlayment
- Nails or screws
- Hammer or nail gun
- Circular saw
- Measuring tape
- Chalk line
- Safety glasses
- Ear protection
- Knee pads
Step 1: Prepare the Joists
The first step is to prepare the joists by making sure they are level and spaced evenly. If the joists are not level, you will need to shim them up. To do this, simply place a shim under the joist and tap it into place with a hammer. Once the joists are level, you can begin laying the underlayment.
Step 2: Install the Underlayment
The underlayment will help to protect the flooring from moisture and provide a cushion for the planks. To install the underlayment, simply roll it out over the joists and secure it in place with nails or screws. Be sure to overlap the seams of the underlayment by at least 6 inches.
Step 3: Lay the First Plank
The first plank should be laid along one of the walls of the room. Start by measuring the distance from the wall to the opposite side of the room. Then, cut the first plank to length so that it is 1/2 inch shorter than the measured distance. This will allow for expansion and contraction of the flooring.
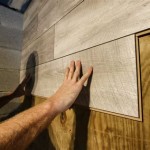
Step 4: Install the Remaining Planks
Once the first plank is in place, you can begin installing the remaining planks. To do this, simply insert the tongue of one plank into the groove of the previous plank. Then, tap the plank into place with a hammer or nail gun. Be sure to keep the planks tight together as you install them.
Step 5: Trim the Planks
Once all of the planks are installed, you will need to trim the last few planks to fit. To do this, simply measure the distance from the last plank to the wall and cut the plank to length. Then, insert the tongue of the plank into the groove of the previous plank and tap it into place.
Step 6: Finish the Floor
Once all of the planks are installed, you can finish the floor by sanding it and applying a finish. To sand the floor, use a sander with a fine-grit sandpaper. Once the floor is sanded, you can apply a finish of your choice. Be sure to follow the manufacturer's instructions for applying the finish.

How To Install Hardwood Floors Directly Over Joists Wood Floor Fitting

Fitting Wood Flooring Straight To Joists And Beyond Blog

Laying Hardwood Flooring On Second Story With No Subfloor

How To Install A Subfloor On Joists Ana White

Laying Hardwood Flooring On Second Story With No Subfloor

Junckers Laying A Floor Over Batons

5 Essential Tips For Tongue And Groove Flooring District Floor Depot

Laying Melbourne Floor Sanding Pj Diamond Timber Floors

Sub Floor Installation Tips From Georgia Pacific

How To Install A Plywood Subfloor Vinawood
Related Posts