Laying Laminate Wood Flooring In A Hallway
Laminate flooring is a popular choice for hallways due to its durability, affordability, and ease of installation. Laying laminate flooring in a hallway, however, presents specific challenges compared to larger, more open rooms. Hallways are often narrow, irregularly shaped, and subject to high foot traffic. This article provides a comprehensive guide to successfully laying laminate flooring in a hallway, covering preparation, installation, and troubleshooting.
Prior to commencing the installation process, thorough preparation is paramount. This stage involves assessing the existing subfloor, selecting the appropriate laminate flooring, and gathering the necessary tools and materials. Neglecting proper preparation can lead to unsatisfactory results, including uneven surfaces, gapping, and premature wear.
Subfloor Preparation
The subfloor is the foundation upon which the laminate flooring will rest. Its condition directly impacts the stability and longevity of the finished floor. A subfloor that is uneven, damaged, or contaminated can compromise the integrity of the new laminate floor.
Inspection: Begin by thoroughly inspecting the existing subfloor. Look for signs of damage such as cracks, warps, or water stains. Identify any areas that are uneven, loose, or squeaky. It's crucial to address any existing issues before laying the laminate flooring.
Cleaning: Remove all existing flooring materials, including carpet, vinyl, or tile. Scrape away any adhesive residue or debris. Thoroughly sweep and vacuum the subfloor to create a clean and dust-free surface. This step is essential for ensuring proper adhesion of the underlayment.
Leveling: Use a self-leveling compound to correct any unevenness in the subfloor. Apply the compound according to the manufacturer's instructions, ensuring it spreads evenly and fills any low spots. Allow the compound to dry completely before proceeding. For minor imperfections, a floor patch compound can be used.
Repairing Damage: Repair any cracks or damage to the subfloor. Use a concrete patch for concrete subfloors and wood filler for wooden subfloors. Allow the patch to dry thoroughly and sand it smooth before proceeding. Replace any damaged or rotten sections of wooden subfloor.
Moisture Testing: Moisture is a primary enemy of laminate flooring. Conduct a moisture test to ensure the subfloor is sufficiently dry. Use a moisture meter to measure the moisture content. Generally, the moisture content should be below 12% for wood subfloors and below 5% for concrete subfloors. If the moisture level is too high, address the source of the moisture and allow the subfloor to dry further before installing the laminate.
Considering Underlayment: Underlayment is a layer of material installed between the subfloor and the laminate flooring. It provides cushioning, sound insulation, and moisture protection. Select an underlayment appropriate for your specific needs and the type of subfloor you have. Some laminate flooring products come with pre-attached underlayment. If not, roll out the underlayment material, overlapping the seams slightly, and tape them together using moisture-resistant tape.
Acclimation: Acclimation is the process of allowing the laminate flooring to adjust to the temperature and humidity of the installation environment. Store the laminate flooring in the hallway for at least 48 to 72 hours prior to installation. This will help prevent warping and gapping after the floor is installed.
Laying the Laminate
With the subfloor prepared, the next step is laying the laminate flooring. This process requires careful planning, precise cutting, and accurate alignment to ensure a professional-looking finish.
Planning the Layout: Before starting, plan the layout of the laminate flooring. Consider the direction of the planks and how they will align with the hallway's dimensions. Ideally, the planks should run lengthwise down the hallway to create a sense of spaciousness. Avoid small slivers of flooring at the ends of rows, as they can be unstable and unsightly. Adjust the width of the first row of planks to avoid narrow strips at the opposite end of the hallway.
Cutting the Planks: Laminate flooring is typically cut using a saw, such as a circular saw, jigsaw, or laminate cutter. Measure the required length of the plank and mark it with a pencil. Use a straightedge to ensure a clean, accurate cut. When using a power saw, cut with the decorative side facing up to prevent chipping. For more complex cuts around door frames or pipes, use a jigsaw for greater control.
Installing the First Row: Start laying the laminate flooring along one wall of the hallway. Use spacers to maintain a consistent expansion gap between the flooring and the wall. This gap allows for the natural expansion and contraction of the laminate due to temperature and humidity changes. The expansion gap is typically about 1/4 to 3/8 inch.
Locking the Planks: Laminate flooring typically features a click-lock system that allows the planks to be easily joined together. Angle the new plank at a slight angle and insert it into the groove of the existing plank. Gently press down until the planks lock into place. If necessary, use a tapping block and hammer to gently tap the planks together for a secure fit. Avoid excessive force, which can damage the locking mechanism.
Cutting Around Obstacles: Hallways often contain obstacles such as door frames, pipes, and corners. To cut around these obstacles, use a combination square and pencil to transfer the shape of the obstacle onto the plank. Use a jigsaw to carefully cut out the shape, ensuring a snug fit around the obstacle.
Completing the Installation: Continue laying the laminate flooring row by row, ensuring that the planks are properly aligned and locked together. Stagger the end joints of the planks to create a more visually appealing and structurally sound floor. Use a pull bar to tighten the last row of planks against the wall. Remove the spacers after the installation is complete.
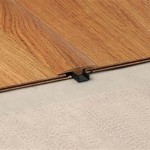
Installing Transition Strips: Transition strips are used to create a smooth transition between the laminate flooring and other types of flooring, such as tile or carpet. Install transition strips at doorways and where the laminate flooring meets other surfaces. Select transition strips that match the color and style of the laminate flooring.
Addressing Common Problems
Despite careful preparation and installation, certain problems may arise when laying laminate flooring in a hallway. Addressing these issues promptly is essential for achieving a satisfactory and long-lasting result.
Gapping: Gapping between planks can occur due to improper installation, insufficient acclimation, or changes in temperature and humidity. To address gapping, use a tapping block and hammer to gently tap the planks back together. If the gap is too large to close, consider replacing the affected planks. Ensure that the flooring is properly acclimated before installation to minimize the risk of gapping.
Squeaking: Squeaking can be caused by an uneven subfloor, loose planks, or friction between the laminate flooring and the subfloor. To address squeaking, identify the source of the noise and correct the underlying problem. Level the subfloor if necessary, and ensure that the planks are securely locked together. Apply talcum powder or graphite lubricant between the planks and the subfloor to reduce friction.
Warping: Warping can occur due to excessive moisture or improper installation. Ensure that the subfloor is dry before installing the laminate flooring, and use a moisture barrier to protect the flooring from moisture. Leave sufficient expansion gaps around the perimeter of the room to allow for the natural expansion and contraction of the laminate. Replace any warped planks.
Damage: Laminate flooring can be damaged by scratches, dents, or water spills. Protect the flooring from scratches by using furniture pads under heavy objects. Clean up spills promptly to prevent water damage. Repair minor scratches and dents with a laminate repair kit. Replace severely damaged planks.
Difficult Cuts: Hallways often present situations requiring complex cuts. Around door frames, pipes and irregular corners. Take extensive measurements. Create templates from cardboard if necessary before undertaking the cut in the laminate planks. Using the appropriate saw, a jigsaw for detailed work, and a circular saw for straighter lines can make the job tidier and more professional. Always err on the side of too large and shave down as necessary rather than cutting too much and wasting a plank.
Tight Spaces: Hallways are by definition narrow and often cluttered during the installation process. Keep the area tidy. Store planks and tools in an adjacent room if possible and only bring forward what is immediately needed. Ensure adequate lighting to avoid mistakes and potential injury.

Installing Laminate Flooring In Hallways Do It Yourself

Installing Laminate Flooring In Hallways Do It Yourself

Best Flooring For Hallways Timba Floors Boards

Laminate Flooring In Hallway Changing Direction Laying Best Hardwood Floors

Installing Laminate Down Hallways From Another Room

Choosing Laminate Flooring For An Entrance Or Hallway Tarkett

Transform Your Hallway Flooring From Dull To Dazzling With These 6 Ideas Carpetright

Iheart Organizing Do It Yourself Floating Laminate Floor Installation

Iheart Organizing Do It Yourself Floating Laminate Floor Installation

Choosing Our Hardwood Flooring For The Hallway Making It Lovely
Related Posts