Laying Engineered Wood Flooring On Existing Floorboards: A Comprehensive Guide
Engineered wood flooring offers a versatile and aesthetically pleasing alternative to solid hardwood, often proving more stable and resistant to moisture and temperature fluctuations. When considering installation, particularly over existing floorboards, several key factors must be understood to ensure a successful and long-lasting result. This article provides a detailed guide encompassing preparation, installation techniques, and common pitfalls to avoid when laying engineered wood flooring on top of existing timber floorboards.
One of the primary advantages of installing engineered wood over existing floorboards is the potential to minimize subfloor preparation and reduce overall installation time. However, this approach necessitates careful assessment of the existing floorboards' condition and suitability. A thorough evaluation will determine if the existing subfloor can provide a stable, level, and secure base for the new engineered wood flooring. Addressing any underlying issues before installation is crucial to prevent future problems such as squeaking, unevenness, and premature wear.
Assessing the Existing Floorboards: A Critical First Step
Before commencing any installation, a comprehensive assessment of the existing floorboards is paramount. This involves visually inspecting the floor for signs of damage, such as warping, cupping, or insect infestation. Any significantly damaged or deteriorated boards must be replaced or securely repaired before proceeding. Furthermore, the levelness of the existing floor must be evaluated using a long spirit level or laser level. Unevenness exceeding acceptable tolerances, typically specified by the flooring manufacturer, requires remediation. This can involve sanding down high spots, filling low spots with leveling compound, or, in severe cases, installing a self-leveling underlayment.
The stability of the existing floorboards is just as important as their levelness. Loose or squeaky boards must be securely fastened to the joists below. This can be achieved by driving screws through the floorboards into the joists, ensuring that the screw heads are countersunk to avoid interfering with the new flooring. Squeaking can be caused by movement between the floorboards and the joists, so it is essential to identify and correct the source of the noise. In some cases, adding shims between the floorboards and joists can eliminate movement and reduce squeaking.
Another critical aspect of the assessment is checking for moisture content. Elevated moisture levels in the existing floorboards can lead to dimensional changes that can affect the stability and appearance of the new engineered wood flooring. A moisture meter should be used to measure the moisture content of both the existing floorboards and the new flooring. Ideally, the moisture content of both materials should be within the manufacturer's recommended range and as close to each other as possible. Allowing the engineered wood flooring to acclimate to the environment in which it will be installed is crucial to minimizing moisture-related issues.
Finally, it is essential to ensure that the existing floorboards are clean and free of any debris, such as dust, dirt, or old adhesive residue. Thoroughly vacuuming and cleaning the floorboards will provide a better surface for the underlayment and engineered wood flooring to adhere to. Removing any obstructions, such as protruding nails or staples, is also necessary to create a smooth and even subfloor.
Selecting the Appropriate Underlayment: Enhancing Performance and Comfort
Choosing the right underlayment is crucial when laying engineered wood flooring over existing floorboards. The underlayment serves several important functions, including providing a level surface, reducing sound transmission, and improving insulation. Different types of underlayment are available, each with its own advantages and disadvantages. The selection should be based on the specific needs of the project and the characteristics of the existing floorboards.
Foam underlayment is a popular choice due to its affordability and ease of installation. It provides good cushioning and sound absorption. However, it may not be suitable for areas with high traffic or where significant leveling is required. Cork underlayment is a more environmentally friendly option that offers excellent sound insulation and moisture resistance. It is also more durable than foam underlayment and can provide a more stable base for the engineered wood flooring. Rubber underlayment is another premium option that offers superior sound and impact absorption. It is particularly well-suited for multi-story dwellings where noise reduction is a priority. It is also more expensive than foam or cork underlayment.
When selecting an underlayment, it is important to consider its thickness. A thicker underlayment can provide better cushioning and sound insulation, but it can also raise the floor level and create transitions with adjacent flooring. It is essential to choose an underlayment thickness that is compatible with the existing floor height and the desired finished floor level. The manufacturer's recommendations should always be followed.
The underlayment should be installed according to the manufacturer's instructions. Typically, this involves unrolling the underlayment and butting the edges together. Some underlayments have self-adhesive edges or require taping to secure the seams. It is important to ensure that the underlayment is properly aligned and that there are no gaps or overlaps. A vapor barrier may be required, depending on the manufacturer's recommendations and the moisture conditions in the room. This barrier helps to prevent moisture from rising from the subfloor and damaging the engineered wood flooring.
For situations where the existing floorboards have minor imperfections, a self-leveling underlayment can be used. This type of underlayment is a pourable compound that flows to create a smooth and level surface. It is more expensive and requires more preparation than traditional underlayment options, but it can be an effective solution for addressing uneven floors. It's crucial to follow the manufacturer's instructions carefully when applying self-leveling compounds, as improper application can lead to cracking or other problems.
Installation Techniques for Engineered Wood Flooring
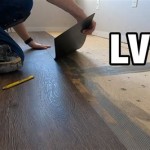
The installation method for engineered wood flooring depends on the type of flooring and the manufacturer's recommendations. Common installation methods include floating, gluing, and nailing or stapling. When installing over existing floorboards, the floating method is often the preferred choice, as it minimizes the amount of disturbance to the existing subfloor. However, gluing or nailing/stapling can be appropriate in certain situations, provided that the existing floorboards are in good condition and securely fastened.
The floating method involves interlocking the engineered wood planks or boards together without attaching them to the subfloor. The underlayment provides a cushion and a barrier between the flooring and the subfloor. This method allows the flooring to expand and contract with changes in temperature and humidity, which can help to prevent warping or cracking. When installing a floating floor, it is important to leave an expansion gap around the perimeter of the room. This gap allows the flooring to move freely without putting pressure on the walls.
The gluing method involves applying adhesive to the back of each plank or board and bonding it to the subfloor. This method provides a more secure and permanent installation compared to the floating method. However, it requires a more level and stable subfloor, and it can be more difficult to remove the flooring in the future. When using the gluing method, it is important to choose an adhesive that is specifically designed for engineered wood flooring and that is compatible with the subfloor material. The adhesive should be applied evenly and according to the manufacturer's instructions.
The nailing or stapling method involves attaching the engineered wood planks or boards to the subfloor using nails or staples. This method is typically used for solid hardwood flooring, but it can also be used for some types of engineered wood flooring. When using this method, it is important to use the correct type and size of fasteners and to follow the manufacturer's recommendations for spacing. It is also important to ensure that the fasteners are driven in straight and flush with the surface of the flooring to avoid damaging the finish.
Regardless of the installation method chosen, it is essential to start with a straight and true baseline. This can be achieved by using a chalk line to mark a straight line along one wall of the room. The first row of planks or boards should be laid along this line, ensuring that they are properly aligned and interlocked. Subsequent rows should be aligned with the first row, maintaining consistent spacing and ensuring that the ends of the planks or boards are staggered to create a more natural appearance. Spacers should be used along the walls to maintain the expansion gap. After the flooring is installed, the baseboards or quarter-round moldings can be installed to cover the expansion gap and create a finished look.
Throughout the installation process, it is important to regularly check the alignment and levelness of the flooring. Any imperfections should be corrected immediately to avoid compounding the problem. It is also important to clean up any adhesive or debris as you go to prevent it from drying and becoming difficult to remove. Following the manufacturer's instructions and taking the time to do the job correctly will ensure a beautiful and long-lasting engineered wood floor.
Proper acclimation, appropriate underlayment, and careful installation techniques are the keys to ensuring a successful engineered wood flooring installation over existing floorboards. By addressing potential issues proactively and following best practices, a durable and aesthetically pleasing floor can be achieved.

How To Lay Engineered Timber Floor Guide Fantastic Handyman Au

Laying New Wood Flooring Over Original Uneven Floorboards Le Arthur Wells

How To Lay Engineered Wood Flooring A Diy Guide For Everyone

Engineered Wood Flooring Project Step By Guide To Laying An Floor

How To Lay Engineered Wood Flooring Blog Advice Centre Luxury

Installation Methods For Wooden Floor Craftedforlife

How To Install Lock Engineered Hardwood Flooring

How To Install Hardwood Flooring For Beginners

Laying Solid Wood Flooring Onto Existing Floorboards And Beyond Blog

What Direction To Lay Hardwood Flooring 50floor
Related Posts