Laying Down Wood Laminate Flooring: A Comprehensive Guide
Transforming your home with wood laminate flooring is a rewarding experience that can enhance both the aesthetics and functionality of your living spaces. However, to achieve a professional-looking and durable installation, it's crucial to adhere to specific techniques and pay attention to essential details.
Step 1: Preparation
Before starting the installation, it's imperative to prepare the subfloor and gather the necessary tools and materials. Ensure the subfloor is level, dry, and free of any debris or imperfections. Tools such as a saw, spacers, and a tapping block are essential for the process. Additionally, gather underlayment to provide a stable and soundproof base for your flooring.
Step 2: Installing the Underlayment
Unroll the underlayment over the subfloor and secure it using tape or adhesive. Ensure there are no gaps or overlaps between the sheets. The underlayment will provide sound insulation, moisture resistance, and support for the laminate flooring.
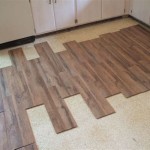
Step 3: Starting Your Layout
Determine the starting point for your installation, typically along the longest wall in the room. Measure and mark a straight line as a guide for the first row of planks. Use spacers to ensure even gaps between the planks and the walls.
Step 4: Installing the First Row
Place the first plank along the marked line, ensuring the tongue side faces the wall. Angle the next plank slightly and insert its tongue into the groove of the first plank. Repeat this process for the entire first row, tapping the planks gently into place using a tapping block.
Step 5: Continuing the Installation
For subsequent rows, start by cutting the first plank to the appropriate length to stagger the joints. Interlock the tongue and groove of each plank and tap them into place using the tapping block. Continue this process until the entire floor is covered.
Step 6: Trimming and Edging
When reaching obstacles such as walls, doorways, or pipes, measure and cut the planks accordingly. Use a saw to make precise cuts and ensure a snug fit. Along the edges of the room, insert spacers between the planks and the walls to maintain uniform gaps.
Step 7: Final Touches
Once the flooring is installed, remove the spacers and install baseboards or quarter rounds around the perimeter. These moldings will conceal the expansion gaps and enhance the overall finish of your floor.
Conclusion
Laying down wood laminate flooring requires precise preparation, attention to detail, and the use of proper techniques. By following the steps outlined above, you can achieve a professional-looking and durable installation that will transform your living spaces.

How To Install Laminate Flooring For Beginners

How To Install Hardwood Flooring Step By Forbes Home

How To Install Laminate Flooring The Home Depot

Common Mistakes When Laying Laminate Flooring Next Day Floors

Waterproof Laminate Flooring Installation

Which Direction Should You Lay Hardwood Floors 50floor

How To Install Hardwood Flooring For Beginners

How To Install Laminate Flooring The Home Depot

Laminate Floor Installation For Beginners 9 Clever Tips

How To Install Laminate Flooring The Home Depot