Laying Down Vinyl Flooring In Bathroom: Essential Aspects
Vinyl flooring is a popular choice for bathrooms due to its durability, water resistance, and affordability. However, installing vinyl flooring in a bathroom requires careful preparation and attention to detail to ensure a successful outcome. Here are some essential aspects to consider when laying down vinyl flooring in your bathroom:
1. Subfloor Preparation: The subfloor is the foundation of your vinyl flooring, so it's crucial to prepare it properly. The subfloor should be smooth, flat, and free of any moisture or debris. If the subfloor is uneven, you may need to level it using a self-leveling compound. Any existing cracks or gaps should be filled with a suitable patching compound.
2. Moisture Control: Bathrooms are inherently moist environments, so it's important to control moisture to prevent damage to your vinyl flooring. Ensure the subfloor is completely dry before installing the flooring. You may also consider installing a moisture barrier beneath the vinyl flooring to provide additional protection against moisture.
3. Choose the Right Vinyl Flooring: Not all vinyl flooring is created equal. For bathroom applications, choose a vinyl flooring specifically designed for wet areas. Look for flooring with a waterproof or water-resistant backing to prevent water damage.
4. Acclimation: Before installing the vinyl flooring, allow it to acclimate to the bathroom environment for at least 24 hours. This will help the flooring adjust to the temperature and humidity levels, reducing the risk of buckling or warping.
5. Dry-Fit and Cut: Dry-fit the vinyl flooring pieces together before gluing or interlocking them. This will allow you to check the fit and make any necessary adjustments. Use a sharp utility knife to cut the flooring to fit around fixtures and obstacles.
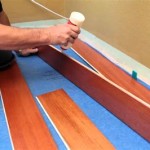
6. Adhesive Installation: If using glue-down vinyl flooring, apply the adhesive evenly to the subfloor using a notched trowel. Carefully place the vinyl flooring pieces into the adhesive, ensuring they are aligned correctly. Press firmly to bond the flooring to the subfloor.
7. Interlocking Installation: For click-lock or floating vinyl flooring, simply click the pieces together until they are locked in place. Ensure the joints are tight and secure. No adhesive is required for this type of installation.
8. Grout and Trim: Once the vinyl flooring is installed, apply grout to the joints between the planks. Use a grout that is specifically designed for vinyl flooring. Install baseboards or quarter-round trim around the perimeter of the room to complete the installation.
By following these essential aspects, you can successfully lay down vinyl flooring in your bathroom and enjoy a durable, water-resistant, and stylish flooring solution for years to come.

How To Lay Vinyl Floor In A Bathroom Dove Cottage

How To Install Vinyl Plank Flooring In A Bathroom Fixthisbuildthat

How To Install Sheet Vinyl Floor Decor Adventures

How To Lay Vinyl Floor In A Bathroom Dove Cottage

How To Install Vinyl Plank Flooring In A Bathroom As Beginner Home Renovation

Diy How To Lay Vinyl Or Lino Flooring

How To Install Sheet Vinyl Flooring

How To Install Vinyl Plank Flooring In A Bathroom Fixthisbuildthat

A Beginner S Guide To Installing Vinyl Plank Flooring Dumpsters Com

How To Install Sheet Vinyl Lino Flooring In A Bathroom Easy Step By Diy Guide
Related Posts