Laying Timber Flooring Over Existing Tiles: A Comprehensive Guide
Installing timber flooring can significantly enhance the aesthetic appeal and value of a property. While traditional methods often involve removing existing flooring materials, laying timber directly over tiles offers a time-saving and cost-effective alternative. This method, however, requires careful consideration and preparation to ensure a successful and long-lasting result. This article provides a detailed guide to laying timber flooring over tiles, covering essential preparation techniques, installation steps, and potential challenges.
The decision to lay timber over tiles should be based on a thorough assessment of the existing tile surface and subfloor condition. Factors such as the type of timber flooring being installed, the evenness of the tile surface, and any existing moisture issues will influence the feasibility and success of this approach. Proper preparation is critical to prevent future problems such as unevenness, squeaking, and moisture damage.
Assessing the Existing Tile Surface and Subfloor
Before commencing any installation, a comprehensive inspection of the existing tile surface is paramount. This assessment should focus on identifying any cracks, loose tiles, or uneven areas. These imperfections, if left unaddressed, will telegraph through the newly installed timber flooring, creating an uneven and potentially unstable surface.
Cracked or loose tiles must be either repaired or replaced. Minor cracks can often be filled with a suitable epoxy repair compound designed for tile. Loose tiles should be carefully removed, the underlying surface cleaned, and the tiles re-adhered using a high-quality tile adhesive. It is crucial to ensure that the repaired or replaced tiles are level with the surrounding tiles to maintain a consistent surface plane.
Unevenness is another critical factor to consider. Significant variations in tile height will require leveling. This can be achieved using self-leveling compounds specifically designed for use over tile. These compounds are typically cement-based and can be poured over the entire surface to create a perfectly level substrate for the timber flooring. Proper application and curing of the self-leveling compound are essential for optimal performance.
Subfloor moisture content is a crucial factor that should never be overlooked. High moisture levels can lead to warping, cupping, and other forms of damage to the timber flooring. A moisture meter should be used to measure the moisture content of both the tiles and the subfloor beneath. Acceptable moisture levels will vary depending on the type of timber flooring being installed, but generally, moisture content should be within the range specified by the flooring manufacturer. If moisture levels are elevated, addressing the source of the moisture is crucial before proceeding with the installation. This may involve repairing leaks, improving ventilation, or installing a moisture barrier.
In addition to visual inspection and moisture testing, it is also advisable to assess the structural integrity of the subfloor. Any signs of rot, damage, or instability should be addressed before installing the timber flooring. Structural issues can compromise the stability and longevity of the entire flooring system.
Preparing the Tile Surface for Timber Flooring
Once the existing tile surface has been thoroughly assessed and any necessary repairs have been completed, the next step is to prepare the surface to ensure proper adhesion of the timber flooring. This preparation typically involves cleaning, sanding, and applying a primer.
Thorough cleaning is essential to remove any dirt, grease, or debris that could interfere with the adhesion of the timber flooring or the leveling compound. The tile surface should be vacuumed to remove loose particles and then scrubbed with a suitable cleaning solution. A degreaser may be necessary to remove any oily residue. After cleaning, the surface should be allowed to dry completely before proceeding.
Sanding the tile surface is recommended to create a rougher texture that will improve the bond between the tile and the adhesive or leveling compound. This can be achieved using a coarse-grit sandpaper and a sanding block or floor sander. The goal is not to remove the tile surface completely but to create a slightly abraded surface that will provide a better key for adhesion. It is important to wear appropriate safety gear, including a dust mask and eye protection, during the sanding process. After sanding, the surface should be thoroughly vacuumed again to remove any sanding dust.
Applying a primer is the final step in preparing the tile surface. A primer is a liquid coating that is applied to the surface to improve adhesion and reduce porosity. The type of primer used will depend on the type of timber flooring being installed and the adhesive or leveling compound being used. It is essential to follow the manufacturer's instructions for applying the primer, including the recommended drying time. A high-quality primer will create a strong and durable bond between the tile surface and the timber flooring.
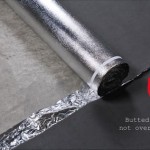
Alternative preparation methods may include applying a decoupling membrane. These membranes are designed to isolate the timber flooring from the underlying tile surface, reducing the risk of cracking or movement due to differential expansion and contraction. Decoupling membranes can be particularly beneficial when installing timber flooring over tiles in areas that are subject to temperature or humidity fluctuations.
Installation Techniques and Considerations for Timber Flooring
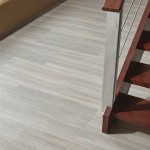
With the tile surface properly prepared, the installation of the timber flooring can commence. The specific installation techniques will vary depending on the type of timber flooring being installed, such as floating floor, engineered timber or solid timber. Each type needs its own specific approach and material choice.
Floating timber floors involve laying the planks or tiles directly over the prepared tile surface without adhering them to the subfloor. These floors typically feature a tongue-and-groove locking system that allows the planks to be connected together, creating a stable and durable surface. A foam underlayment is typically installed between the tile surface and the timber flooring to provide cushioning, sound insulation, and moisture protection. Floating timber floors are relatively easy to install and can be a good option for DIY projects.
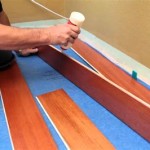
Engineered timber flooring consists of a thin layer of hardwood bonded to a core of plywood or other composite material. Engineered timber flooring offers the aesthetic appeal of solid hardwood with improved dimensional stability and resistance to moisture. Engineered timber flooring can be installed using a variety of methods, including gluing, nailing, or floating. When installing engineered timber flooring over tiles, gluing is often the preferred method. A suitable adhesive should be applied to the prepared tile surface, and the engineered timber planks should be carefully placed and pressed into the adhesive. It is important to follow the adhesive manufacturer's instructions for application and curing.
Solid timber flooring is the traditional choice for many homeowners. Solid timber flooring offers a timeless aesthetic and can be refinished multiple times over its lifespan. However, solid timber flooring is more susceptible to moisture damage and expansion and contraction than engineered timber flooring. When installing solid timber flooring over tiles, it is essential to use a suitable moisture barrier and adhesive. Nailing or screwing the solid timber planks to the subfloor through the tiles may be another alternative, but it is crucial to ensure that the fasteners are long enough to penetrate the subfloor and provide a secure hold. Furthermore, extreme care should be taken to avoid damaging any utilities or pipes that may be beneath the tile floor.
Regardless of the type of timber flooring being installed, it is crucial to follow the manufacturer's instructions carefully. These instructions will provide specific guidance on preparation, installation, and maintenance. Proper installation is essential to ensure the longevity and performance of the timber flooring.
Acclimatizing the timber flooring to the environment is a step often overlooked but it is crucial to the stability of the timber floor. Before installation allow the timber to acclimatize in the room in which it will be installed for a minimum of 48-72 hours. This process allows the timber to adjust to the room's temperature and humidity, minimizing expansion and contraction after installation. Following manufacturer’s guidelines is critical for optimal results.
Expansion gaps must be left around the perimeter of the room and around any fixed objects, such as pipes or columns. These gaps allow the timber flooring to expand and contract without putting pressure on the surrounding walls or structures. The size of the expansion gaps will depend on the type of timber flooring being installed and the size of the room. Failure to provide adequate expansion gaps can lead to warping, buckling, or cracking of the timber flooring.
In addition to proper installation techniques, ongoing maintenance is essential to keep the timber flooring looking its best. Regular cleaning and maintenance will help to protect the flooring from scratches, stains, and other damage. Avoid excessive moisture, which can damage the timber. Use appropriate cleaning products specifically designed for timber flooring. Protective mats at entrances can minimize dirt and grit from being tracked onto the floor. Furniture pads underneath furniture can prevent scratches. Regular professional cleaning and refinishing can help extend the life of the timber flooring.
Laying timber flooring over tiles can be a successful and cost-effective way to upgrade a space, it's important to note that not all situations are suitable for this approach. High humidity environments, subfloors with significant moisture issues, or tile surfaces with extensive damage may require alternative solutions, such as removing the existing tiles and installing the timber flooring directly on the subfloor. Consulting with a flooring professional is always recommended to determine the best approach for a specific project.

Can Timber Flooring Be Laid Over Tiles Cb Floors

Can You Install Wood Flooring Over Tiled Floors Havwoods

Can You Install Wood Flooring Over Tiled Floors Havwoods

Can You Install Wood Flooring Over Tiled Floors Havwoods

Discover How To Lay Wood Floors Over Tile Discount Flooring Depotdiscount Depot Blog

Install Hardwood Flooring Over Tile Floor Double Glue Down Method

Can You Tile Onto Wood Floors Stonesuper

Installing Tiles On Hardwood Flooring Expert Gui

The How And Why Of Laying Floorboards Over Tiles

Laying Wood Flooring Over Tiles Floor Fitting
Related Posts